Get new posts by email:

Archives

Currently Reading

Here are the tastingspoons players. I’m in the middle (Carolyn). Daughter Sara on the right, and daughter-in-law Karen on the left. I started the blog in 2007, as a way to share recipes with my family. I’m still doing 99% of the blogging and holding out hope that these two lovely and excellent cooks will participate. They both lead very busy lives, so we’ll see.

– – – – – – – – – – – – – – – – – – – – – –

BOOK READING (from Carolyn):

Music of Bees, Eileen Garvin. Absolutely charming book about a woman in midlife, lonely, who raises bees, also makes unlikely friends. Heart-warming and very interesting about beekeeping.

A Postcard from Paris, Alex Brown. Really cute story. Dual time line, 1940s and present day about renovating an old apartment in Paris, things discovered.

Time of the Child, Niall Williams. Oh such a good book. Very small village in Ireland, 1960s. A baby is left on the doorstep. The town all whispers and helps. I listened to an interview of the author, which made me like him and his books even more.

Sipsworth, Simon Van Booy. If you like animals you’ll swoon. An old woman who really wants to die finds a tiny mouse in her house and befriends it and finds a reason to live. Utterly charming book.

The Forger’s Spell, Edward Dolnick. True story. For seven years a no-account painter named Han van Meegeren managed to pass off his paintings as those of Johannes Vermeer.

If You Lived Here, You’d be Home by Now, Christopher Ingraham. Could hardly put it down – about a journalist who takes on a challenge to move to small town in Minnesota and write about it. He expects to hate it and the people and place, but he doesn’t. Absolutely wonderful true story.

The River We Remember, William Kent Kreuger. 1950s, Minnesota. A murder and the aftermath. Could hardly put it down. Kreuger has such a vivid imagination and writing style.

How the Lights Gets In, Joyce Maynard. An older woman returns to New Hampshire to help care for her brain-injured son. Siblings and family, lots of angst and resentments.

The Filling Station, Vanessa Miller. Every American should read this book. A novelized retelling of the Tulsa massacre in 1921. Absolutely riveting.

The Story She Left Behind, Patti Callahan Henry. Love this author. Based on a true story. A famous author simply vanishes, leaving her husband and daughter behind. She had invented a mystical language no one could translate. Present day, someone thinks he’s solved the riddle, contacts the family. Really interesting read.

The Girl from Berlin, Ronald Balson. Love anything about Tuscany. An elderly woman is being evicted from a villa there, with odd deed provenance. Two young folks go there to help unravel the mystery. Loved it.

The Island of the Colorblind, Oliver Sacks, M.D. Nonfiction. The dr is intrigued by a remote Pacific island where most of the inhabitants are colorblind. He also unravels a mystery on Guam of people born with a strange neurological problem. Medical mysteries unveiled. Very interesting.

The Bookbinder, Pip Williams. Post 1914 London. Two sisters work at a bookbindery. They’re told to not read the books. One does and one doesn’t. One has visions beyond her narrow world; the other does not. Eventually the one gets into Oxford. Lovely story.

The Paris Express, Emma Donoghue. 1895 on a train to Paris, a disaster happens. You’ll delve into the lives of many people who survived and died in the crash.

A Race to the Bottom of Crazy, Richard Grant. This is about Arizona. Author, wife and child move back to Arizona where they once lived. Part memoir, research, and reporting in a quest to understand what makes Arizona such a confounding and irresistible place.

The Scarlet Thread, Francine Rivers. A woman’s life turned upside down when she discovers the handcrafted quilt and journal of her ancestor Mary Kathryn McMurray, a young woman who was uprooted from her home only to endure harsh frontier conditions on the Oregon Trail.

A Place to Hide, Ronald Balson. 1939 Amsterdam, an ambassador has the ability to save the lives of many Jewish children. Heartwarming.

Homeseeking, Karissa Chen. Two young Chinese teens are deeply in love, but in China. Then their families are separated. Jump to current day and the two meet again in Los Angeles.

North River, Pete Hammill. He always writes such a good story. A doctor works diligently healing people from all walks of life. His wife and daughter left him years before. One day his 3-yr old grandson arrives on his doorstep.

A Very Typical Family, Sierra Godfrey. A very messed-up family. Three adult children are given a home in Santa Cruz, Calif, but only if the siblings meet up and live in the house together. A very untypical scenario but makes for lots of messes.

Three Days in June, Anne Tyler. The usual Anne Tyler grit. Family angst. This wasn’t one of my favorites, but it was entertaining and very short.

Saved, Benjamin Hall. Author is a veteran war reporter. Ukraine, 2022, he nearly loses his life to a Russian strike. Riveting story – he survives, barely.

Grey Wolf, Louise Penny. Another Inspector Gamache mystery in Quebec. She is such an incredible mystery writer.

All the Colors of the Dark, Chris Whitaker. A missing person mystery, a serial killer thriller, a love story, a unique twist on each. Could hardly put it down.

Orbital, Samantha Harvey. Winner of 2024 Booker Prize. I don’t usually like those, but I heard the author interviewed and she hooked me. This is not a normal book with a beginning, a story and an end. It’s several chapters of the day in the life of various astronauts at the ISS (Int’l Space Station). All fictional. She’s been praised by several real astronauts for “getting it” about space station everyday life.

The Blue Hour, Paula Hawkins. An island off Scotland. Inaccessible except when the tide is out. Weird goings on. An artist. A present day mystery too.

Iron Lake, William Kent Krueger. A judge is murdered and a boy is missing. Riveting mystery.

Tell the Wolves I’m Home, Carol Ricks Brunt. 1980s. A 14-yr old girl loses her beloved uncle. Yet a new friendship arises, someone she never knew about.

Four Treasures of the Sky, Jenny Zhang. 1880s, a young girl is kidnapped in China and brought to the United States. She survives with many hurdles in the path.

The Boy Who Fell out of the Sky, Ken Dornstein. Memoir, 1988. The author’s brother died in the PanAm flight that went down in Lockerbie, Scotland. A decade later he tries to solve “the riddle of his older brother’s life.”

Worse Care Scenario, T.J. Newman. Oh my. Interesting analysis of what could/might happen if a jet crashed into a nuclear plant. Un-put-downable.

Song of the Lark, Willa Cather. Complicated weave of a story about a young woman in about 1900, who has a gifted voice (singing) and about her journey to success, not without its ups and downs.

Crow Talk, Eileen Garvin. Charming story which takes place at a remote lake in Washington State, about a few people who inhabit it, the friendships made, but also revolving around the rescue of a baby crow.

The Story Collector, Evie Woods. Sweet story about some dark secrets from an area in Ireland, a bit magical, faerie life, but solving a mystery too.

A Sea of Unspoken Things, Adrienne Young. A woman investigates her twin brother’s mysterious death. She goes to a small town in California to figure it out, to figure HIM out.

The King’s Messenger, Susanna Kearsley. 1600s England, King James. About one of his trusted “messengers,” and his relationship with a young woman also of “the court.” Lots of intrigue.

In the Shadow of the Greenbrier, Emily Matchar. Interesting mystery in/around the area of the famous resort in White Sulphur Springs, West Virginia.

Isola, Allegra Goodman. Hard to describe, survival story on an island in the 1600s.

Save the Date, Allison Raskin. Rom-com, witty, LOL funny. Clever.

The Sirens, Emilia Hart. Numerous time-lines, Australia. Mysteries abound, nightmares, abandoned baby, weird allergies.

Red Clay, Charles Fancher. LOVED this book. Mostly post-Civil War story about the lives of slaves in Alabama during Reconstruction.

Stars in an Italian Sky, Jill Santopolo. Dual time line, 1946 and recent time. Love stories and a mystery.

Battle Mountain, C.J. Box. Another one of Box’s riveting mysteries. Love his descriptions of the land.

Something Beautiful Happened, Yvette Corporon. A memoir of sorts in Greece, tiny island of Erikousa, where the locals hid Jews during WWII. All elusive stories told by the author’s grandmother.

The Jackal’s Mistress, Chris Bohjalian. 1860s Virginia, about a woman who saves the life of a Union soldier. Really good story.

Song of the Magpie, Louise Mayberry. Really interesting story about Australia back in the days when it was mostly a penal colony. Gritty strength of a woman trying to thrive with her farm.

The Boomerang, Robert Bailey. A thriller that will have you gripping the book. About a lot of secrets surrounding the president (fictional novel, remember) and his chief of staff and about cancer. A cure. Such a good story.

Care and Feeding, Laurie Woolever. Really interesting memoir of a woman driven to succeed in the restaurant business. She worked for Mario Batali and then Anthony Bourdain. Gritty stories.

Everything is Tuberculosis, John Green. Maybe not a book for everyone. A real deep dive into the deadly tuberculosis infection, its history. I heard the author interviewed and found the book very interesting.

The Book Lovers Library, Madeline Martin. Fascinating read about Boots’ drug stores’ lending library. And the people who worked in them.

The Arrivals, Meg Mitchell Moore. LOL funny, about a middle-aged couple whose children (and their various family members) return to the family home and the chaos that ensues.

My Life as a Silent Movie, Jesse Lee Kercheval. About grief. A big move to Paris, finding herself a new life with a new set of real blood family.

Escape, Carolyn Jessop. Another memoir about a woman really in bondage in Utah, Mormon plural marriage.


Tasting Spoons

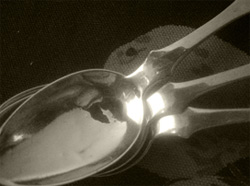
My blog's namesake - small, old and some very dented engraved silver plated tea spoons that belonged to my mother-in-law, and I use them to taste my food as I'm cooking.

Scroll down to the bottom to view my Blogroll

Posted in Uncategorized, on February 6th, 2014.

freezer_whiteboard

Ever since Christmas my usual high level of cooking interest has waned a bit. I really didn’t over-indulge much over the holidays (a good thing), so I wasn’t scrounging low calorie meals particularly, though I prepared a few new ones, all with dismal results.

I also have been spending an inordinate amount of time sitting with my leg up on an ottoman. Why? Because I had a skin cancer removed from my right lower leg on December 24th and had no idea when I made the appointment that the regimen was rest-rest-rest. (The office forgot to mention that part to me or I’d have waited until after Jan. 2nd.) It’s hard to cook meals from a sitting, semi-reclining position.

Perhaps I mentioned it some days after the 1st of January that after the doctor admonished me severely (she could tell I’d spent too much time on my feet) that I truly did sit with my leg UP. And languish. And get bored. I read. I watched TV, I caught up on some of my magazine reading. The wound itself is much larger than even the doctor thought it would be. It didn’t really hurt except the first couple of days. On the skin surface it looked about the size of a penny, but using a MOHS method of surgery, that sucker had spread out underneath, so the wound was big, slightly larger than a silver dollar. Now, 5 weeks out, it’s maybe slightly larger than a quarter and closing in. But it’s an open wound that must be carefully bandaged every 3 days (my DH does it for me as it’s in a very awkward place to try to do it yourself) with special cream, a sealing bandaging thing, leg wrapped and then I have to wear a compression stocking all day (promotes healing, they say). I can’t get tap water on the wound (for fear of infection) so have to cover my leg in a plastic bag every time I shower. Big nuisance. And no, my dr. did not want to do a skin graft.

This growing old stuff is for the birds! My back had fits from so much forced sitting, so I did make a few trips to the chiropractor. Then my left knee acted up – a pulled tendon or muscle – I think (from what, I don’t know), and after about 5 visits to the chiropractor for that one, it’s back to nearly normal now.

In between times I was up some, down a lot. After about a week of this forced rest stuff, at one of the follow-up visits to the dermatologist I asked the nurse if I could be “up” to fix dinner. She said oh, of course you can. You can lead a normal life, but just spend a few hours a day with your leg up. Ah-ha! I was back in the kitchen and my DH was a very happy camper I can tell you for sure!

I defrosted some chicken one night and made a chicken and artichoke heart sauce to go over rice. It was awful, I thought. But I had way too much left over to throw out, so I re-engineered it and made a casserole with pasta and cheese, hoping the cheese would enhance the flavor. No. After 3 meals of it (4 chicken breasts to start with) we threw out the remaining. I was glad to see it go. I made a new salad dressing and didn’t like it at all, but hated to throw it out, so we ate it, not liking it one bit.

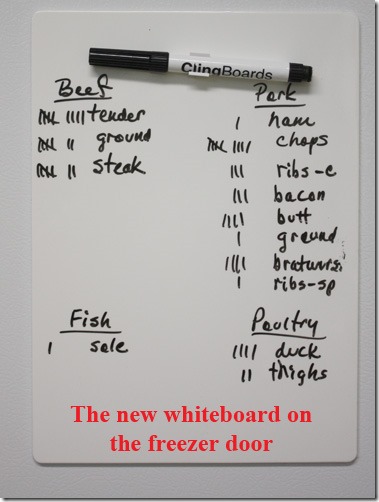
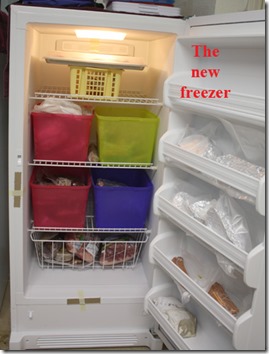
freezer_uprightThen we discovered that our freezer part of our refrigerator/freezer in the garage – that holds most of our frozen meat, including the Berkshire pig meat, steaks, roasts, chicken, fish, etc. that I keep on hand all the time – was on the fritz. Oh dear. I tinkered with it for a few days, finally bought a freezer thermometer and was aghast when I discovered the temp was only 28°F in the freezer. No wonder the salmon I took out was almost bend-able. Finally we unloaded most of it (with the fish, I had to throw away all but one piece of sole as it had defrosted) into thermal coolers with dry ice, bought a new upright freezer at Best Buy, on sale, and waited until it was delivered 2 days later. I shopped for plastic boxes, just the right size, to store things in, that would fit on the shelves. Then I catalogued all the meat in there and re-positioned everything so I now can go to the pork box and pull out what I want. And I bought a white board so I will know (I hope) what’s IN the freezer all the time.

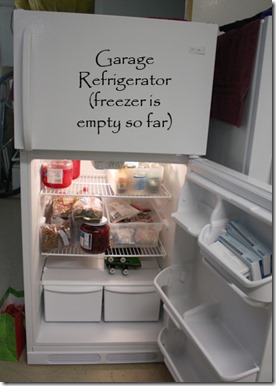
We also bought a small garage_refrigerator_freezerrefrigerator freezer for the garage too. It was on sale as well. It’s quite small, but has enough room to hold a turkey in November and has room for the myriad of plastic boxes that contain all kinds of jarred stuff that I don’t have room for in the kitchen refrigerator. Do you have stuff like that too? Like a jar of harissa with just a tiny bit I’ve used, some preserved lemon, walnut oil, specialty mustards, lots of different nuts that I don’t use much, 2 huge jars of maraschino cherries that I use in December when I bake Bishop’s Bread. A reader (thank you) sent me a link to a farm in Washington State, near Yakima, that sells maraschino cherries that don’t have that wicked red dye in them. I ordered a jar (Tillen Farms) and it will sit there unopened until next December. I hate to throw away the other 2 jars, though. You can see that new jar sitting on the middle shelf. Sometime soon I’m going to make a list of everything in those plastic boxes in the refrigerator (I have another white board to go on that door too) so I’ll know at a glance what’s there. And I won’t have to open the refrigerator since I’ll have the list on the whiteboard on the front. That extra package of hot paprika that Janet gave me for Christmas. Check. The hazelnuts. Check. Asian plum sauce. Check. Hoisin Sauce. Check. Hazelnut oil. Check. Ah, 2 jars of preserved lemon. Check. Mint sauce from England. Check. Garlic jam to serve on cream cheese. Check. And on and on it goes. Getting organized is hard work!

Posted in Desserts, on February 4th, 2014.

emily_luchettis_50_year_apple_cake

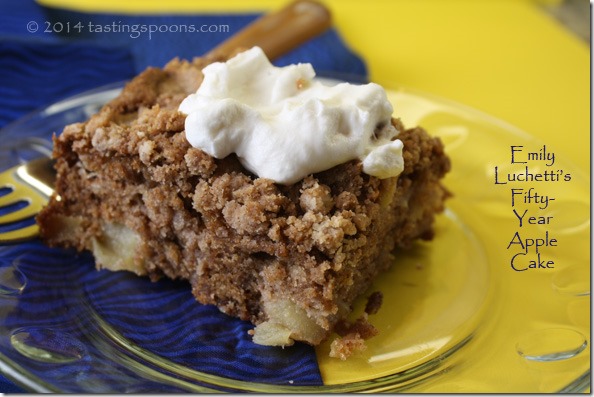
Why is it called Fifty-Year Apple Cake, you wonder? Because it’s a very old-old apple recipe. Not, as I thought, that it has something to do with heirloom apples. And the photo above doesn’t exactly show you that this cake is mostly apples, cloaked in a small amount of batter that merely binds the apples together. Well, there’s the crumb topping added on top, too. But still, it’s mostly apples.

When we were having a big group at our house one recent evening, I wanted a delicious mid-winter kind of dessert. We are in a Bible study group that’s ongoing, reading the whole Bible in a year (our whole church), but synopsized in a book called The Story, NIV: The Bible as One Continuing Story of God and His People. We get into the most interesting discussions in this group. There are 12 of us if everyone makes it, and we’ve been meeting weekly since late September with a break for Christmas. We enjoy each other. We’re all members of our church, but some of us didn’t know one another. It’s been a very pleasant bonding experience. And I’ve enjoyed having an excuse to bake since I don’t want lots of left overs hanging around for me to snack on.

Anyway, we’ve been hosting it at our house up until now and I’ve served dessert each time. A couple of times someone else helped out. Last week I scanned through my to-try recipes and decided on this one. I will tell you that I erred in the making of this recipe, but it actually didn’t make any difference. It was only now, days later as I’m writing this – and beginning this post that I went online and tried to learn more about the original recipe. That’s when I learned who Emily Luchetti is (a pastry chef in San Francisco). That’s when I realized that the recipe I had put into my MasterCook file was Cheryl Sternman Rule’s riff on the cake. If I’d gone back to her blog post and read it again before I started, I’d have realized it, but I was in a hurry and didn’t. Anyway, I got a little confused about the crumb topping. In actuality, the original recipe didn’t HAVE a crumb topping. That was Cheryl’s addition, among other things. She also took out the walnuts and raisins, switched out some brown sugar for white, and added a whole lot more apples. All of those things are good, and it made for a delicious cake nevertheless. One I’d make again, no question! But I’d be wary of the mistake I made – adding some of the topping to the dry ingredients, which didn’t have any negative effects; it just isn’t necessary, that’s all.

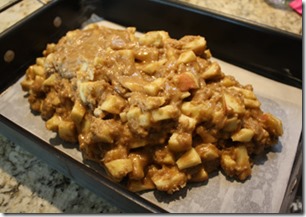
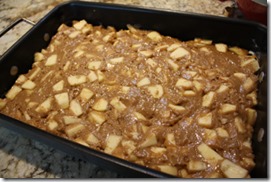
apple_cake_mound_cakepanAt left is a photo of the apple/cake batter before it’s spread out in the pan.

What I did find online is a video of Emily Luchetti making the original of this cake – if you’re interested  – you do have to sign up (free, but you know at some point they’re going to start charging for viewing the videos). The video of Emily will start playing, then it will stop and you have to sign up in order to see the rest of it. If they begin bugging me via email, I’ll just unsubscribe. I don’t know about you, but I get about 30 or more advertising emails a day – all websites I’ve signed up for for some reason and they send me something every day or two, 365 days a year. Some I like to get, but they send things way too often. Annoying.

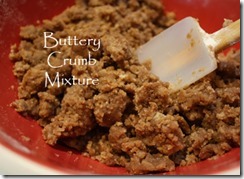
buttery_crumb_mixtureEmily’s cake didn’t have any brown sugar in it, and half as much apples, so it was a bit more cakey, I’d say, than the recipe you’ll find below. I kind of liked this version, though it’s not true to the original. You’ll find many recipes for a Fifty-Year Apple Cake online (from some heirloom cookbooks, for instance). Even Emily says it’s probably more like 75 or 100 years old since it’s been around so long. She suggests you use a juicy apple (not a Pippin or Granny Smith, which she reserves only for pies). Cheryl used Fuji because it’s what she had. You can also use Gala or Braeburn or Pink Lady. Cheryl didn’t peel the apples at all, just cored and chopped. I mostly peeled mine. The addition (or substitution) of brown sugar gives the cake a much more caramely flavor. One that I liked.

batter_spread_cakepanAt left is the batter all spread out in the pan. In making it, the apples are chopped and you make the cake batter using vegetable oil as the fat in it, add the topping and bake it in a 9×13 parchment lined baking pan. Once cooled, you cut it into squares and serve with powdered sugar, crème fraiche (Emily’s recommendation because she thinks the cake needs something a little tart on it rather than something sweet), sweetened whipped cream or ice cream.

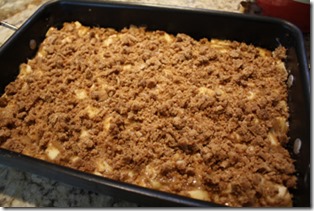
There below right you can see the cake with the topping on it – ready to bake.

apple_cake_ready_to_bakeWhat’s GOOD: a great showcase for good, juicy apples. The cake is dark from the brown sugar and cinnamon (the only spice). It’s a moist and tender cake, worth making. The crumb topping gives it some crunch. Really delicious in every way. Yes, I’d definitely make it again.

What’s NOT: can’t think of anything I didn’t like.

printer-friendly CutePDF

Files: MasterCook 5+ and MasterCook 14 (click on link to open in MC)

* Exported from MasterCook *

Emily Luchetti’s Fifty-Year Apple Cake (a riff on)

Recipe By: A Passion for Desserts by Emily Luchetti, adapted by Cheryl Sternman Rule at 5 Second Rule
Serving Size: 20 small servings

2 large eggs
1 cup granulated sugar
1 cup light brown sugar — (packed)
2 teaspoons cinnamon
1/2 cup vegetable oil
1 1/2 pounds Fuji apples — (about 4) or other variety, peels on, chopped (5-6 cups chopped apple)
2 cups all-purpose flour
2 teaspoons baking soda
1 teaspoon salt
1 cup cold (or even frozen) crumb topping from below
Powdered sugar — for sifting over the top
1/2 cup chopped walnuts — (in the original recipe, as well as raisins) optional
CHERYL’S CRUMB TOPPING (you’ll use 1 cup of this for the above cake):
1 cup dark brown sugar — packed
1/2 cup granulated sugar
1/2 teaspoon salt
1 1/2 tablespoons cinnamon
1 cup unsalted butter — melted and warm
2 1/2 cups all-purpose flour

Notes: The nutrition info on this recipe is incorrect as you do not use all of the crumb topping to make the cake. Next time I make it, I’ll be adding chopped walnuts, probably about 1/2 cup. You could also add raisins.
1. Preheat the oven to 350°F. Grease the sides and corners of a 9×13-inch rectangular cake pan and line the bottom with parchment.
2. In a large mixing bowl, whisk the eggs, two sugars, cinnamon, and oil. Fold in the apples. In a separate bowl, sift the flour, baking soda, and salt. Stir the dry ingredients into the wet, folding and mixing until all the white, floury bits are completely incorporated. The batter will be extremely thick. Continue stirring until you can’t see any white flour crumbs.
3. Scrape the batter into the prepared pan, and use a small offset spatula to work it into the corners. Sprinkle with 1 cups of the crumb topping (see below).
4. Bake in the center of the oven for 45 minutes, until a skewer comes out clean, or until it reaches 210°F on an instant-read thermometer. For neat slices, let cool completely. If desired, sift over a little powdered sugar, but go easy — the cake’s plenty sweet. Or, serve with vanilla ice cream or softly whipped cream sweetened with sugar and vanilla.
5. Cutting it with a metal bench scraper makes better squares. After 24 hours, store any leftover cake in the refrigerator.
6. CRUMB TOPPING: In a medium bowl, stir together both sugars, the salt, and cinnamon. Add the melted butter and whisk until combined. Fold in the flour until it is absorbed and set the mixture aside. (Freeze what remains and use on any other kind of fruit-based cake or cobbler.) Makes about 3 1/2 cups.
Per Serving (inaccurate because it includes all of the topping and you only use 1 cup of it): 405 Calories; 17g Fat (37.7% calories from fat); 4g Protein; 60g Carbohydrate; 2g Dietary Fiber; 46mg Cholesterol; 302mg Sodium.

Posted in Breads, Brunch, on February 2nd, 2014.

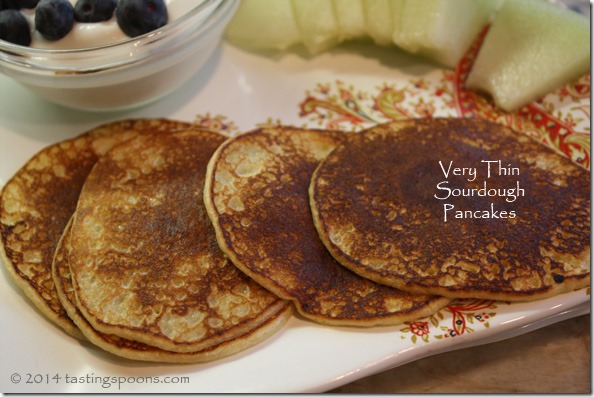
sourdough_pancakes

Pretty much, I’ve had a love affair with sourdough my whole life. But for the last 20 years or so I didn’t have a sourdough starter going. I first bought one back in the 1960s, and I baked bread regularly and often made pancakes and waffles, and had a great recipe for a dinner roll too. But then I got out of the habit and finally I’d let the starter go too long between feedings and the batter had expired, so to speak. I kept it in one of those cute little crockery spring lock containers and it just sat in the back of the refrigerator. But with it and other living organisms, eventually it ran out of fuel or food and if you don’t keep it going by feeding it flour and water every so often and allowing it to bloom, brighten, develop its yeasty presences, it will die of old age. This was years ago, of course, but when I’d opened the crock and sniffed the contents I knew it was a goner.

Then a couple of weeks ago you’ll remember I wrote up a post about my DH’s father Charles’ buttermilk pancakes. That got me to thinking, longingly, about my favorite sourdough and its wonderful tasty benefits. I enjoyed Dave’s dad’s buttermilk pancakes, but not nearly as much as I love the flavor and even the spongy texture of sourdough. So, when I saw a package of sourdough starter I jumped at it and bought one. As I’m writing this, the starter is still in its infancy of development. At its first mixing, once it sits for 4 hours, you mix more bread flour and water into it for 7 straight days and you need to keep it at about 90°F day and night, feeding it once a day. Then, and only then, will the sour part of it have progressed so it’s taste-able. Each evening I scoop out a cup of the bubbly fermenting batter and throw it out, and add in another mixture of flour and warm water. I stir it all around until they are no lumps and cover again with plastic wrap and let it get a nice warm glow for another 24 hours. Finding a place in my kitchen with a consistent 90° temperature was a little difficult – the warming drawer doesn’t go that low. The oven obviously doesn’t. I finally settled on putting it on top of my toaster oven, just 3-4 inches below the fluorescent under-cupboard lights in my little butler’s pantry. We’ve just had to leave those lights on day and night for the last several days. That drives my DH crazy – he’s a stickler about turning off lights – and I do forget now and then to turn off a light somewhere in the house. We both do.

Once I’ve finished the 7-day feeding schedule I’ll be able to store a few cups of starter in the refrigerator and hopefully it will keep for a week without getting into trouble. I suppose I could set up an alarm on my iPhone to remind me once a week to feed the starter, couldn’t I? Like maybe every Saturday morning, perhaps.

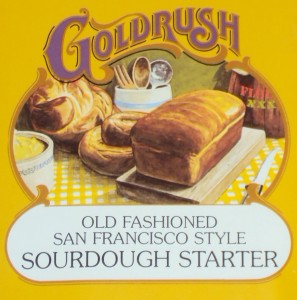
sourdough_starterYou can buy a sourdough starter package mix as I did. You can also make your own – there’s a good tutorial over at King Arthur Flour, if you’re interested: sourdough starter. At the cookware store I purchased the package you see at right. Buying the package makes it quite simple. As I recall, it was about $5.00. The sourdough starter I bought years ago was from Alaska and I certainly had many conjured thoughts over the years about the old “sourdoughs,” they called them, the solitary gold miners with their trusty pack horses, and the stories about how they would mix up the batter the night before and store it inside their sleeping bags next to their bodies, or on the horse, next to the horse’s hide, where it would keep warm. Because warmth is key here. This new starter I bought claims to be a San Francisco style. Now I don’t exactly know what that means – but San Franciscans do believe their sourdoughs are better than anybody else’s. The bread certainly is – there’s just nothing quite like the real thing – that musty, fusty sour smell from freshly baked sourdough bread that is ubiquitous on restaurant tables in SFO. We can buy sourdough bread here in Southern California, as you can in most places here in the U.S., but it ISN’T like the loaves from there.

Because I was anxious to try some sourdough pancakes, instead of throwing out the 1-cup of batter the other day (day 3 of its 7-day growing period), I used that one cup to make a small batch of sourdough pancakes. Perhaps they weren’t quite as powerfully sour as they’ll be after I continue getting the dough more sour as the days go by, but they were awfully darned good.

This batter I’m brewing is all made with bread flour – because the starter package is aimed at baking bread, not making anything else. So, I mixed in a little bit of all-purpose flour (because the batter was just slightly too thin, if you can believe that) and the other ingredients before pouring little dollops into a hot nonstick pan. I didn’t even grease the pan. It didn’t need it because I’d added just a little jot of canola oil to the batter. You don’t even need to butter the pancakes, either. Thin little sourdough pancakes somehow don’t need butter – but syrup yes. But they’re even good plain because they’re very moist.

What’s GOOD: Well, I loved it – loved that spongy chew to every bite. As pancakes go,I love thin ones, so these ticked all my sourdough hot buttons. And it was even sour, which I liked and I’ll like it even better once the dough is finished it’s 7 days of fermenting.
What’s NOT: if you don’t want to hassle with a sourdough starter, the feeding, mixing and nurturing you have to do with it, you may not like it. But the flavor of those finished goods. Oh, yes! Worth it, I hope.

printer-friendly CutePDF
Files: MasterCook 5+ and MasterCook 14 (click on link to open in MC)

* Exported from MasterCook *

Sourdough Pancakes

Recipe By: An old favorite of mine, from the 1960’s
Serving Size: 4 (as part of a breakfast – double quantity if this is all you’re eating)

1 1/2 cups sourdough batter
1 large egg
1 tablespoon sugar
1 tablespoon vegetable oil — or melted butter
3/4 teaspoon salt
2 tablespoons evaporated milk — or regular milk – approximate (depends on the consistency of the sourdough batter)

1. To the sourdough batter add the egg, sugar, oil, salt and milk (if needed).
2. Stir vigorously until all ingredients are smooth. If the mixture is too thick, add a bit more milk. If it’s too thin, add a tablespoon or two of all-purpose flour.
3. Heat a nonstick pan or griddle to medium-high. Pour small slightly larger than dollar-sized pancakes into pan and wait until a few bubbles appear in the center and flip to other side. Cook another 30-40 seconds or just until the pancake has browned slightly. Serve immediately while they’re hot. It’s not necessary to serve butter, but do have maple syrup to pour over the top.
Note: This is not a full-breakfast portion, but 4 servings as part of a breakfast. To serve main course portions, double the quantities. You can make larger pancakes – the small size is just my preference. The consistency of sourdough batter varies – some are thinner than others, so you may need to vary the amount of flour or milk you add. It’s better to have to thin the batter than to have to thicken it as the flour won’t have had time to feed in the yeasty sourdough environment. Sourdough thins as it sits (during the overnight process) so you may not need any additional milk. The pancakes take less time than usual to cook because they are SO thin. Watch carefully and definitely do not do something else – stay by the griddle and watch them!
Per Serving: 72 Calories; 5g Fat (65.7% calories from fat); 2g Protein; 4g Carbohydrate; 0g Dietary Fiber; 55mg Cholesterol; 426mg Sodium.

Posted in easy, Fish, on January 31st, 2014.

salmon_capers_lekue

If you’re not into new gadgets, you may as well skip on by this post. I’d been eyeing this new thingamabob for several months and finally decided to bite.

The company that makes Lékué is in Spain. And when you try to SAY the word, speak it fast – you don’t languish the word out but quick step it fast. The product appears to be made of silicone (like Silpats, for instance – it has a similar feel to it), but nothing says exactly what or how. Other than it can withstand microwaving at 800 watts and the oven up to 400° F. It’s not a hard surface – it’s very soft and pliable but sturdy enough to stay put, although if you have food in the steam case (that’s what I bought – they have lots of other products as well) it will bend. Hence you walk from counter to microwave holding both ends of the Lekue Steam Case with Tray for 1 to 2 Persons.

Obviously the products have met the standards of the EU, since it’s manufactured in Spain. Everything says its very safe for storing, cooking, baking and microwaving. I’ll take their word for it since the EU is far more strict about these kinds of things than we are here in the U.S. Photo at left is from the company’s website. (Yes, they make them in green like mine, or orange or clear.)

What you see there is the smaller of the two types of steam cases. It has a slightly rounded bottom, but the little soft, silicone tray sits inside it (removable because you can cook without it).

Since I’m retired, you’d think I’d have endless time on my hands to cook whatever and whenever with no concern for the time involved. Not so. I don’t know how I found time to work, back when I did. I’m SO busy. I treasure my time at home on the occasional day when I don’t have any plans. The evening I used my new steam case I was pressed for time. I’m guessing you are also, so ride along with me as I explain how I made dinner in about 15 minutes flat.

Recently Updated2

There you can see my about-to-be cooked dinner. The tray thing is in the bottom – the fish is sitting on it.

Into the bottom I poured in about 1/3 cup of water, then I squeezed a half of a lemon in the water also. The water or liquid is below the tray and although the tray has holes in it, the fluid didn’t come up over the edges. The tray went in and I gently placed the fish on top.

I sprinkled the top of the salmon with kosher salt and freshly ground black pepper, then I spread about 2 teaspoons of butter as best I could all over the salmon. That part was a bit difficult because the salmon was moist and the butter, although soft, didn’t really want to spread. You can see how well I did there in the top photo.

Next I drizzled the top of the salmon with a little tiny bit of olive oil. I don’t exactly know why since I’d already spread butter on it, but the recipe said to use both. Okay.

Then I sprinkled about a tablespoon of capers on top of that and sprinkled about a tablespoon or more of freshly chopped Italian parsley on top of that. The lid was closed. Easy. Up to this point I think it took me about 2 minutes, including the time it took to walk out to the garden to find Italian parsley. Well, I may be a little off – maybe 3 minutes total.

Into the microwave it went to 2 minutes. I do need to go find my instruction booklet for my Dacor microwave because I think mine is higher wattage than 800, and the recipes are all for 800 watts. So I might need to cook whatever I do make in this at a lower power setting.

The recipe I followed was for fillet of sole, and my salmon was actually quite thin – not much thicker than sole, but I did cook it for 2 minutes, rather than the 1 1/2 minutes suggested for the sole. And sure enough, it was perfectly cooked. Wow.

The rest of the dinner was all ready (yellow crookneck squash and a big green salad with lots of vegetables in it and my favorite Creamy Garlic Blue Cheese Dressing that I make many times a year). I quick-like dished up the vegetables and the salad, then lastly I put the salmon out on our dinner plates and we sat down. It might have been better had I taken the steam case to the dinner table – it would stay hotter longer – but it was still piping hot when we ate our first bites.

What’s GOOD: first and foremost, the speed at which I got this dinner on the table. Wow. The vegetables were left overs, so all I had to do was warm them up. The salad took about 15 minutes to make. The recipe was a good one – we could taste the citrusy aspect of this, and of course, the capers give it lots of flavor anyway. Sometimes fish is just best done the simplest way. It was juicy and tender. Only a couple of little edges (that leaned up against the inside wall of the steam case) were a bit overcooked, but still edible. I’ll watch that next time. So far so good, I’d say, with my new cooking utensil investment. I’ll be trying other dishes. One intrigues me – you can make scalloped potatoes (like au gratin) in no time flat.
What’s NOT: so far, nothing at all. I like this thing, this Lékué and I liked the recipe.

printer-friendly CutePDF
Files: MasterCook 5+ and MasterCook 14 (click link to open in MC)

* Exported from MasterCook *

Steamed Salmon with Capers in the Lékué

Recipe By: Adapted from the Lekue cookbook
Serving Size: 2

10 ounces salmon fillets
2 tablespoons water Juice of 1/2 lemon
Salt and freshly ground black pepper to taste
2 teaspoons soft butter
2 teaspoons olive oil
1 tablespoon capers — drained and rinsed
1 tablespoon Italian parsley — divided use

1. Using the small (1-2 person serving) Lekue case, pour in water and lemon juice. Insert tray.
2. Place salmon fillet on top of the tray and sprinkle with salt and pepper.
3. Spread the fish with the butter and drizzle with olive oil.
4. Add capers and half of the Italian parsley. Fold lids closed.
5. Microwave at 800 watts for 2 minutes (if using thicker salmon, it will take longer). Remove Likue case from microwave and leave the lid closed for one minute longer (it continues to cook).
6. Serve on heated plates and garnish with additional parsley and lemon wedges, if desired.
Per Serving: 228 Calories; 12g Fat (48.6% calories from fat); 28g Protein; trace Carbohydrate; trace Dietary Fiber; 81mg Cholesterol; 161mg Sodium.

Posted in Cookies, Desserts, on January 29th, 2014.

smores_brownies

For a few days I considered not posting this recipe, just cuz this brownie dessert is super-sweet and cuz marshmallows aren’t one of my favorite things. But some people really like sweet-sweet desserts (or brownies) and some people (children?) think marshmallows are the cat’s meow.

The first disclaimer here: I didn’t make these myself. It was from a Phillis Carey cooking class, and that picture above was my serving at the class. But what got me to thinking about them was the little square I took home (of this). I waited 2 days, and had it with a mid-afternoon cup of coffee, so the over-the-top sweet wasn’t quite so over-the-top. With that, I decided I’d post it anyway, but with just one tweak (a little less sugar).

First you need to line the 9×13 pan with foil – including long flaps on at least 2 sides so you can lift these out of the pan after baking. Then you line up inside the pan the graham crackers, slightly overlapping them. A few are kept aside for crumbling on top. Then you melt the chocolate and butter together, add sugar and egg, then vanilla and flour. That mixture is poured over the prepped graham crackers and baked – actually it’s slightly under-baked because you bake these a 2nd time with the topping.

On top of the hot brownies you sprinkle chocolate chips and marshmallows and bake again for 3-5 minutes. If you have a kitchen torch, you can also lightly brown the marshmallows. Then while that’s hot, you press the remaining graham cracker chunks on the top of the sticky, melting marshmallows. You cool these, remove from the pan and cut into servings. The recipe indicates it’ll serve 15. I think it would easily serve 18 – because – as I said – these suckers are sweet.

What’s GOOD: the chocolaty flavor, for sure – I think my favorite part was the brownies themselves. If you’re a fan of marshmallows, well, you’ll love these. If you like graham crackers, and the whole s’mores thing, you’ll be in nirvana. I’d think children would be enchanted with this recipe. Throw a few M&Ms on top of the sticky marshmallows and they might be in heaven. I wouldn’t do that, but that’s cuz I don’t love overly sweet desserts.

What’s NOT: nothing at all, unless you’re averse to marshmallows or grahams.

printer-friendly CutePDF

Files: MasterCook 5+ and MasterCook 14 (click on link to open in MC)

* Exported from MasterCook *

S’Mores Brownies

Recipe By: Phillis Carey cooking class, 2014
Serving Size: 15 (maybe more)

20 pieces graham crackers — divided use
3/4 cup unsalted butter
4 ounces unsweetened chocolate — (good quality) chopped (ScharffenBerger recommended)
1 3/4 cups sugar — [I reduced this from 2 cups]
3 large eggs
1 teaspoon vanilla
1 cup flour
2 1/2 cups miniature marshmallows
1 cup chocolate chips — semisweet

1. Preheat oven to 350°F. Line a 9×13 baking pan with foil that extends up over the two sides (enough to grab onto). Coat the inside with cooking spray. Place 15 graham crackers in pan, with sides slightly overlapping. Break remaining 6 graham crackers into small chunks and set aside.
2. Place butter and unsweetened chocolate in a medium-sized microwavable bowl and heat on high for 1 minute; stir and heat another 30 seconds, or until chocolate is barely melted; stir it until it’s smooth. Stir in sugar, then eggs and vanilla; mix well. Stir in flour and pour over graham crackers in pan. Bake for 30-32 minutes or until a toothpick inserted in the center comes out with fudgy crumbs. Do not over bake.
3. Sprinkle top with marshmallows and chocolate chips. Bake 3-5 more minutes or until marshmallows begin to puff. Remove from oven and press remaining graham cracker chunks into the marshmallows. (You may use your kitchen torch to toast the marshmallows before adding the graham crackers, if desired.) Cool and then use foil sides to help lift the brownies from the pan before cutting and serving. Brownies keep at room temperature for 5-6 days.
Per Serving: 386 Calories; 20g Fat (43.7% calories from fat); 4g Protein; 53g Carbohydrate; 3g Dietary Fiber; 67mg Cholesterol; 77mg Sodium.

Posted in Brunch, on January 27th, 2014.

charles_buttermilk_pancakes

Are these unusual? Probably not. But I made them for a reason. The recipe came from my DH’s father, Charles. His loving Dad, who was a traditional patriarch of the family, and only helped in the kitchen under duress. Or, unless he was preparing cocktails. Or, related to this recipe, he did sometimes invite friends over for cocktails and a pancake dinner.

Here’s how this went: our oldest grandson was visiting and my DH was telling a story. My DH does that a lot – he’s also the king of the phrase – “never let a few facts get in the way of a good story” – that latter sometimes to my embarrassment because once he gets it in his head about some nuance of a story – he’ll tell it that way over and over even though the facts are wrong and even though I’ve told him time and time again that he’s got it wrong. Oh well, I love him anyway!

Dave was telling a story about how one late November when he was away at college (this would have been about 1960 – he went to Bucknell University, in Lewisburg, Pennsylvania – where his mother was an alumnus), he decided to skip his Wednesday classes and leave after his Tuesday ones (2 days before Thanksgiving) and drive the 5 hours home to Ocean City, New Jersey. He surprised his parents when he arrived at about 6:00 pm, to find they were having a party. A party where everyone was very dressed up (like suits and fancy dresses), but they were serving cocktails and then they were about to have a sit-down dinner of pancakes and sausage! His dad cooked all the sausage and bacon in the kitchen and kept it warm in the oven. They always made their own patties of sausage because for many years the family owned a gourmet market in Dave’s home town, and his dad, among other things, could butcher meat. He was also a bank director some years later. But he knew how to make a good batch of sausage (and no, we don’t have his Dad’s recipe for that) and the chunk of sausage was always shaped into a big 2-pound lump, then squared off like a brick and sold, as in a “brick” of sausage. His Dad also had some kind of a big electric griddle to plug in in the dining room, next to his chair at the end of the china and crystal-set table. He held court, so to speak, from that chair, turning now and then to flip or pour more batter on the griddle. He had a reputation for throwing these pancake dinners – well, he also did pancake breakfasts too, with tons of bacon, sometimes kidneys were served (this back in the day when no one thought a thing about eating quantities of organ meat), always home made sausage patties and gargantuan stacks of his “famous” buttermilk pancakes.

daves_dad_charlesAt right is a photo of Charles, probably when he was in his late 40’s. Cigarette in hand. I could have cropped out the cigarette, but that’s the kind of photography thing that was done back then. Sorry it’s not a better photo – I took it at an angle in order to get rid of reflections since it has a glass cover. He was a very  handsome man.

Anyway, Charles also had a reputation for making a mean cocktail. That particular evening, Dave asked what he could do to help? His father said you can take over making the cocktails. Dave’s first “order” was for 2 rye highballs (rye whiskey and water, in this case) and he served them to one of the couples. Dave went back into the kitchen to start making some other drink. In a minute his dad came into the kitchen with the 2 glasses in hand, motioned to Dave, went to the kitchen sink and poured the two drinks down the drain. He said, “son, you need to learn how to make a cocktail – here in our house we make them long and we make them strong.” For sure, Dave never forgot!

So, there’s the background story! In telling this tale to our nearly 20-year old grandson, Logan wasn’t interested in the making of the drinks, but he asked Dave if we ever make the pancakes. Dave glanced at me with a quizzical look since Dave doesn’t do anything except man the outdoor grill and wash dishes. I said yes, but not for years – I’d look for the recipe, though. In amongst the few recipes Dave had when I met him was one very yellowed 3×5 card that’s titled: “Your Dad’s Buttermilk Pancakes.” About 10 years ago we went to Gloucester, Massachusetts, after Dave’s Aunt Louise died (Dave’s maternal aunt), and in amongst her things were a few recipe cards, including one in Dave’s mother’s handwriting, “Charles’ Buttermilk Pancakes.” So the recipe had legs and a reputation.

Back to last week – that next morning I whipped up a batch since I had buttermilk on hand, thank goodness. These pancakes are a cinch to make – and no, there isn’t anything unusual in them at all – flour, soda, salt, sugar, eggs and buttermilk. We had the left overs for breakfast this morning, quickly zapped in the microwave.

My preference is for thinner pancakes, so I actually added just a tetch more buttermilk to the batter. I truly don’t like thick pancakes, and the batter as written was too stiff for my liking. I’ve also changed 2 other things in the recipe below – scant the soda (I could taste it in the finished pancakes) and the salt. Otherwise, the recipe is just like it was in Charles’ time. (I never met his Dad, as he died when Dave was about 30, 10 years before I met him in 1981.) Dave may have never made a rye highball since (current versions use ginger ale rather than water according to the brief search I did on the internet), but he sure learned how to make them that night and he loves to tell stories about his Dad’s pancake dinners.

It must have been popular back then to have breakfast food for dinner. Was it holdover from the food shortages of WW II, when meat was scarce? Occasionally, my parents used to have waffle parties on Sunday nights. This would have been in the early to mid-1950s. And my mom would make a moderate mound of sausage or bacon, and she would set up the waffle iron on a sideboard in our dining room and my mom would man the waffle station (my recollection is she used the Bisquick version). The big treat was mid-way in the meal my mother would bring out a big bowl of freshly whipped cream and defrosted (sweetened) strawberries mixed through it, and that last waffle with that topping became dessert along with fresh, hot coffee. I hunted all over internet images trying to find a photo of the kind of rectangular cardboard box with a metal top and bottom that used to be the only way you could buy strawberries (other than fresh) in a frozen form. Couldn’t find a one. Oh well.

What’s GOOD: well, mostly it’s the memories. We enjoyed the pancakes – they were the penultimate in tenderness (remember my adage: buttermilk = tender). They browned beautifully and they were thin, to my liking. If you want plain and simple pancakes, these fit the bill. Complex? No. Nuanced with extras? No. Gourmet? No. Just plain, ordinary pancakes.
What’s NOT: nary a thing.

printer-friendly CutePDF
Files: MasterCook 5+ or MasterCook 14 (click link to open in MC)

* Exported from MasterCook *

Charles’ Buttermilk Pancakes

Recipe By: Slightly adapted from my DH Dave’s Dad’s recipe
Serving Size: 8

3 cups all-purpose flour
1 tablespoon baking soda — scant
1 teaspoon salt — scant
1 teaspoon granulated sugar
2 large eggs
1 quart buttermilk — (it may need a few T. more)
Oil for greasing the pan for each batch you cook

1. In a large bowl (use a Pyrex pouring style measuring cup/bowl if you have one) combine all the ingredients.
2. Use an electric mixer to mix until the batter is smooth.
3. Preheat oven to 250° and heat all the plates, including one for serving.
4. Heat a nonstick frying pan to medium-high. Pour about 2 teaspoons of canola oil into the pan and spread around with a spatula. Pour batter into smaller, rather than larger rounds. When you can see bubbles toward the middle of the batter (about 1 1/2 to 2 minutes), turn and allow to cook the other side for about 1 – 1 1/2 minutes. Remove pancake to the heated plate in the oven. Continue cooking pancakes until you’ve used all the batter.
5. Serve with your choice of toppings: butter, maple syrup, whipped cream and strawberries, or other fruit syrups.
Per Serving: 241 Calories; 3g Fat (10.6% calories from fat); 10g Protein; 42g Carbohydrate; 1g Dietary Fiber; 57mg Cholesterol; 885mg Sodium.

Posted in Grilling, Pork, on January 25th, 2014.

grilled_pork_chops_spanish_adobo

Years ago, when I was in the advertising biz, we had a very talented art director on our staff from the Philippines, named Dolf. He was an American, but so loved his native country’s cuisine. A couple of times he brought chicken adobo to our festive potluck lunches – his version from the Philippines, a wet braise kind of dish. But this post is NOT about the Filipino version, which is altogether different. Not just a little bit different, but a lot different.

SPANISH ADOBO is a spice mixture, and is meant to be liberally applied to pork chops (and allowed to sit there, so it becomes a marinade) and grilled – it’s cinchy easy to make. I saw a blog post from one of the varied ones I read, and it was called pork chops adobado. Since I’d not heard the adobado (rather than adobo) part before, I started sleuthing. Adobo is the spice mixture, but once you put it on some kind of meat and grill it, it becomes a food preparation, so it’s the adobado or adobada. I read what wikipedia had to say about it, then did a search and came to a recipe at epicurious that sounded just right.

In the explanation, wikipedia says of ancient cooking:

Animals were usually slaughtered in the coldest months of winter, but surplus meat had to be preserved in the warmer months. This was facilitated through the use of adobos (marinades) along with paprika (a substance with antibacterial properties). Paprika gives a reddish color to adobos and at the same time the capsaicins in paprika permit fats to dissolve to the point of allowing tissue penetration, going deeper than the surface.

spanish_adobo_pasteIf I interpret what that says, it means meat was marinated for long periods of time, like months – yikes. From winter to summer? So, by using a paprika-based marinade, they were able to preserve meat without refrigeration (obviously) and the capsaicins (that’s what gives heat to peppers) in it allowed for better absorption. Spanish (or Mexican) Adobo is a oil and spice paste that’s spread on the pork up to a couple of hours ahead of grilling. It’s a mixture of oil, paprika, dried oregano, fresh garlic, ground cumin, hot chili flakes, fresh lime zest, salt and pepper.

I slathered this mixture onto 2 pork chops and 2 steaks. It’s a heady mixture – not only with spices, but it has some heat. If you’re averse to hot spicy food, eliminate the chili flakes. I used half-sharp paprika (a mixture of mild and hot), so it was plenty hot for me. The recipe calls for mild paprika. The paste marinated on the chops for a couple of hours (in the refrigerator), then Dave grilled them. First they’re browned – and I mention this only because with the reddish paste on them, it may be hard to tell when the chops are truly browning as they’re already brownish red before you put them on the grill. After they’re grilled on both sides just to get grill marks (if you can see them), you move them over onto an indirect area of the grill, loosely cover them with an upside-down foil pan, or with foil itself to finish cooking. Use a meat thermometer and take them off when they’re just done!

You can vary the heat depending on what kind of paprika you use. Please don’t use grocery store paprika – it doesn’t cut the mustard. (Oh, ha! I made a joke . . . 🙂 Here is a link to Penzey’s page for Hungarian paprika. Many high end markets now carry premium Hungarian paprika – do seek it out. And do refrigerate it. Penzey’s also sells Spanish paprika, but that is the smoked variety. Perhaps cooks in Spain do use the smoked, but I’d try it without the first time. And if I tried it, I’d use half regular and half smoked. The smoked goes a long way.

Be SURE to use a meat thermometer – the chops took much less time than anticipated. Ours were about 3/4 inch thick, and only took about 10 minutes cooking time. And?

What’s GOOD: the adobo spices were a big hit. I loved it; so did Dave. We have found a new, local purveyor of pork, and this first try was great – the meat was tender and juicy. The paprika and other spices hit a great flavor note for both of us. It was a quick preparation – and some nights that’s exactly what’s needed. I’ll be making this again and again.
What’s NOT: I can’t think of a thing. We loved this, big time.

printer-friendly CutePDF
Files: MasterCook 5+ and MasterCook 14 (click link to open in MC)

* Exported from MasterCook *

Grilled Pork Chops with Adobo Paste

Recipe By: Adapted from Epicurious
Serving Size: 4

2 1/2 tablespoons olive oil
2 tablespoons Hungarian paprika — (can use half-sharp)
1 1/2 tablespoons dried oregano — crumbled
1 tablespoon minced garlic
1 1/2 teaspoons ground cumin
1/4 teaspoon red chili flakes — or more if desired
1 1/2 teaspoons lime zest — finely grated, from a fresh lime
1 1/2 teaspoons kosher salt
1/4 teaspoon black pepper
2 pounds bone-in pork center rib chops — 3/4″ thick, or thicker

1. Heat grill to medium-high for direct-heat cooking.
2. Stir together all ingredients except pork chops in a bowl to form spice paste, then rub paste all over pork chops. Allow to rest for 20 minutes to 2 hours in refrigerator.
3. Oil grill rack, then grill chops, turning over occasionally and moving around if flare-ups occur, until browned, 2 to 3 minutes total.
4. Move chops to indirect heat, then cover loosely with heavy-duty foil, turning chops over once, until thermometer inserted horizontally into center of a chop (do not touch bone) registers 140°F, 6-10 minutes. Transfer to a platter and let stand 5 minutes before serving.
Per Serving: 405 Calories; 29g Fat (65.3% calories from fat); 31g Protein; 4g Carbohydrate; 2g Dietary Fiber; 89mg Cholesterol; 770mg Sodium.

Posted in Essays, on January 23rd, 2014.

IMG_2414

Just got through reading one of the most in-depth articles ever – about cocoa (photo above from King Arthur Flour). You might not think you need to know more about cocoa, but if you’ve noticed the grocery aisles lately, you can now find a variety of cocoa types on the shelves, and unless you know the differences, you might make a big mistake using a different kind (like Dutch process) in your Grandma’s old-favorite chocolate cake recipe.

The folks at King Arthur Flour sell 5 different types of cocoa powders. I own a couple of them, and only know the simplest of rules – if the recipe calls for baking soda you can use Dutch process (or regular, actually). If the recipe calls for baking powder, you only want to use regular cocoa. But there are so many, many nuances of chocolate in the different types.

So, if you’re a home baker and have interest, head over to KAF and read the article written by PJ Hamel. They made several different recipes for chocolate things with all the different cocoa types and show you the difference in photos, but also describe the differences in the taste. The article is well worth reading and book-marking for future reference. KAF, as I mentioned, carries a very wide variety of cocoas you can buy. I’m a fan of their products (and no, they don’t pay me anything to say that!). If you sign up for their email stuff, you’ll hear about it when they offer free shipping. But you  need to be a reader of their blog in order to hear about the recipe developers and their baking efforts.

Posted in Veggies/sides, on January 21st, 2014.

brussels_sprouts_gratin

Everybody’s talking about Brussels sprouts lately. And I couldn’t be happier. I don’t know how many recipes I have here already, but there’s always room for more. This one’s a good addition, and would make a really nice side if you’re having guests.

The recipe came from Marie Rayner’s food blog (The English Kitchen). I lightened up her recipe just a tad. I used bacon instead of pancetta and I used just a little bit of cream rather than nearly a cup. Then, it happened that I only had fresh wheat bread, so my bread crumbs came from that, but they were just fine – it was just a little harder to tell when the crumbs were toasty brown, that’s all, because they were already brown in color. Minor problem really!

First the Brussels sprouts were cooked in lightly salted water, cooled, halved. Then I cooked a slice of thick bacon (cut up into tiny pieces) and later a small bunch of sliced almonds were browned in the bacon fat too. Then the Brussels sprouts were added in, to soak up the little tiny bit of bacon grease there was in the pan (if you use regular bacon you’ll want to pour off most of the fat). Then they’re poured into a flat gratin dish (I used a 9 inch ceramic pie plate, which was the perfect size brussels_sprouts_gratin_platedfor a pound of Brussels). The bread crumbs are browned in the same cooking pan with a little bit of butter until they’re lightly toasted. Cream is poured over the Brussels sprouts, then the crumbs are mixed with grated Parmigiano-Reggiano cheese and that’s sprinkled over the top of the Brussels sprouts. Bake for 18 minutes. That’s all there is to it. Easy peasy.

We had the remainder of our dinner all ready to go, so as soon as the Brussels sprouts came out of the oven, we were ready to plate everything. The cream (which I’d poured mostly on top of the cut sides of the Brussels sprouts) was almost completely absorbed into the Brussels sprouts – it was barely moist on the bottom of the dish. Thank you, Marie, for such a great recipe!

What’s GOOD: everything about these are good. The crunchy bread crumbs and cheese? Oh yum. The tender Brussels sprouts are so very tasty. The almonds also add a nice little crunch. A great recipe I’ll be making again.
What’s NOT: Well, it does take a bit more prep time than just simmering Brussels sprouts, of course, but it was well worth the effort. When we have a fairly plain protein for our dinner, I like to do something a bit more elaborate for the side dish.

printer-friendly CutePDF
Files: MasterCook 5+ and MasterCook 14 (click on link to open in MC)

* Exported from MasterCook *

Brussels Sprouts Gratin

Recipe By: Adapted from a Sophie Grigson (BBC Food) recipe by Marie Rayner (The English Kitchen) and further adapted by me.
Serving Size: 4

1 pound Brussels sprouts — trimmed
1 slice thick-sliced bacon — chopped
2 tablespoons sliced almonds
3 tablespoons heavy cream
2 teaspoons fresh lemon juice
3 tablespoons fresh bread crumbs
2 teaspoons unsalted butter
3 tablespoons Parmigiano-Reggiano cheese — coarsely grated
fine sea salt and coarsely ground black pepper to taste

1. Bring a large pot of lightly salted water to a boil. Add the sprouts and cook for about 4 minutes until crispy tender. Drain well and set aside.
2. In the same pan add the bacon and cook until it’s crispy. Toss in the almonds and allow them to brown lightly. Cut the Brussels sprouts in half and add them to the pan and cook them for a few minutes longer. Pour the sprout mixture in a ceramic dish just large enough for the Brussels sprouts slightly crowded together (a 9-inch ceramic pie plate works well for 1 pound). Season to taste with some salt and pepper. Stir together the cream and lemon juice and pour this on top of each Brussels sprout, if possible.
3. Melt the 2 tsp butter in the skillet and add the bread crumbs. Toss to coat and cook for a few mintues until they crisp up and turn a light golden brown. Remove from the heat and mix together with the Parmesan Cheese. Sprinkle this mixture evenly over top of the sprouts in the dish.
4. Preheat the oven to 400*F. Bake for 15 to 18 minutes until the crumbs are golden brown. Serve hot. Marie noted – as with most things these are even tastier the day after and reheated!
Per Serving: 167 Calories; 11g Fat (57.5% calories from fat); 7g Protein; 12g Carbohydrate; 4g Dietary Fiber; 26mg Cholesterol; 162mg Sodium.

Posted in easy, Fish, Grilling, on January 19th, 2014.

cedar_planked_salmon_mustard_brownsugar

Are you looking for a super-easy dinner with salmon? You’ve come to the right recipe – this one’s so simple – as long as you’re willing to do the cedar-plank thing on the grill.

Not taking a lot of time to hunt for a recipe this time, I just googled “cedar plank salmon.” The #1 recipe came from the Food Network. It’s a Steven Raichlen recipe, but from what I read, Bobbie Flay must have had him on his BBQ show and prepared this dish. What convinced me was the 5-star rating. I read through some of them – a few people didn’t like the quantity of mustard or thought it was bitter. My thought is that they used cheap Dijon. If you use the real stuff, particularly the Maille brand, there won’t be any bitterness. I did reduce the quantity of both mustard and brown sugar, and we were ooohing and aaahing as we ate it.

First we soaked a cedar plank (one worked for the portion we were grilling, but you might need 2) for about 2 hours in cold water. Then the plank itself went onto a medium-hot grill for about 4 minutes. That gave it time to steam-out most of the water, but got the plank super-hot. Then my DH salmon_mustard_sugarturned the plank over and carefully placed the lightly slathered and brown sugared salmon fillet (pictured at left with the slather and sugar ready for grilling) on top of the plank. The lid was closed, the heat reduced just slightly, and 10 minutes later the salmon had reached 135°F and it came off. When Dave lifted the lid the last time (he checked the temp of the fish twice) a big plume of smoke engulfed him and burned his sinuses a little. He had a honkin’ headache for the rest of the evening, poor guy. Beware of that, my friends! He said the plank was slightly in flames too, but it didn’t reach the fish. Obviously, you toss the plank once it’s used. You could also do this in the oven, I suppose, but not with the cedar plank – unless you do it at a lower temp. You don’t want that kind of smoke swirling around in your oven.

The salmon needed nothing else – perhaps I could have served it with a little wedge of lemon – but it truly didn’t need it. It was a tiny bit crispy along the edges (from the brown sugar) and the mustard added just a lovely character to the fish. It was perfectly done, juicy, flaky. Delicious.

What’s GOOD: rip-roaring easy and tasty. That’s about all I can say, it should be enough for you to try this super-simple recipe. Good enough for guests too. I haven’t tried oven roasting this, but it should be easy to do that if you don’t want to cedar plank it.
What’s NOT: nada, nothing!
printer-friendly CutePDF
Files: MasterCook 5+ or MasterCook 14 (click link to open in MC)

* Exported from MasterCook *

Cedar Planked Salmon with Dijon and Brown Sugar

Recipe By: Adapted slightly from a Steven Raichlen recipe, via the Food Network
Serving Size: 4

one cedar plank (6 by 14 inches)
1 1/2 pounds salmon fillets
Salt and freshly ground black pepper
3 tablespoons Dijon mustard
3 tablespoons brown sugar

1. Soak the cedar plank(s) under water for 2 hours or more.
2. Preheat grill to medium-high. Place the cedar plank on the grill, cover and allow to pre-heat for about 4 minutes.
3. In the kitchen, spread the salmon fillets with a coating of Dijon, then sprinkle the brown sugar evenly on top. Do this just before you’re ready to grill – otherwise the sugar will begin to melt off the fish, even sitting at room temp.
4. When the cedar plank is super-hot, carefully turn the plank over with tongs and place the fish on top/center of the plank. Close lid, reduce heat just slightly (you don’t want the plank to burn, if at all possible). Depending on the thickness of the fish, cook for 10-15 minutes, or until the internal temperature reaches 135° (use an instant-read thermometer). If the edges of the plank start to catch fire, have a spray bottle of water handy and carefully spray the wood (not the salmon) and perhaps lower the heat slightly. Remove from grill and serve immediately.
Per Serving: 231 Calories; 6g Fat (25.5% calories from fat); 34g Protein; 7g Carbohydrate; trace Dietary Fiber; 89mg Cholesterol; 258mg Sodium.

Related Posts Plugin for WordPress, Blogger...