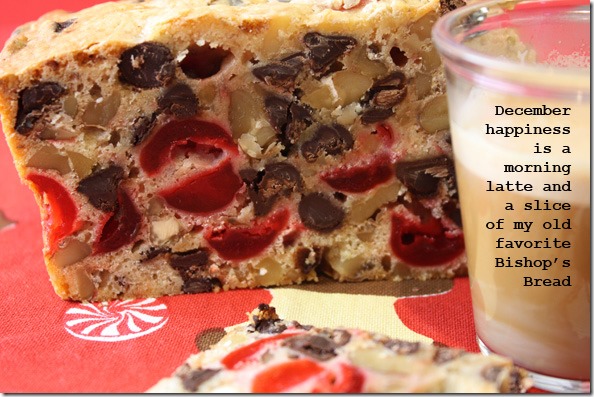
It’s only in the month of December that I allow myself to indulge in Bishop’s Bread. Not that it’s all that “bad,” but someone did ask me the other day if I wasn’t bothered by ingesting all of that red dye from the maraschino cherries. I decided years ago that since I do only make this once a year, and I don’t eat THAT much of it, that I can allow myself a slice every day or two or three. My friend Cherrie, who also loves this bread, asked me if I would bring some of the slices to a girl’s event at her house last week . . . she put it out on a platter with other things. She and I both took a half of a slice with a hot cup of coffee. We were seated across the room from each other and happened to make eye contact as we both bit into it at the same time – we both grinned – like “thumbs up.” The chocolate chips, the walnuts, and then, those halved maraschino cherries too. There’s just enough batter (the cake part) to hold it together. So delicious!
Archives
Recent Posts
Currently Reading
Tasting Spoons
You might think you don’t need a recipe for a fruit salad, right? But if you’d like to serve a fruit salad that’s just a bit different, you could try this one. You just have to plan ahead a few hours or overnight (to make the flavorful syrup) to serve this with a brunch. It’s well worth making.
Ginger seems to be on my radar lately. And if I were to just add a vanilla bean to the stem ginger in syrup that I made last week, I’d have had half of this recipe already done! In this case you make a simple syrup with fresh ginger, a vanilla bean and a bunch of lemon peel. That does need to be made ahead as it provides a ton of flavor to the fruit once you mix it all together.
Once that mixture has cooled and the solid stuff (ginger, vanilla bean and lemon peels) strained out, you’re left with this delicious ginger/vanilla essence syrup. You could just slurp it with a spoon. Trust me on that one! (If you have leftovers of the syrup, it would be lovely added to a cup of hot tea.) But we’re making a fruit salad, so all you do is add in all the fruit. You could change what YOU like to have in the way of fruit – at the class Phillis Carey used Navel oranges, mangoes, bananas, kiwis, grapes and pomegranate seeds. It was a beautiful and very tasty combination. You could add apples, pears or pineapple too. Your choice.
What’s GOOD: the flavoring in the syrup is what makes this. The ginger gives the syrup just a teeny tiny bit of heat and the vanilla adds a depth to it – perhaps not distinguishable, but it makes for one very tasty bowl of fruit. The pomegranate seeds add a lovely color to the presentation too.
What’s NOT: really nothing except that you do have to plan ahead one day or at least half a day to make this.
Files: MasterCook 5+ and MasterCook 14 (click link to add to MC – 14 includes photo)
* Exported from MasterCook *
Winter Fresh Fruit Salad with Vanilla Syrup
Recipe By: Phillis Carey cooking class, Nov. 2013
Serving Size: 10 (or more)
VANILLA GINGER SYRUP:
1/2 cup sugar
2 cups water
1 piece ginger — about 1 inch long, peeled and thinly sliced
1 vanilla bean — split lengthwise and seeds scraped out
1 lemon — peel only (reserve lemon for other use)
1 whole navel orange — peel only (use fruit for the salad)
FRUIT SALAD:
3 large navel oranges — or blood oranges
2 whole mangoes — peeled and diced
5 whole kiwi fruit — peeled and diced
1 cup red grapes — seedless
1 cup pomegranate — seeds only (from 1 large one)
2 whole bananas — ripe but firm, peeled and diced
1. Combine the sugar, water, the ginger and vanilla seeds and pod in a saucepan. Use a vegetable peeler to remove wide strips of zest from the lemon and 1 orange, add to the saucepan and bring to a boil over medium-high heat. Reduce the heat and simmer 5 minutes. Refrigerate until cold.
2. Meanwhile, peel the remaining oranges with a paring knife, cutting along the natural curve of the fruit. Hold an orange over a large bowl and cut along both sides of each membrane to free the segments, letting them fall into the bowl. Also segment the orange used in the syrup that’s already peeled. Squeeze each empty membrane to release the juices. Repeat with the remaining oranges. Add the mangoes, kiwis and pomegranate seeds and gently toss. Pour the syrup over the fruit and chill overnight.
3. Before serving, remove the citrus zest, ginger and vanilla pod. Add the fresh banana at this point. Pour into a large serving bowl or spoon the fruit and syrup into individual bowls.
4. POMEGRANATES: To remove pomegranate seeds, cut the fruit into quarters, then break apart in a bowl of water. Skim off the pith that floats to the top and drain the seeds.
Per Serving: 158 Calories; 1g Fat (2.9% calories from fat); 2g Protein; 41g Carbohydrate; 4g Dietary Fiber; 0mg Cholesterol; 6mg Sodium.
Posted in Cookies, on December 12th, 2013.
Well, I can truly say the Christmas cookie baking has begun. I’ve started with a list of the cookies I want to make this year (there are some regulars, of course), but I always like to try something new too. I hunted through my cookbooks and eventually settled on this cookie found online.
And what a winner this one is! It’s from King Arthur Flour. I’ve mentioned it here before that they have a great blog, called Baking Banter. They have a big test kitchen, and numerous bakers who enjoy writing up their interesting baking journeys. These cookies are just one.
When you think of gingerbread cookies you might just think of the flat, hard variety you’d find for decorating gingerbread men. Or making gingerbread houses. These cookies are nothing like those. This is a thicker cookie – just full of spicy aromas – and also some chocolate (both cocoa and some mini-chocolate chips). They’re soft and tender cookies, although by tender I don’t mean like shortbread, either. No, these are soft. Not exactly cake-like, though. Not brownie-like. More like pumpkin cookies – moist but bursting with the spices that flavor this cookie (ginger, cinnamon, nutmeg, cloves). You also notice the molasses (there’s a LOT of molasses in these). That’s what gives the dark-dark color, not the cocoa. Once the cookies are all mixed up, you add in the mini chocolate chips, then they’re rolled into balls (or scooped with a cookie scoop in 1-tablespoon sizes) and dipped into the pearl sugar, placed on parchment-lined baking sheets and baked 10-12 minutes.
Now, I have to mention . . . I was baking these cookies to take to a cookie exchange, so I decorated them according to the recipe. It calls for (Swedish) pearl sugar. I found it at my local grocery store. I’m not a fan of those kinds of toppings particularly – they distract me from the cookie flavor (when you crunch down on them). To me those crunchy sugar things are just a waste of calories – they don’t have any taste to speak of – they’re just sugar-sugar-sugar. The cookie has all you’ll need. But, they look cute with the topping.
The dough is very easy to mix up. You scoop a small tablespoon of dough into a round shape and dip just half of the cookie into the pearl sugar. If I did them with the topping again I would use fewer of the pearl sugar thingies – the ones that got close to the hot pan melted and don’t look very attractive. The others buried slightly into each cookie top looked fine.
There, above, you can see them rolled into balls (those are the raw cookies) and dipped, ready for baking. The cookies, once baked, need to cool a bit on the baking sheets, so I just went ahead and formed all the remaining dough into cookie shapes so it was easy to put in the next batch. Don’t put the cookies that close together on the baking sheet or they’d all melt into one another – this was just my “staging sheet.”
If you bake these without the pearl sugar, you might put clear sugar crystals on top – that would be better than the pearl shape, I think. But the cookies truly don’t need any embellishment. They are very dark colored – most people would mistake these for chocolate cookies, so I’d be sure to put a little sign out saying what they are. I’m going to make a sign when I go to the cookie exchange. In this group, each person brings 6 little bags of 6 cookies each, and you pick and choose to take home 6 bags from other people. Supposedly only one bag per person, so you can’t choose to take all 6 bags of spritz or divinity from someone else. So that’s why it would be good to have a sign on these since the look would lead most people to think they’re all chocolate.
What’s GOOD: loved the flavor of these. Very, very spicy indeed (not hot spicy, just warm pumpkin pie kind of spices). Or gingerbread – which of course, these ARE. They have a little tiny bit of the cake-like quality of gingerbread, but they’re definitely a cookie. Next time I won’t bother with the white pearl sugar, but that’s just me. Your kids will likely love dipping the balls into the topping. Just don’t let them overdo it.
What’s NOT: the only thing I’d do differently next time is do without the pearl sugar. Not because it made the cookies wrong or anything. I just don’t care for the crunch. Although, once baked the pearl sugar isn’t so crunchy.
Files: MasterCook 5+ or MasterCook 14 (click link to open in MC)
* Exported from MasterCook *
Chocolate Gingerbread Cookies
Recipe By: King Arthur Flour (blog)
Serving Size: 30
1 3/4 cups all-purpose flour
1 teaspoons baking soda
2 teaspoons ground ginger
1 teaspoons ground cinnamon
1/4 teaspoon ground cloves
1/4 teaspoon ground nutmeg
1/2 teaspoon salt
1 tablespoons cocoa — or Dutch-process cocoa
1/2 cup unsalted butter — (8 tablespoons) at room temperature
1/2 cup packed dark brown sugar
1/2 cup molasses
1 cups semisweet chocolate mini chips
5 tablespoons Swedish pearl sugar — (optional – can use less)
Notes: I’m not so crazy about the pearl sugar on top – it looks cute, but I don’t think it adds anything to the taste. A very dark, dark cookie (looks like a chocolate cookie, but it’s really the molasses that gives these the dark color). Absolutely delicious and easy.
1. Preheat the oven to 325?F. Line two baking sheets with parchment paper, or grease lightly.
2. Combine the flour, baking soda, spices, salt, and cocoa.
3. In a separate bowl, with electric mixer beat the butter with the sugar until light and creamy.
4. Add the molasses and beat until combined.
5. Mix in the dry ingredients, then stir in the chips.
6. Scoop the dough a tablespoon at a time; a tablespoon cookie scoop works well here. Roll the top portion of each dough ball in pearl sugar.
7. Place the unbaked cookies 1 1/2″ apart, sugar side up, onto the prepared baking sheets.
8. Bake the cookies for 10 to 12 minutes, until their surface begins to crack. Remove from the oven, cool on the pan for 5 minutes, then transfer the cookies to a rack to cool completely.
Per Serving: 119 Calories; 5g Fat (39.0% calories from fat); 1g Protein; 18g Carbohydrate; 1g Dietary Fiber; 8mg Cholesterol; 82mg Sodium.
In 1987 this recipe (called Tahoe Brunch back then) was published in our neighborhood weekly newspaper. I clipped it out and prepared it numerous times over the years – often when we did a brunch on our sailboat because it can be prepared the day before, then baked the day-of. (We have a smallish oven on the boat, and I did have one pan that would fit in it.) A month or so ago I went to a Phillis Carey cooking class, and she prepared it too, with just a couple of modifications. It was then I realized that I’ve never posted this recipe here on my blog. That mistake is now fixed!
It seems that I don’t entertain for brunch anymore. I think it’s because every Sunday morning we’re busy attending morning services at our Presbyterian church, and to try to put on a brunch after that, when we don’t even get home from church until about 11 is just not feasible. Do people have Sunday brunches on Saturdays? I suppose I could – I just haven’t ever thought of it.
So this delicious recipe has been updated just a little bit – I reduced the amount of Italian sausage, tried to quantify the amount of bread called for, have given options for the cheddar or Provolone, and options for either parsley or basil. And gave you options for adding the mushrooms (I used to) or fresh tomatoes (Phillis’ recipe). I’m a bit staggered by the calorie count on this recipe – I may have never noticed it before.
What’s great about it is the fact that it’s made the day before, and over the years I’ve made this numerous times for Thanksgiving morning, Christmas morning, or New Years Day morning. It’s the Italian sausage in it that I like so much. Spicy sausage just gives this a wonderful flavor. Mix that with the cheese, and it’s kind of like pizza in a breakfast dish, I suppose.
It’s very easy to put together once you cook the Italian sausage and onions. Phillis’ recipe had you cube up the bread. My old recipe calls for buttering bread in slices. Either way works.
What’s GOOD: It’s the Italian sausage in it that I like the best, but then I’m a fan of the stuff. The recipe just has lots of flavors abounding in it from the mushrooms, cheese, tomatoes and the seasonings. Love that it can be made 24 hours before. Do bake in a glass or ceramic dish, not metal. You’ll hear lots of mmmm’s and sighs when you serve this.
What’s NOT: nothing really except that it’s rich and high in calories! But it’s a special occasion kind of dish.
printer-friendly CutePDF
Files: MasterCook 5+ and MasterCook 14 (click link to open in MC)
* Exported from MasterCook *
Tahoe Brunch (Bread Pudding Breakfast Casserole)
Recipe By: A 1987 Tustin News article
Serving Size: 10
4-6 cups french bread — crusts removed
2 tablespoons butter — softened
4 tablespoons unsalted butter
8 ounces fresh mushrooms — sliced (optional)
2 cups yellow onions — thinly sliced
salt and pepper — to taste
1 pound Italian sausage — sweet (mild)
3 cups cheddar cheese — grated (or Provolone)
6 whole eggs — extra large
2 1/2 cups milk
1 tablespoon Dijon mustard
1 teaspoon dry mustard
1 teaspoon nutmeg
2 tablespoons fresh parsley — chopped (or basil)
1 cup fresh tomatoes — chopped (remove some seeds if possible)
3/4 cup cheddar cheese — grated for topping (or Provolone)
Notes: don’t use a really soft bread in this or it will just turn to mush.
1. Butter the bread with the softened butter, cut into cubes and set aside. In a 10-12 inch skillet, melt the 1/2 cup butter and brown the mushrooms and onions over medium heat for 5-8 minutes or until onions are golden. Season to taste with salt and pepper and set aside. Crumble the Italian sausage and cook until the meat is no longer pink.
2. In a greased 11 x 7-inch ceramic or Pyrex casserole, add all the bread cubes, top with the onion and mushrooms, sausage and cheese.
3. In a medium-sized bowl mix the eggs, milk, both mustards, nutmeg, with salt & pepper to taste (about 1 tsp salt and 1/8 tsp pepper). Pour over the sausage and cheese mixture, cover with plastic wrap and refrigerate overnight.
4. At least 30 minutes before baking, remove casserole from refrigerator. Bake uncovered in a preheated 350° oven for 45 minutes, then sprinkle top of casserole with fresh tomatoes and some additional cheese. Bake 15 more minutes until mixture is bubbly. Allow to sit for about 5 minutes before serving.
Per Serving: 885 Calories; 45g Fat (45.9% calories from fat); 37g Protein; 82g Carbohydrate; 5g Dietary Fiber; 233mg Cholesterol; 1579mg Sodium.
Most evenings I don’t serve any carb with our meal. We just don’t need it. Not that we wouldn’t LIKE to have some, but we know it’s better for us if we don’t indulge in potatoes or rice or some other kind of starch. Even bread. So, this revision was borne of that wish – could we have my old favorite, cabbage patch stew that is usually served with a lovely fluffy mound of whipped potatoes on top?
If you click on the link above, you’ll go to my 2007 blog post about this – one of my all-time favorite family meals. It’s a soupy, stewy kind of dish that I originally got out of a little Betty Crocker cookbook that was given to me when I got married the 1st time in 1962. Looong time ago. It’s SO very easy to make – all in one pan except for the potatoes.
Back some years ago I made a Kalyn’s Kitchen recipe for a kind of cheesy cauliflower dish called Twice Baked Cauliflower that gives you the illusion you’re eating baked (mashed) potatoes with all the trimming like sour cream, bacon, chives, etc. Every time I make those, I think about our friend Lynn (and his wife Sue) who now live in Colorado. Lynn, you see, abhors cauliflower. I served those to him one night – didn’t even mention what it was – he ate it, loved it, and somewhere in the conversation I mentioned cauliflower. Lynn turned a bit blue. CAULIFLOWER? No. That couldn’t have been cauliflower. He simply doesn’t EAT cauliflower. But he did. Now whether he’s ever eaten it since, I don’t know. (Sue, you’ll have to tell me . . . she reads my blog.)
SO, all that said, I decided to lighten up my old favorite by making it with half ground turkey and half ground beef, and then to make the “mashed potatoes” with cauliflower. The only carbs in this dish come from the one can of kidney beans that are also part of the recipe (and whatever little amount of carbs exist in the other vegetables). The beans – I left those in – they’re more complex carbs. As for the cauliflower – just TRUST ME about this – you’ll hardly know you’re eating cauliflower. I’ve re-written the recipe completely below, including the cauliflower mixture. If you eat the cauliflower “mashed potatoes” straight, yes, you’ll probably notice they don’t quite taste like potatoes, but when it’s mixed with the herby, spicy stew mixture, you simply don’t know. It has almost the same texture as mashed potatoes.
What’s GOOD: This is a very healthy meal – especially if you use all turkey or use less. Or no turkey, of course. The combination of veggies just works. What can I say. And the mashed potatoes cauliflower put it into the comfort food category. Make a double batch and freeze the left overs (freeze the cauliflower separately – come to think of it – I’ve never frozen pureed cauliflower so don’t know absolutely how that would be once defrosted – let me know) – that’s what I do.
What’s NOT: absolutely nothing. I love this stuff.
printer-friendly CutePDF
Files: MasterCook 5+ or MasterCook 14 (click link to save in MC – 14 includes photo)
* Exported from MasterCook *
Cabbage Patch Stew Revised with Cauliflower Mashed Potatoes
Recipe By: Adapted from an age-old Betty Crocker cookbook
Serving Size: 8
1/2 pound ground turkey — dark meat
1/2 pound ground beef — (or use all ground turkey)
2 medium onions — sliced thin
1/2 cup celery — diced
2 cloves garlic — minced
2 cups kidney beans — canned, undrained (one 15-ounce can)
2 cups tomatoes — canned, undrained (one 15-ounce can)
1 tablespoon chili powder — or more to taste
1 tablespoon ground cumin
1 tablespoon Worcestershire sauce
1/4 cup chicken broth
1 teaspoon beef broth concentrate
salt and pepper to taste
1 1/2 cups water
1 1/2 cups cabbage — shredded or sliced thinly
CAULIFLOWER “MASHED POTATOES:”
1 head cauliflower
2 tablespoons milk — or more if needed
salt & pepper to taste
1 tablespoon butter
1/2 cup cheddar cheese — grated (garnish)
1. Brown ground beef and ground turkey over medium heat. Add onions, garlic and celery and cook until vegetables have lost their raw color. Add beans, tomatoes and seasonings (and some water if it appears to be too thick) and continue to simmer for 15-25 minutes, adding the cabbage during the last 8-10 minutes. The original recipe called for the addition of 2 cups of water, but I’d recommend about 1 cup, maybe 1-1/2 cups.
2. Meanwhile, in a saucepan simmer cauliflower florets in water until fork tender. Drain and place in food processor. Process/mash them using the butter, milk and salt & pepper to taste until they are very smooth. This will take longer than you think – keep testing the texture and tasting for seasonings.
3. Serve about 1 to 1-1/2 cups stew per person in large bowls, then add scoops of hot cauliflower on top and garnish with shredded cheese.
Per Serving: 365 Calories; 15g Fat (35.8% calories from fat); 24g Protein; 36g Carbohydrate; 14g Dietary Fiber; 58mg Cholesterol; 190mg Sodium.
Posted in Breads, on December 7th, 2013.
You know how adding buttermilk in any baked good makes it super tender? This recipe does it in spades, as they say, to make the softest, most tender scone I may have ever tasted. And then you add in the gingerbread flavors. Delicious is all I can say.
Understand . . . this is not gingerbread. It’s nothing whatsoever like cake gingerbread. It’s the gingerbread (spice) flavors that give it the delish flavor but in a soft, tender flaky scone.
My favorite scone that I’ve been making for decades, Buttermilk Scones, is similar, but the proportions in the ingredients are different than these. How, exactly, the chemistry works in baking continues to baffle me. Sometimes I go to Harold McGee’s book On Food and Cooking: The Science and Lore of the Kitchen. Usually I find the answer there to most of my cooking questions about why and how. And I sometimes refer to that baking chemistry book, Ratio: The Simple Codes Behind the Craft of Everyday Cooking
by Michael Ruhlman, with all of the proportions students learn in culinary school. I don’t remember them, period. When I have a question, though, I often dig out that book too, to see if it has any answers. Scones aren’t covered in that book, however. Only biscuits, and these just aren’t “biscuits.”
Nevertheless, buttermilk is a tenderizer in bread and pastries. Of and by itself I don’t think it has much super-tenderizing powers, but combined with flour and fat, it must develop the tenderness. I’ve never found that using the dried buttermilk powder works as well. I’ve never tried a side by side trial, but something happens, not good I mean, when they dry buttermilk.
Technically, what we buy at our grocery stores ISN’T buttermilk. It’s a cultured buttermilk. Real buttermilk is a by-product of real cream when the butterfat liquids run off in the process of making butter. I haven’t a clue how to find real honest-to-goodness buttermilk. I believe I’ve looked at Whole Foods, thinking surely they’d have it, but they didn’t when I visited the store some months ago. If you’re a farmer or near dairy farmers, perhaps you can buy it directly. I’d love to try it in baking. I remember trying buttermilk when I was a child, on my grandfather’s farm. He didn’t have dairy cattle, but his brother did, on adjoining land. I didn’t love drinking it, as my grandfather did, but it was definitely more tasty. More tangy for sure, but that’s about all I recall.
But, for purposes of providing tenderness to baked goods, store-bought buttermilk suffices. Our normal buttermilk starts with skim milk, actually, then they culture it somehow and it ends up being a low-fat product and has the consistency of real buttermilk. The little tiny globules in store-bought buttermilk is produced – it’s not natural to the product. It is what it is, and we’re mostly stuck with it. If you want to know whether your buttermilk is or isn’t real, look for the word cultured. That’s the manufactured (fake) stuff. If it says pure buttermilk, give it a try. Taste it too.
Now, back to these scones. They’re mixed together much like any other scone mixture, so I won’t belabor that process. The batter does contain eggs – that’s not always in scones – they tenderize baked things also. The only thing Phillis Carey said about this recipe is that it’s imperative you not add any more flour than necessary – more flour = dry and less tender. You’ll develop a rhythm once you make these yourselves. Just know the batter is very wet and you want to keep it that way as much as possible. Your hands will get kind of raggedy from the sticky dough, but that’s okay!
You don’t have to make the marmalade butter, but it’s so easy to do, and would add an especially nice touch if you’re making these for guests, particularly. Just mix butter, marmalade and a pinch of salt if you use unsalted butter. Let it sit for awhile so the flavors meld a bit. Otherwise, serve with butter and whatever jam you have on hand.
What’s GOOD: if you’re a lover of fall, gingerbread or pumpkin pie spices, you’ll love these scones. They’re super tender from the buttermilk and from very little handling. You’ll really enjoy these. I just about guarantee it. If you have left overs, wrap them in foil and freeze for another day.
What’s NOT: nothing that I can think of.
printer-friendly CutePDF
MasterCook 5+ file and MasterCook 14 file
* Exported from MasterCook *
Gingerbread Scones with Marmalade Butter
Recipe By: Phillis Carey cooking class, Sept. 2013
Serving Size: 12
2 1/2 cups all-purpose flour
1/2 cup brown sugar
2 tablespoons sugar
1 teaspoon baking powder
1/2 teaspoon baking soda
1/4 teaspoon salt
2 teaspoons ground ginger
1/2 teaspoon ground cloves
1/2 teaspoon ground nutmeg
1/2 cup unsalted butter — diced and chilled
1 large egg
1/3 cup buttermilk
1 tablespoon molasses
1 large egg — (for the egg wash)
1 tablespoon water
1 tablespoon sugar — (to sprinkle on top)
MARMALADE BUTTER:
1/2 cup unsalted butter — at room temperature
3 tablespoons orange marmalade — or apricot jam (chopped)
1 dash salt
1. Preheat oven to 400°F. In a large bowl whisk together the flour, brown sugar, granulated sugar, baking powder, soda and salt. Add ginger, cloves and nutmeg and whisk until well blended. Cut or rub in butter until pieces are the size of peas.
2. In a small bowl whisk together the egg, buttermilk and molasses until blended. Pour into the flour mixture, stir with a fork until evenly moistened. With hands, quickly and gently press together to form a dough. Divide dough in half and press each into about a 6-7 inch circle, about 1-inch thick.
3. Gently transfer dough to a large baking sheet, then cut into 6 wedges each, leaving the circle in its shape, just barely separating them.
4. In a small bowl whisk together 1 egg and water, then lightly brush this over the top of scones. Sprinkle tops with the 1 T. granulated sugar and bake for 20-25 minutes or until a toothpick inserted in the center comes out clean. Internal temperature should be 200°F. Cool on a rack for 10 minutes. Serve warm or at room temp with Marmalade Butter.
5. MARMALADE BUTTER: Place softened butter and marmalade in food processor and process until smooth. Scrape into a decorative bowl (or individual small ramekins). Chill until serving time, allowing butter to warm to room temp for at least 30 minutes before serving.
Per Serving: 299 Calories; 17g Fat (49.3% calories from fat); 4g Protein; 34g Carbohydrate; 1g Dietary Fiber; 77mg Cholesterol; 187mg Sodium.
Posted in Desserts, on December 5th, 2013.
What’s the nomenclature – this is an adult beverage dessert? Made with Amaretto in the pudding part and more in the whipped cream topping. There’s not THAT much liqueur in this – 1/3 cup total, spread over 8-10 servings, so that’s about 1 1/2 teaspoons or so per person. Maybe too much for young children since this dessert isn’t cooked, so it’s the straight stuff . . . keep that in mind.
When the first bite of this hit my tongue, well, I sighed in contentment. At the cooking class with Phillis Carey where I learned how to make this, the classroom was in total silence as we all mmmm’d or sighed. Phillis has devised lots of tiramisu variations. She just loves the dessert in general, so she keeps coming up with new methods of making it. The orange one she made a few months ago was off the charts. And now this one with pumpkin. Wow.
Start making this several hours ahead because it needs to rest – so the liqueur soaks into the ladyfingers. It’s still the raw liqueur used, but once it sits with the pastry it seems to mellow some. First you must make a simple syrup (1 cup sugar + 1 cup water, the standard measurements). You do have to buy (well, find first, then buy) the soft ladyfingers. This time of year (as I write this, it’s Fall) they’re harder to find – if you find them (usually near the fresh fruit, such as strawberries, in the produce section) buy extra and stick those in the freezer so you have them when you need them. Since I had this I’ve looked in 2 stores and haven’t found them. I’ll keep looking.
USING DRIED ITALIAN LADYFINGERS: Phillis said you could make this with the hard Italian ladyfingers – in that case I recommend you add 1 1/2 cups of water to the simple syrup and Amaretto mixture – you’ll need a whole lot more liquid to make this work. The proportion for that came from my favorite tiramisu recipe where Cook’s Illustrated devised the amount of coffee needed to dip the dried ladyfingers (you need a total of 2 1/2 cups liquid to soak dried ladyfingers). If you want to make your own soft ladyfingers, I found a recipe at the Food Network.
Layer the soft ladyfingers in a 9×13 pan and brush them with the Amaretto syrup. You’ll make a big bowl full of the pumpkin mixture – it’s sweetened condensed milk, brown sugar and Mascarpone cheese, and a whole bunch of heavy cream whipped up. Then you add in the pumpkin puree and pumpkin pie spices. Half of it is layered on top of the bottom layer of ladyfingers, then another layer of ladyfingers, the balance of the Amaretto syrup is brushed on, then finally you add the last of the pumpkin cream mixture. That’s covered and refrigerated for at least 4 hours, or up to 24 hours. Then just before serving, whip yet more whipped cream with the Amaretto syrup and that gets spread on the top along with the crushed up Amaretti cookies. You’ll feel like you’ve died and gone to heaven, especially if you love pumpkin.
What’s GOOD: The pumpkin, the cream, the Amaretto. Oh gosh. Everything. The fact that you can make this 24 hours ahead is also very nice.
What’s NOT: should I mention it’s decadent? Certainly over the top with heavy cream, but we’re not counting, right ;- )
MasterCook 5+ file and MasterCook 14 file
* Exported from MasterCook *
Pumpkin Amaretti Cookie Tiramisu
Recipe By: Phillis Carey cooking class, Nov. 2013
Serving Size: 10
1 cup water
1 cup granulated sugar
1/3 cup Amaretto
6 ounces soft ladyfingers — (two 3-ounce packages)
3/4 cup sweetened condensed milk
1/4 cup light brown sugar
6 ounces mascarpone cheese — at room temperature
1 1/4 cups heavy cream
1 cup pumpkin puree — Libby’s
1 teaspoon pumpkin pie spice — (or make your own using 1/4 tsp cinnamon, 1/4 tsp ginger, 1/4 tsp allspice, 1/8 tsp ground cloves and 1/8 tsp nutmeg)
1 cup heavy cream — (for topping)
3/4 cup Amaretti Di Saronno Cookies — coarsely crushed
1. SYRUP: Combine water and sugar in a small saucepan. Stir over medium heat until sugar dissolves and then allow mixture to come to a boil. Remove from heat and allow to cool. Stir in the Amaretto. REMOVE 3 T. of the syrup to use in topping.
2. Separate ladyfinger sections, leaving the individual fingers attached. Lay half the ladyfinger sections, round side down, in a 9×13 glass dish. Brush well with the Amaretto syrup to saturate each ladyfinger (do not use a silicone brush for this unless that’s the only kind of brush you have).
3. In a mixer gradually beat sweetened condensed milk and brown sugar into the mascarpone. Add the 1 1/4 cups heavy cream and bean until soft peaks form (this may take longer than usual because of the other ingredients in the mixture). Fold in pumpkin and pumpkin pie spice. When you do this, the mixture will thicken further (something to do with the sweetened condensed milk and the pumpkin combination). Spoon half the mascarpone cream over the ladyfingers and spread evenly. Top cream with remaining ladyfingers which also have been brushed with more Amaretto syrup (not the reserved 3 T). Spread on the remaining mascarpone cream mixture. Cover and refrigerate for at least 4 hours or up to 24 hours.
4. Just before serving (or up to an hour or so before) whip the 1 cup heavy cream to soft peaks, then stirring in the reserved 3 T. of Amaretto syrup. Spread this on top of the tiramisu so all of it is covered completely. Sprinkle with the crushed Amaretti Di Saronno cookies and serve immediately, or chill (covered) for an hour or so. Use a spatula or just use a big spoon to serve in small bowls or a plate.
INSTRUCTION FOR USING DRIED ITALIAN LADYFINGERS: Add 1 1/2 cups water to the Amaretto syrup. Pour it into a flat dish and as you start the bottom layer, place a ladyfinger into the syrup and roll it around for a max of 2-3 seconds. That’s all, no longer. Place the ladyfingers in the bottom of the dish as usual and repeat the dipping for the 2nd layer of ladyfingers. The dish will need longer than 4 hours for resting and soaking up the liquid – at least 6 hours.
Per Serving: 500 Calories; 31g Fat (55.3% calories from fat); 6g Protein; 51g Carbohydrate; 1g Dietary Fiber; 143mg Cholesterol; 89mg Sodium.
An altogether different (for me anyway) way to use left over turkey. And it will likely become a favorite. Made especially easy because I was able to use our Thanksgiving turkey meat, and left over mashed potatoes too, which were taking up space in my refrigerator.
Not knowing anything about the history of the French word Parmentier, I looked it up online, only to find that, in culinary terms it means a potato on top, almost like a shepherd’s pie, or a cottage pie. The dish is named after Antoine-Augustin Parmentier, a French pharmacist, nutritionist, and inventor who, in the late 18th century, was instrumental in the promotion of the potato as an edible crop. So, that’s why (per wikipedia). The hachis part means chopped meat.
I read the recipe over at Susan Herrmann Loomis’ blog, On Rue Tatin. If you don’t know about her, you should. She’s an American, but went to live in France a long time ago now, wrote a book about her culinary experiences (very cute) including meeting her husband (I see that she doesn’t mention her husband on her About page, so perhaps she’s divorced now . . . don’t know . . . but she does have a couple of children). She lives in Normandy in the little town of Louviers, gives English-speaking cooking classes regularly if you’re interested and has written about 12 cookbooks.
My version of this – from the picture above – is a much more wet casserole – not exactly soupy, but certainly it oozed all over the plate. My mashed potatoes were very soft to begin with. But that made no difference to the flavor.
One of the things that stood out in my mind as I was reading Susan’s blog, was her little quip that “ . . . . sprinkling Gruyere cheese on almost everything that goes in the oven is a French custom. . .” Having visited the Gruyere cheese factory (a very small place considering the volume of cheese sold ‘round the world with its name on it – hence I always buy the imported, the “real” Gruyere), and since I had a chunk of the cheese in my refrigerator already, it was a no-brainer I’d make this.
It took about 10 minutes to create the casserole: first I sautéed the onion (Susan used a red onion, I used a yellow) in a bit of oil and butter. While that cooked briefly I shredded the turkey meat and shredded the Gruyere. Into the casserole dish went the mostly cooked onion with a tiny sprinkling of cheese (I was remembering Susan’s comment about the cheese). I sprinkled the top with a little bit of salt, pepper and a light dusting of powdered bay leaf. Then I added all the turkey meat, with another light sprinkling of cheese. I drizzled the cream on top of that and added the little bit of turkey gravy (her recipe has you add stock – I used the gravy because I had a bunch in the refrigerator and never seem to know what to do with it except in reheated left over Thanksgiving dinner). Then using my hands to mush and squish the cold mashed potatoes, I gently placed the potatoes on top and tried to cover it barely and completely. I wanted a solid potato covering, but I didn’t want it to be thick, so I gently pushed and shoved the potatoes so it would be a solid slate of them. If you have youngsters to feed, you’ll likely want a much deeper potato layer, which is fine! The bulk of the grated cheese goes on top of the potatoes. Make sure the casserole is deep enough that the potatoes aren’t heaped above the edge or you’ll have a bit of bubbling overflow. Fortunately I put the casserole on another pan so the drips didn’t burn up in the oven!
We had pan-roasted Brussels sprouts with this, but any green veg would be fine, or even a salad. You could – I’m sure – use some left over veg inside this dish (like peas or broccoli) but I wanted to make it as true to Susan’s recipe as I could. I did make a few changes, but I hope they did nothing but enhance the flavors rather than detract from them!
One little caveat: I used the best-est turkey chunks (both breast and dark meat) from our kosher bird, which was super-moist and tender; I used the left over mashed potatoes which contained cream cheese, so they were rich-rich already. I used ample cheese (maybe more than Susan did – I didn’t weigh it – she used 2 ounces for a larger casserole, I think). I did use heavy cream, although I just added it into the meat section (not used in the potatoes as she did). Just know that it’s rich in fat grams. Oh, I’d make it again in a second! But then, shepherd’s pie, which is so very similar to this, is also a particular favorite flavor-taste for me.
What’s GOOD: oh gosh, was this ever fantastic. For me – it’s all about the CHEESE. It absolutely “makes” this dish, in my opinion. Gruyere has such a unique flavor – it’s not a straight eating kind of cheese (at least not to me) but has a kind of sharp, yet deep nutty quality to it. I use some Gruyere or Emmental in my cheese fondue recipe because it’s just the best combo for flavor. Anyway, the flavor in this dish is over-the-top delicious! This is going to go onto my list of Carolyn’s favs, and will be added to my usual Thanksgiving roundup under the section of left overs.
What’s NOT: not a single, solitary thing. It IS rich. Decadent, I suppose. A splurge in the calorie department.
printer-friendly CutePDF
Files: MasterCook 5+ and MasterCook14 (click to open in MC)
* Exported from MasterCook *
Turkey Hachis Parmentier
Recipe By: Adapted from On Rue Tatin (blog)
Serving Size: 4
1 tablespoon unsalted butter
1 tablespoon olive oil
1 large yellow onion — halved, very thinly sliced
3 cups cooked turkey — shredded
1/2 cup turkey gravy
1/3 cup heavy cream
Fine sea salt and freshly ground black pepper
1/4 teaspoon ground bay leaf
2 cups mashed potatoes — left over, seasoned with milk, salt and pepper
1 cup Gruyere cheese — grated
Notes: Shred (rather than cube) the turkey meat to give a wonderful texture to the dish. Sprinkling Gruyere cheese on almost everything that goes in the oven is a French custom and is entirely optional, but the flavor will be SO enhanced with the cheese.
1. Melt the butter and oil in a medium-sized, heavy saucepan over medium heat. When it is heated, add the onions and stir so they are coated with the fat; cover, and cook until they are tender and translucent, about 15 minutes, stirring frequently so they don’t stick. Season lightly with salt and pepper.
2. Preheat the oven to 425°F.
3. When the onions are cooked, transfer them to a medium-sized baking dish, and spread them evenly across the bottom. Top with the shredded turkey. Drizzle gravy and cream over all. Sprinkle just a little bit of cheese over the turkey.
4. Spread the potatoes over the turkey in an even layer. If the potatoes are cold, mash them gently in your fingers and drop pieces over the turkey, filling in the holes without mashing down the potatoes. It’s okay if the top is craggy but it should be completely covered. Sprinkle evenly with the cheese, and bake in the center of the oven until the cheese and the potatoes are slightly golden, about 30 minutes. Remove from oven and serve.
Per Serving: 522 Calories; 31g Fat (53.0% calories from fat); 42g Protein; 18g Carbohydrate; 3g Dietary Fiber; 147mg Cholesterol; 591mg Sodium.
Posted in Brunch, on December 3rd, 2013.
Oh my goodness gracious. Do just those those words give you a clue about how absolutely divine this brunch dish could be? It’s an absolute must-make if you’re into Benedict eggs in general, and if you like avocado and bacon.
This dish does take a bit of time to make. I won’t kid you about that part – you need to roast the bacon in the oven with the brown sugar/chipotle topping. It isn’t difficult, but just a bit tedious and time consuming. But remember, this is an extra-special brunch dish. Maybe you can enlist the help of someone else to help you with part of it? The English muffins need to be toasted at the last minute, although I suppose you could do it half an hour ahead and then reheat them in the oven briefly. Just don’t let them get hard or dried out! The tomatoes are easy enough to get sliced ahead of time. The Hollandaise is easy enough to make – hopefully you’ve made it before so you know how the drill goes with that. The difference here is that the mashed avocado goes into the Hollandaise sauce at the last minute. You can very gently and quickly reheat the mixture before serving, but the sauce has to be made at the last minute.
And then there’s the eggs, of course. If you haven’t ever made poached eggs, maybe you should practice once or twice. They’re not difficult, really, although some people do have trouble with the egg white spreading everywhere, so it wouldn’t hurt to try it for a time or two. I learned at a cooking class some years ago about putting the egg into a Pyrex glass cup and gently lowering the cup and egg into the simmering water and tipping it out with your fingers holding the opposite edge. Very simple. The egg stayed together without wisps of white spidering in all directions.
Have everything all warm and then pile it all together – English muffin, tomato slice, bacon, egg and avocado Hollandaise on top. And some cilantro sprinkled on the top if you remember! Then dig in. You won’t believe how good this is. Thanks to Phillis Carey for this recipe.
What’s GOOD: everything single, solitary mouthful is good and if you weigh effort against taste, taste will win, but it takes some effort to put it all together. Worth it, though.
What’s NOT: really nothing except for the time required to make it all. Not a good brunch dish if you’re in a hurry!
printer-friendly CutePDF
MasterCook 5+ file and MasterCook 14 file
* Exported from MasterCook *
California Benedict with Chipotle Spiced Bacon, Tomato and Avocado Hollandaise
Recipe By: Phillis Carey cooking class, Sept. 2013
Serving Size: 4 (2 per person)
BACON:
8 pieces thick-sliced bacon — cut in half (across)
1/2 cup brown sugar
1/2 teaspoon chipotle chile powder
EGGS:
1 tablespoon vinegar
8 large eggs
4 whole English muffins — halved
2 tablespoons unsalted butter
4 slices fresh tomato
2 tablespoons fresh cilantro — minced (for garnish)
AVOCADO HOLLANDAISE:
3 large egg yolks — at room temperature
3 tablespoons fresh lemon juice
1/2 cup unsalted butter — melted (hot)
1 whole avocado — peeled & diced
Notes: Each person might be happy with just one of these, not two, especially if you’re serving anything else like fruit or breads, coffee, champagne. Hungry men and boys probably would be happy to eat two of them.
1. BACON: Preheat oven to 400°. Line a large baking sheet with parchment paper and set a rack in the pan; arrange bacon slices on the rack. In a small bowl combine the brown sugar and chipotle chile powder. Spread this mixture over the top of each bacon slice, covering all the surface with some of the mixture. Bake for 15-25 minutes or until the bacon is crispy and golden brown. Remove and set aside.
2. HOLLANDAISE: Heat at least 3 inches of water in the bottom of a double boiler to a low simmer. In the top of the double boiler whisk egg yolks and lemon juice together, then place on top of the simmering water in the lower pan. Whisk constantly, add the hot, melted butter in a slow, steady stream. As the sauce thickens, you may add the butter a bit faster.
3. AVOCADO: Place diced avocado in a strainer and rinse under cold tap water. Drain and transfer it to al food processor (or you may use a fork or potato masher in a bowl). When the Hollandaise sauce is finished, whiz up the avocado and gently add to the Hollandaise sauce. If the mixture is too cool, you can gently reheat the sauce (don’t COOK it, just reheat it). Season with salt and pepper to taste.
4. ENGLISH MUFFINS: Toast the muffin halves and lightly spread with soft butter.
5. EGGS: Fill a medium saucepan with about 2-3 inches of water. Add vinegar and bring mixture to a simmer. Crack an egg into the simmering water, holding the egg right above the water and letting it slide into the water. (Alternately, crack each egg into a small heatproof dish and gently lower one side of the dish into the water as you tip the egg out into the water.) Cook eggs for 3-4 minutes or until the egg white is set but yolk is not still wobbly. Remove the eggs to a paper-towel lined pan or dish. (You may also cook the eggs ahead of time, remove to a paper towel lined pan and when you’re ready to serve, slip the eggs back into the simmering water for about 30 seconds to reheat them.)
6. TO SERVE: Place warmed English muffins on each plate (2 per person is specified; 1 muffin may be enough for some people). Place a tomato slice on each one, then the bacon (reheat it very briefly in the microwave or in the oven), the poached egg, then spoon Hollandaise sauce over each one and garnish with cilantro.
Per Serving (this makes 2 per person, which might be too much food!): 906 Calories; 64g Fat (62.9% calories from fat); 29g Protein; 56g Carbohydrate; 4g Dietary Fiber; 683mg Cholesterol; 845mg Sodium.
Posted in Breads, on December 1st, 2013.
So, is it a bread or a cake? It has the tenderness of a cake, but it’s baked in a bread pan and it’s sliced like a quick bread, but truly, it could be either.
Being a fan of ginger anyway, when I saw this recipe at Marie Raynor’s recipe blog, The English Kitchen, I knew I’d need to make it. Only trouble was, the recipe called for “stem ginger in syrup.” Hmmm. I knew what it was (fresh ginger in a thick sugar syrup), but was fairly certain I’ve never seen it here in the U.S. I did find it online at amazon.com – Stem Ginger in Syrup, but since it’s a heavy jarred product, I didn’t want to pay the hefty shipping. Stem ginger is just ginger that’s been sliced or cubed and cooked in a thick syrup until it’s tender.
What to do? Well, make your own, silly! It couldn’t be that hard, right? It wasn’t. So, I’m including 2 recipes below – one for the cake/bread and one for the ginger in syrup. If you happen to live in a part of the world where you can buy stem ginger in syrup, go for it. Otherwise, buy a big bunch of fresh ginger and make it yourself a day or so ahead.
So first, the ginger: buy very fresh ginger – or go to a market where you think you’ll get younger ginger (some Asian markets actually sell a very young white ginger) peel it, cut into small chunks, combine it with a simple syrup and cook for awhile (about 45 minutes I’d say). Taste the ginger to make sure it’s soft enough. When I did, after about 30 minutes, it definitely was not softened enough, so I cooked it more than an hour, I think. And the syrup reduced down quite a bit too. After cooling in the pan, I poured it into a glass jar and let it rest in the refrigerator.
Since I made the ginger a few weeks ago it was just sitting in the refrigerator, and in that time the ginger began to crystallize, so I had little sugar crystals all over the ginger pieces. It didn’t make any difference since it was going to be baked anyway. I minced up the ginger into very fine little pieces and cut up the prunes too (not quite so small – each prune about 5 pieces)
The recipe also calls for muscovado sugar. I did find some of that, but the day I was going to bake this cake, I took it out and discovered that the sugar was as hard as a rock. The suggestion on the box was to place it in a bowl and cover it overnight with a very damp towel, and by morning it would be soft. I didn’t have time to do that, so I just substituted dark brown sugar. The recipe also calls for a common British ingredient – golden syrup. There, in Britain, you’d buy Lyle’s brand, and I’ve purchased it here at some specialty stores. If you don’t have it, use dark corn syrup instead.
The bread/cake is quite simple to mix up – like most batters. The prunes and ginger (with some of the syrup clinging to the pieces) were added in at the last and gently stirred to combine. The recipe suggested using parchment in the pan, but I have one of those wonderful new ridged pans that just doesn’t seem to need that kind of coaching. The top of the bread (right out of the oven) is brushed with the ginger syrup and sprinkled with turbinado/raw sugar. The bread came out of the pan perfectly – after I’d let it rest for about an hour. I did try to slice it within a couple of hours, and decided that was a bad idea – the cake was just too tender at that point. Once it sat overnight wrapped in plastic wrap, it sliced beautifully and I served it to my DH’s men’s bible study guys.
What’s GOOD: gee, the interesting taste – the little tiny nibs of crystallized ginger are barely noticeable (you can see one sticking up in the cut slice above) but the ginger flavor is just right. The prunes add lovely color and rich flavor. Altogether delicious. And yes, I’d make it again. The recipe makes just one medium sized height loaf and you’ll find that it’ll disappear fast. Because the cake is so tender, you’ll need to cut larger slices than in a quick bread kind. And make it the day before you need it as it needs the overnight resting time. Marie says this isn’t the prettiest of cakes, but I wasn’t put off by its appearance at all. The center sunk a bit, so when I brushed on the syrup on top some of it pooled in the crease – so it made the very center a little wet with syrup. The recipe is a keeper.
What’s NOT: nothing other than the nuisance of having to make your own stem ginger in syrup. I have enough to make another loaf, though, which will be nice.
Cake printer-friendly CutePDF
Cake Files: MasterCook 5+ and MasterCook 14 (click link to open file in MC – 14 includes photo)
* Exported from MasterCook *
Sticky Stem Ginger & Prune Cake
Recipe By: The English Kitchen blog (Marie Raynor)
Serving Size: 10
170 grams self-rising flour — (1 1/2 cups) sifted together with ginger
1 tablespoons ground ginger
120 grams unsalted butter — softened (8 1/2 T)
120 grams muscovado sugar — (9 1/2 T packed), or dark brown sugar
1/4 cup Lyle’s golden syrup — (if you can’t find it use dark corn syrup)
2 large eggs — beaten
100 grams stem ginger in syrup — finely chopped (about 1/2 cup or so)
100 grams prunes — finely chopped (about 2/3 cup loosely packed)
TOPPING:
2 tablespoons syrup from the jar of stem ginger
2 tablespoons turbinado sugar
Optional: if you like nuts, add some chopped walnuts or pecans to the batter – about 1/2 cup
1. Preheat the oven to 350*F/180°C. Butter a medium sized loaf tin (about 8 1/2 inches by 4) and line it with baking paper. Set aside.
2. Cream the butter and sugar together until light and fluffy. Beat in the golden syrup. Add the beaten eggs a bit at a time, whisking until thoroughly combined. Whisk in the flour/ginger mixture. Stir in the prunes and chopped stem ginger. Spread the batter into the prepared loaf tin, smoothing over the top. Bake in the preheated oven for 40 to 50 minutes, until the top springs back when lightly touched and a toothpick inserted in the centre comes out clean. Or use an instant read thermometer and remove when it reaches 200-205°F.
3. Remove from the oven. Immediately brush the top with the stem ginger syrup allowing it to asorb completely (any excess will pool in the center crease – try not to let that happen). Sprinkle with the demerara sugar and allow to cool completely in the pan. Wrap in plastic wrap overnight – will make for easier slicing. As this makes a very tender cake, cut into thicker-than-usual slices to serve.
Per Serving: 291 Calories; 11g Fat (33.0% calories from fat); 3g Protein; 47g Carbohydrate; 1g Dietary Fiber; 69mg Cholesterol; 251mg Sodium.
Ginger only printer-friendly CutePDF
Ginger only files: MasterCook 5+ and MasterCook 14 (click to open & add to MC – 14 includes photo)
* Exported from MasterCook *
Stem Ginger in Syrup
Serving Size: 12
1 cup fresh ginger — peeled, then cut into 1 inch pieces (see note #1)
2 cups sugar
2 cups water
1. Pour sugar and water in a saucepan and bring to a simmer. When the sugar dissolves, add the peeled ginger pieces. [My advice: use more ginger than you think – there’s ample fluid to prepare more than a cup.]
2. Simmer for approximately 25-45 minutes until the ginger is tender (taste it to make certain). You want the syrup to penetrate the ginger’s fiber. If the syrup seems too thin, remove cooked ginger and gently simmer the syrup until it’s reached the thicker consistency you prefer. Let cool and store the ginger and syrup together in a jar and refrigerate. After a few weeks the ginger will develop sugar crystals; that’s not a problem if you’re using the ginger in baking. The syrup makes a very nice glaze for a bread or cake – don’t use too much as it will make the cake or bread soggy. The syrup will have a very nice mild heat to it – can be used in other things like mixed drinks or lemonade.
Per Serving: 135 Calories; trace Fat (0.4% calories from fat); trace Protein; 35g Carbohydrate; trace Dietary Fiber; 0mg Cholesterol; 3mg Sodium.

Leave a Comment!