Get new posts by email:

Archives

Currently Reading

Here are the tastingspoons players. I’m in the middle (Carolyn). Daughter Sara on the right, and daughter-in-law Karen on the left. I started the blog in 2007, as a way to share recipes with my family. I’m still doing 99% of the blogging and holding out hope that these two lovely and excellent cooks will participate. They both lead very busy lives, so we’ll see.

– – – – – – – – – – – – – – – – – – – – – –

BOOK READING (from Carolyn):

Music of Bees, Eileen Garvin. Absolutely charming book about a woman in midlife, lonely, who raises bees, also makes unlikely friends. Heart-warming and very interesting about beekeeping.

A Postcard from Paris, Alex Brown. Really cute story. Dual time line, 1940s and present day about renovating an old apartment in Paris, things discovered.

Time of the Child, Niall Williams. Oh such a good book. Very small village in Ireland, 1960s. A baby is left on the doorstep. The town all whispers and helps. I listened to an interview of the author, which made me like him and his books even more.

Sipsworth, Simon Van Booy. If you like animals you’ll swoon. An old woman who really wants to die finds a tiny mouse in her house and befriends it and finds a reason to live. Utterly charming book.

The Forger’s Spell, Edward Dolnick. True story. For seven years a no-account painter named Han van Meegeren managed to pass off his paintings as those of Johannes Vermeer.

If You Lived Here, You’d be Home by Now, Christopher Ingraham. Could hardly put it down – about a journalist who takes on a challenge to move to small town in Minnesota and write about it. He expects to hate it and the people and place, but he doesn’t. Absolutely wonderful true story.

The River We Remember, William Kent Kreuger. 1950s, Minnesota. A murder and the aftermath. Could hardly put it down. Kreuger has such a vivid imagination and writing style.

How the Lights Gets In, Joyce Maynard. An older woman returns to New Hampshire to help care for her brain-injured son. Siblings and family, lots of angst and resentments.

The Filling Station, Vanessa Miller. Every American should read this book. A novelized retelling of the Tulsa massacre in 1921. Absolutely riveting.

The Story She Left Behind, Patti Callahan Henry. Love this author. Based on a true story. A famous author simply vanishes, leaving her husband and daughter behind. She had invented a mystical language no one could translate. Present day, someone thinks he’s solved the riddle, contacts the family. Really interesting read.

The Girl from Berlin, Ronald Balson. Love anything about Tuscany. An elderly woman is being evicted from a villa there, with odd deed provenance. Two young folks go there to help unravel the mystery. Loved it.

The Island of the Colorblind, Oliver Sacks, M.D. Nonfiction. The dr is intrigued by a remote Pacific island where most of the inhabitants are colorblind. He also unravels a mystery on Guam of people born with a strange neurological problem. Medical mysteries unveiled. Very interesting.

The Bookbinder, Pip Williams. Post 1914 London. Two sisters work at a bookbindery. They’re told to not read the books. One does and one doesn’t. One has visions beyond her narrow world; the other does not. Eventually the one gets into Oxford. Lovely story.

The Paris Express, Emma Donoghue. 1895 on a train to Paris, a disaster happens. You’ll delve into the lives of many people who survived and died in the crash.

A Race to the Bottom of Crazy, Richard Grant. This is about Arizona. Author, wife and child move back to Arizona where they once lived. Part memoir, research, and reporting in a quest to understand what makes Arizona such a confounding and irresistible place.

The Scarlet Thread, Francine Rivers. A woman’s life turned upside down when she discovers the handcrafted quilt and journal of her ancestor Mary Kathryn McMurray, a young woman who was uprooted from her home only to endure harsh frontier conditions on the Oregon Trail.

A Place to Hide, Ronald Balson. 1939 Amsterdam, an ambassador has the ability to save the lives of many Jewish children. Heartwarming.

Homeseeking, Karissa Chen. Two young Chinese teens are deeply in love, but in China. Then their families are separated. Jump to current day and the two meet again in Los Angeles.

North River, Pete Hammill. He always writes such a good story. A doctor works diligently healing people from all walks of life. His wife and daughter left him years before. One day his 3-yr old grandson arrives on his doorstep.

A Very Typical Family, Sierra Godfrey. A very messed-up family. Three adult children are given a home in Santa Cruz, Calif, but only if the siblings meet up and live in the house together. A very untypical scenario but makes for lots of messes.

Three Days in June, Anne Tyler. The usual Anne Tyler grit. Family angst. This wasn’t one of my favorites, but it was entertaining and very short.

Saved, Benjamin Hall. Author is a veteran war reporter. Ukraine, 2022, he nearly loses his life to a Russian strike. Riveting story – he survives, barely.

Grey Wolf, Louise Penny. Another Inspector Gamache mystery in Quebec. She is such an incredible mystery writer.

All the Colors of the Dark, Chris Whitaker. A missing person mystery, a serial killer thriller, a love story, a unique twist on each. Could hardly put it down.

Orbital, Samantha Harvey. Winner of 2024 Booker Prize. I don’t usually like those, but I heard the author interviewed and she hooked me. This is not a normal book with a beginning, a story and an end. It’s several chapters of the day in the life of various astronauts at the ISS (Int’l Space Station). All fictional. She’s been praised by several real astronauts for “getting it” about space station everyday life.

The Blue Hour, Paula Hawkins. An island off Scotland. Inaccessible except when the tide is out. Weird goings on. An artist. A present day mystery too.

Iron Lake, William Kent Krueger. A judge is murdered and a boy is missing. Riveting mystery.

Tell the Wolves I’m Home, Carol Ricks Brunt. 1980s. A 14-yr old girl loses her beloved uncle. Yet a new friendship arises, someone she never knew about.

Four Treasures of the Sky, Jenny Zhang. 1880s, a young girl is kidnapped in China and brought to the United States. She survives with many hurdles in the path.

The Boy Who Fell out of the Sky, Ken Dornstein. Memoir, 1988. The author’s brother died in the PanAm flight that went down in Lockerbie, Scotland. A decade later he tries to solve “the riddle of his older brother’s life.”

Worse Care Scenario, T.J. Newman. Oh my. Interesting analysis of what could/might happen if a jet crashed into a nuclear plant. Un-put-downable.

Song of the Lark, Willa Cather. Complicated weave of a story about a young woman in about 1900, who has a gifted voice (singing) and about her journey to success, not without its ups and downs.

Crow Talk, Eileen Garvin. Charming story which takes place at a remote lake in Washington State, about a few people who inhabit it, the friendships made, but also revolving around the rescue of a baby crow.

The Story Collector, Evie Woods. Sweet story about some dark secrets from an area in Ireland, a bit magical, faerie life, but solving a mystery too.

A Sea of Unspoken Things, Adrienne Young. A woman investigates her twin brother’s mysterious death. She goes to a small town in California to figure it out, to figure HIM out.

The King’s Messenger, Susanna Kearsley. 1600s England, King James. About one of his trusted “messengers,” and his relationship with a young woman also of “the court.” Lots of intrigue.

In the Shadow of the Greenbrier, Emily Matchar. Interesting mystery in/around the area of the famous resort in White Sulphur Springs, West Virginia.

Isola, Allegra Goodman. Hard to describe, survival story on an island in the 1600s.

Save the Date, Allison Raskin. Rom-com, witty, LOL funny. Clever.

The Sirens, Emilia Hart. Numerous time-lines, Australia. Mysteries abound, nightmares, abandoned baby, weird allergies.

Red Clay, Charles Fancher. LOVED this book. Mostly post-Civil War story about the lives of slaves in Alabama during Reconstruction.

Stars in an Italian Sky, Jill Santopolo. Dual time line, 1946 and recent time. Love stories and a mystery.

Battle Mountain, C.J. Box. Another one of Box’s riveting mysteries. Love his descriptions of the land.

Something Beautiful Happened, Yvette Corporon. A memoir of sorts in Greece, tiny island of Erikousa, where the locals hid Jews during WWII. All elusive stories told by the author’s grandmother.

The Jackal’s Mistress, Chris Bohjalian. 1860s Virginia, about a woman who saves the life of a Union soldier. Really good story.

Song of the Magpie, Louise Mayberry. Really interesting story about Australia back in the days when it was mostly a penal colony. Gritty strength of a woman trying to thrive with her farm.

The Boomerang, Robert Bailey. A thriller that will have you gripping the book. About a lot of secrets surrounding the president (fictional novel, remember) and his chief of staff and about cancer. A cure. Such a good story.

Care and Feeding, Laurie Woolever. Really interesting memoir of a woman driven to succeed in the restaurant business. She worked for Mario Batali and then Anthony Bourdain. Gritty stories.

Everything is Tuberculosis, John Green. Maybe not a book for everyone. A real deep dive into the deadly tuberculosis infection, its history. I heard the author interviewed and found the book very interesting.

The Book Lovers Library, Madeline Martin. Fascinating read about Boots’ drug stores’ lending library. And the people who worked in them.

The Arrivals, Meg Mitchell Moore. LOL funny, about a middle-aged couple whose children (and their various family members) return to the family home and the chaos that ensues.

My Life as a Silent Movie, Jesse Lee Kercheval. About grief. A big move to Paris, finding herself a new life with a new set of real blood family.

Escape, Carolyn Jessop. Another memoir about a woman really in bondage in Utah, Mormon plural marriage.


Tasting Spoons

My blog's namesake - small, old and some very dented engraved silver plated tea spoons that belonged to my mother-in-law, and I use them to taste my food as I'm cooking.

Scroll down to the bottom to view my Blogroll

Posted in Soups, on August 18th, 2011.

avocado_corn_chowder_chilled

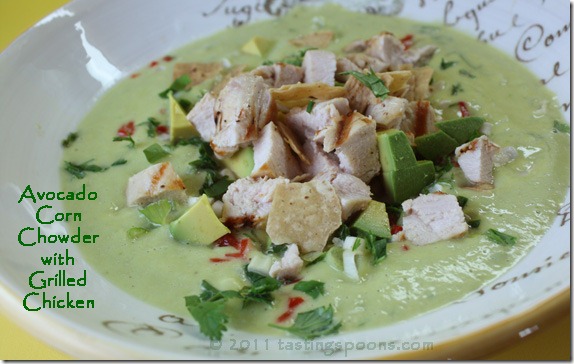
Oh my goodness, was this good. Like liquid guacamole, in a way. Liquid avocado, piquant with lemon juice and a little honey. Crunchy with the bell peppers, green onions, corn and tortilla chips (my addition) and some freshly grilled chicken.

The recipe came from the August, 2011 issue of Cooking Light. Our daughter-in-law’s sister Janice emailed me to tell me how good this was and sent a scan of the page from the magazine. Since I had two avocados in the refrigerator, ready to be used, this was perfect. It’s a Mark Bittman recipe – he’s one good cook!

His rendition of this serves 4 people. If this were a prelude to a meal, or you were serving it with other things (I really don’t know what you’d serve with it, other than some kind of toasted bread), you could make this serve 4. But, as a full meal, it’s about right for 2, which is what I did. We had it for dinner. For 2 of us I used one ear of corn, less red bell pepper, one green onion and two very small chicken breasts.

As I was about to make the soup part, I went back to look at the recipe – as I stood over the blender with the water, lemon juice and honey in it, adding in the avocado cubes. My thought was that one avocado and 1 1/2 cups of water was going to make green water. I thought I must have missed something in the ingredient list. Surely that’s not the right amount? It was. It’s perfectly thick enough for a soup – trust me on this one. The recipe indicated just stirring in all the raw veggies (red bell peppers, corn, green onions) but I wanted it to be on top (like the photo shows in the magazine) so I added in those things as a topping instead. I forgot about the added lime wedge, but I didn’t miss it.

On the website several people commented about the use of orange juice (instead of lemon juice as I’ve done) – several thought it was too sweet. I’d think the same thing, so I’d definitely make it with lemon juice. But I did use Meyer lemons – they’re sweeter than regular lemons – so if you use regular ones, you might need to add just a smidgin more honey. Taste it and see. I barely added any salt and pepper – suit  your own taste.

This recipe is a keeper. If you’re fortunate enough to have an avocado tree, you’ll be in luck with this rendition. Do try it.

What I liked: just everything – the coolness, the avocado flavor, the fresh veggies on top, the piquant taste of the soup with the lemon juice. Everything could be made ahead except for the chopped avocado that goes on top – even grilling the chicken. Also really liked the silky texture.

What I didn’t like: nada, nothing. Will make this again for sure.

printer-friendly PDF
MasterCook 5+ import file (click to run MC, or right click to save file)

Avocado-Corn Chowder with Grilled Chicken

Recipe By: Mark Bittman, Cooking Light, 8/2011
Serving Size: 4
NOTES: I eliminated the red chili flakes (didn’t think it needed it). For an entree soup, this will serve two people – if this is the case, you may use just half of the remaining avocado, corn from one ear, a few T. of red bell pepper, one onion or two at most. I added the tortilla chips (not in the original recipe). We had two small chicken breasts (4 ounces each) and each ate one, cubed.

2 whole avocados — ripe, divided use
1 1/2 cups water — (yes, that’s the correct amount of water)
1/2 cup fresh lemon juice — Meyer lemons, or orange juice
1 teaspoon honey — more if using regular lemons
1 teaspoon kosher salt — divided
1/2 teaspoon freshly ground black pepper — divided
1/4 teaspoon red chili flakes — optional
12 ounces boneless skinless chicken breast halves
1 teaspoon olive oil
1 small garlic clove — cut in half
1 cup fresh corn kernels — about 3 ears
1/2 cup chopped red bell pepper
2 tablespoons chopped green onions
1/4 cup chopped fresh cilantro
4 pieces lime wedges
1/4 cup tortilla chips — crushed

1. Peel and coarsely chop 1 avocado; place in a blender. Add water, lemon (or orange) juice, honey, 3/4 teaspoon salt, 1/4 teaspoon black pepper, and red pepper, if desired; blend until smooth. Place in freezer to chill while chicken cooks. Or chill in refrigerator for an hour or two.
2. Heat a grill pan over medium-high heat. Brush chicken with oil; sprinkle with remaining 1/4 teaspoon salt and 1/4 teaspoon black pepper. Place chicken in pan; cook 4 minutes on each side or until done. Remove chicken from pan; rub chicken with cut sides of garlic halves. Let chicken stand 10 minutes; cut or shred into bite-sized pieces.
3. Peel and dice remaining avocado. Pour soup into wide soup bowls and sprinkle on top the diced avocado, corn, bell pepper, and onions into chilled avocado puree. Spoon chowder into bowls; top with chicken, tortilla chips and cilantro. Serve with lime wedges if desired.
Per Serving: 402 Calories; 22g Fat (46.1% calories from fat); 24g Protein; 33g Carbohydrate; 5g Dietary Fiber; 49mg Cholesterol; 620mg Sodium.

Posted in Soups, on August 16th, 2011.

carrot_cauliflower_soup

With both cauliflower and carrots in my refrigerator, when I saw this soup prepared over at the TV Food Network, I decided I really needed to make it. Melissa D’Arabian made it sound so good. A friend of hers had served something similar and Melissa worked on the recipe to make it her own. This is a very healthy dish.

Onion is sautéed in olive oil, then you add chopped carrots and chopped-up cauliflower, along with a few red pepper flakes, some lemon zest, ground cumin (one of my favorite spices), a slug of chicken stock, and you let that simmer for about 30-40 minutes until the veggies are tender. I let it sit for awhile to cool down (using my blender with hot food is not one of my favorite things to do). It did take a couple of batches to do it all (actually I made a double batch, using up all of my cauliflower, so it took 3 batches in the blender to puree it all).

After the soup has chilled, add in some yogurt, pour out into serving bowls and top with more salt and pepper, if desired, a large dollop of yogurt, some minced onion, and I added some cilantro just to make it look pretty. It’s delicious. Solid and substantial, but since it’s chilled, it’s very smooth going down.

What I liked: the smooth texture, the coolness of it on a warm, summer evening, the fact that it’s a very healthy soup, can be made ahead. Also loved the cumin in it – if there is a secret ingredient, that’s it. I really liked the silkiness of the added yogurt. It tamed some of the red pepper heat. I couldn’t pick out the flavor from the lemon zest, but am certain it added something.

What I didn’t like: the recipe calls for too much red pepper flakes. I think it needs no more than a pinch, so I’ve changed the below recipe to that effect. A small pinch, if there is such a thing. Since it simmers for awhile, those red chile flakes just permeate the entire pot.

printer-friendly PDF
MasterCook 5+ import file (click to run MC or right click to save file)

Chilled Carrot and Cauliflower Soup

Recipe By: Melissa d’Arabian, Food Network, 7/2011
Serving Size: 4
NOTES: Melissa’s original recipe called for a lot more red pepper flakes. It was too much, so it’s reduced in this recipe. I used Greek yogurt. And I added in the minced cilantro.

1 tablespoon olive oil
1 whole yellow onion — chopped
5 medium carrots — peeled and coarsely chopped
1/2 head cauliflower — cut into florets
1 pinch red pepper flakes (small pinch)
2 teaspoons lemon zest
1 teaspoon ground cumin — or more to taste
2 cups low-sodium chicken stock — or vegetable stock
3/4 cup plain yogurt — divided use
Kosher salt and freshly ground black pepper
1 green onion — finely chopped
2 tablespoons fresh cilantro — minced

1. Heat the oil in large pot over medium heat. Add the onions and cook until tender, about 5 minutes. Add the carrots, cauliflower, red pepper flakes, lemon zest, cumin, stock, and 2 cups water and bring to a boil. Cover and simmer over low heat until the carrots are very tender, about 30 to 40 minutes.
2. Let the soup cool slightly, and then puree in blender (or use stick blender) in small batches until smooth. Pour the soup into a large bowl and whisk in 1/2 cup of the yogurt. Taste and season with salt and pepper. Chill the soup in the refrigerator for at least 2 hours up to 24 hours. Serve the soup in individual bowls with dollops of remaining yogurt, and some chopped green onion and cilantro.
Per Serving: 125 Calories; 5g Fat (38.5% calories from fat); 4g Protein; 15g Carbohydrate; 4g Dietary Fiber; 6mg Cholesterol; 59mg Sodium.

Posted in Chicken, Grilling, on August 14th, 2011.

grilled_chicken_belize_bbq_sauce

My DH said to me as I came home from a morning out, “Kerry’s wife is out of town, so I invited him over for dinner; hope that was okay!” Well, sure, it was, but I needed to scramble to figure out what to make. I defrosted chicken breasts and made a quick grocery list. DH went shopping for that as well as for all the food we’ll need this weekend for family coming to visit. I’m preparing all new stuff for that, with only one recipe I’ve ever made before, and it’s not on the blog. So a bunch of new recipes to come.

Digging through my files I came across one from a cooking class I took eons (like 20 years) ago, taught by Alan Greeley, a well-known chef/owner of The Golden Truffle. An institution in our part of the world. For whatever reason, we rarely go there. It’s a distance to drive (30 minutes), but their food is good, so don’t know why it’s not on our go-out-to-dinner radar.

First I found a quinoa recipe that sounded good, and to me, the grilled chicken was perfect to serve with it. The quinoa salad had a slightly Asian twist to it (recipe to come), so this chicken rendition, which also contained a squirt of soy sauce, was a perfect accompaniment. The chicken didn’t quite get to marinate the full 5 hours (recipe said up to 5 hours), but it got about 2 hours, and I used my handy-dandy vacuum container to help the chicken absorb some of it.

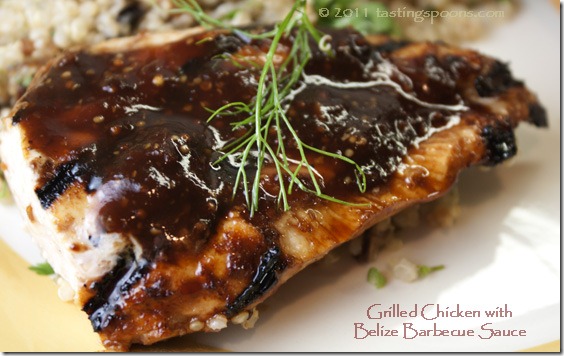
The sauce has a myriad of ingredients – jarred chile sauce, fresh lemon and lime juices, brown sugar, soy, garlic, coarse ground mustard, salt, Worcestershire, chipotle chile and balsamic vinegar. And you know that if a sauce like this has sugar in it, (there’s sugar in bottled chile sauce too) it will tend to burn and/or stick to the grill. Cooking at a lower heat is your secret to success. The sauce is piquant (one of my favorite words when something is both sweet and sour), which comes from the sugar and the citrus juices. The original recipe also called for the zest and juice of an orange, but I didn’t use that part. What makes this recipe Belizean is probably the use of the fresh citrus juices and the chipotle chile. The original recipe also called for some habanero, but I thought it was hot enough with just the chipotle. You can add a jalapeno chile if you’d like – mince it up and add at the beginning. What’s probably not Belizean is balsamic vinegar. But hey, it’s one of those great umami tastes, so why not?

Save a little bit of the barbecue sauce just after you make it, as it tastes good as a dollop on top of the chicken when it’s served. Do not serve any of the sauce that has been in contact with the raw chicken! Salmonella fast track there!

Grill the chicken as you normally would – don’t overcook it – the chicken breasts I used were relatively thin and didn’t need pounding, and they cooked through in about 3 minutes per side. Then I put a spoonful of the sauce on top and served it. I happened to have some fennel fronds on my chopping board (that went in the quinoa salad) so I put that on top. Cilantro would be the more obvious choice if you have it. I have leftover sauce (I made the full recipe, but only marinated 3 chicken breasts) so will make this again in the next week or so and try grilling the chicken on the outdoor grill; we’ll see how that works.

What I liked: how easy it was to make the sauce (simmered for about 20 minutes). It’s a different kind of sauce – not your typical barbecue sauce – much of the flavor comes from the jarred chile sauce, a tomato-based one. Tasting the sauce by itself it’s hard to pick out what is in it. It was great – not necessarily the most flavorful I’ve ever made, but it was very good.

What I didn’t like: how quickly you can burn the chicken (because of the sugar in the sauce), so do use a low temp.

printer-friendly PDF
MasterCook 5+ import file (click to run, right click to save file)

Grilled Chicken Breasts with Belize Barbecue Sauce

Recipe By: Adapted from a cooking class at The Golden Truffle,
Costa Mesa, California (about 1985)
Serving Size: 8
NOTES: If you happen to have an orange on hand, you can zest it and add the juice to the sauce.

8 boneless skinless chicken breast halves
minced cilantro or chopped fennel fronds for garnish

BBQ SAUCE:
3/4 cup chili sauce — jarred
1/4 cup fresh lemon juice
2 tablespoons fresh lime juice
1 tablespoon light brown sugar
2 tablespoons soy sauce
1 large garlic clove — crushed
2 teaspoons chipotle chile canned in adobo
2 tablespoons coarse grain mustard
1/2 teaspoon salt
2 tablespoons Worcestershire sauce
2 tablespoons balsamic vinegar

1. Combine the BBQ sauce ingredients in a small saucepan. Bring to a simmer and cook for about 20 minutes. Stir frequently and don’t allow it to burn.
2. Remove from heat and allow to cool to room temperature.
3. Pound the chicken breasts to an even thickness between two pieces of plastic wrap.
4. Combine in a plastic bag about 3/4 of the batch of sauce. Add chicken and squish it around so all sides of the chicken breasts are covered in sauce. Refrigerate up to 5 hours.
5. Heat an indoor stovetop grill to medium heat. Slather some vegetable oil on the grill (or you may barbecue the chicken on an outdoor grill if you’d prefer) and add the chicken breasts. Turn to grill on both sides and cook for about 2-4 minutes per side, or until chicken is tender and no longer pink inside. Test the chicken – cut into a thick part and make sure it’s just cooked through. Serve chicken with the remaining sauce on the side so each serving has a bit more. Sprinkle top with some minced cilantro or fennel fronds, if desired.
Per Serving: 152 Calories; 2g Fat (10.9% calories from fat); 28g Protein; 5g Carbohydrate; 1g Dietary Fiber; 68mg Cholesterol; 565mg Sodium.

Posted in Salads, on August 14th, 2011.

heirloom-tomato-salad-goat-cheese

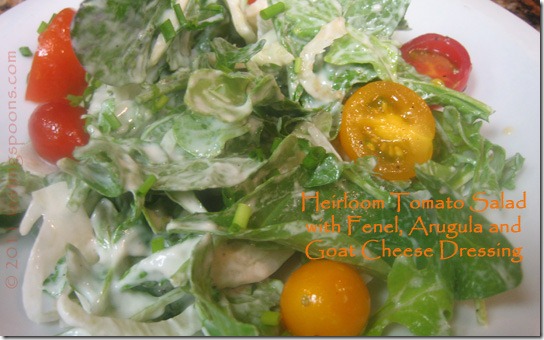
The other day I was archiving my photos (I’ve finally developed a system for saving my food photos on CDs) and when I got to this one I was puzzled. I didn’t remember posting it. Sure enough, I hadn’t. It was from a cooking class with Phillis Carey. A class from several months ago, actually. And I’d written EXC on the recipe (meaning excellent) and a note saying “dressing is really good.” So, there you have my few-word synopsis of this recipe.

It starts, though, with some really good heirloom tomatoes. This one calls for cherry tomatoes, but if you don’t have those, regular sized will do. Try to buy the multi-colored cherry tomatoes if you can – the salad is ever-so pretty that way. You also need some soft goat cheese, a little bit of buttermilk, arugula and fennel. If you have all that (as well as usual kitchen staples like olive oil, lemons, mayo and chives) then you’re in business.

You could also make this an entrée type salad – just add some nice, big, plump shrimp on top. If you can’t find arugula, you can use baby spinach or watercress too.

Picnik collage

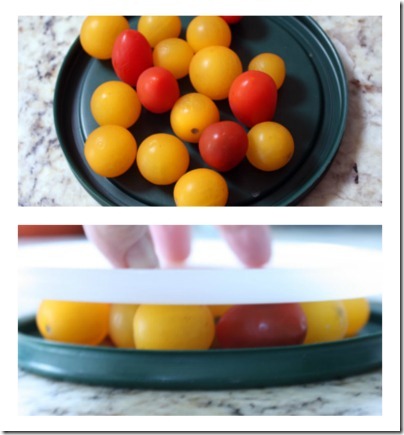
Phillis showed us a really clever trick

So, here you have a simple collection of cherry tomatoes. I’ve put them on a Tupperware lid. To keep them contained, it’s good to have a short lip on the lid.

In the below picture, I’ve placed a second lid, the white one, turned upside down on top of the cherry tomatoes. So you see there’s a little “window” in the middle.  In the bottom photo you can see the edge a bit better on the bottom lid.

I took my long serrated-edged knife, and holding the lid (and the tomatoes) fairly firmly in place, I sawed back and forth until I’d cut all the cherry tomatoes in half. A whole bunch of them in one fell swoop. If you have all one type, they’ll all get cut the same. If you’re really a – – l retentive, you’ll very carefully place each tomato with the stem end up. I didn’t bother. The idea came from one of the chefs at Great News, the cooking school I go to more often than not. It was Phillis’ class, but the chef-helper knew of this great trick. It’s a good one.

What I liked: the dressing. For me, salads are almost always about the dressings anyway. But when you have superior ingredients (like arugula, for instance, which I just love) and fennel (another veggie I really love), then it’s a salad marriage made in heaven. This isn’t a tart, vinegary kind of dressing (the only acid comes from a bit of lemon juice), but more creamy type from the soft goat cheese.

What I didn’t like: nothing, really. Be sure to toss the salad just before serving because the dressing will wilt the greens soon. That’s why arugula is used, because it can stand up to that kind of a creamy dressing. The dressing also doesn’t keep too long, so use it up in a day or two if you can.

printer-friendly PDF
MasterCook 5+ import file (double click to open, or right click to save file)

Heirloom Cherry Tomato, Fennel & Arugula Salad with Goat Cheese Dressing

Recipe By: Phillis Carey, 2011
Serving Size: 4
NOTES: You probably will not use all the dressing. You can also make this an entree type salad by adding large cooked shrimp on top.

2 ounces goat cheese — soft type, room temperature (or you can use sheep’s feta)
1/3 cup buttermilk
2 tablespoons extra virgin olive oil
1 tablespoon mayonnaise
1 tablespoon fresh lemon juice
salt and pepper to taste
1 pinch red pepper flakes
SALAD:
salt and freshly ground black pepper to taste
4 ounces baby arugula — or regular arugula (or baby spinach or watercress)
2 small fennel bulbs
1 pinch cherry tomatoes — heirloom type, halved
1 teaspoon extra virgin olive oil
2 tablespoons fresh chives

1. DRESSING: Combine in food processor the goat cheese, buttermilk, olive oil, mayo and lemon juice and process until smooth. Season to taste with salt and pepper.
2. SALAD: Place arugula in a large bowl. Using a mandoline or vegetable peeler, shave fennel over the arugula. Toss with just enough dressing to coat the greens, then season with salt and pepper. Divide among 4 salad plates, mounding slightly.
3. Toss the heirloom tomatoes with the teaspoon of olive oil, salt and pepper, then scatter on top of the salads. Sprinkle chives on top and serve. Pass additional dressing at the table.
Per Serving (assumes you eat all the dressing): 209 Calories; 16g Fat (67.4% calories from fat); 7g Protein; 11g Carbohydrate; 4g Dietary Fiber; 17mg Cholesterol; 156mg Sodium.

Two years ago: Tiramisu (an America’s Test Kitchen recipe, my favorite)
Three years ago: Zucchini Pancakes (a delish dinner side dish)

Posted in Beef, easy, on August 12th, 2011.

weeknight_bolognese

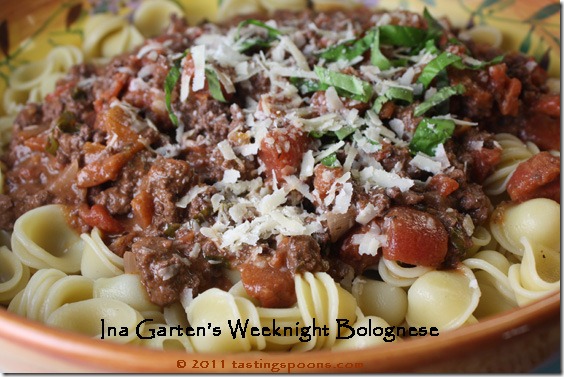
Am sure I’ve mentioned before that I Tivo all of Ina Garten’s new episodes. And even though it’s summertime and the weather is warm and muggy, when I watched Ina make this easy-easy Bolognese sauce, I was hooked. I went online to download the recipe and noted a few comments from others who had made it (suggesting cooking a little longer than the 10+ minutes and reducing the salt). So I added a quarter of an onion to the sauce (sautéing it first), greatly reduced the salt in the sauce, and I also added a little dollop of beef soup base (my Penzey’s favorite flavor enhancer) to the sauce also.

Using orecchiette pasta was different – usually I opt for linguine – but I’m very glad I used the orecchiette because it did exactly what Ina said – it provided little “cups” to hold sauce. The only other unusual thing in this is 1/4 cup of heavy cream. What a great idea – and wow, did it ever add a delicious richness to the sauce. She also has you add 1/4 cup of the red wine toward the end – it does simmer off the alcohol in the 10 minute cooking then – but she said it added lots of good flavor. Some sliced basil was added in at the end also. Oregano and a pinch of red chile flakes are all the herbs that flavor the dish.

My DH loved it. I mean, he nearly licked the bowl. He raved about it. And raved about it. I thought it was delicious. And I mentioned above how EASY it is. If you don’t want to, or can’t add wine, use good, flavorful beef stock instead. I’m looking forward to the leftovers, for sure.

What I liked: how easy it was to make, beginning to end about 45 minutes; liked the added flavor from the heavy cream – it’s just 4 T. of it; really liked the orecchiette pasta too – would definitely do that again. It should freeze well, too. Next time I’ll make a double batch and freeze half.

What I didn’t like: nothing at all. Would and will make it again, sooner rather than later.

printer-friendly PDF
MasterCook 5+ import file

Weeknight Bolognese from Ina Garten

Recipe By: Adapted from Ina Garten, 2011
Serving Size: 5
Serving Ideas: Ina recommended orrechiette because the little cups hold some of the sauce in each bite.
NOTES: If you can’t buy San Marzano type tomatoes (there is a brand called San Marzano, but they’re not really San Marzano tomatoes), use other brands, but add in about 1/2 tsp of sugar to the sauce. I also added about 1/2 tsp. of beef concentrate (from Penzey’s) just for extra flavor. I also let it simmer for about 30 minutes – longer at least than the recipe indicated.

2 tablespoons olive oil — plus extra to cook the pasta
1/2 cup yellow onion, chopped
1 pound lean ground beef — sirloin, if possible
4 teaspoons minced garlic — (about 4 cloves)
1 tablespoon dried oregano
1/4 teaspoon crushed red pepper flakes
1 1/4 cups dry red wine — divided
28 ounces crushed tomatoes — preferably San Marzano
2 tablespoons tomato paste
Kosher salt and freshly ground black pepper
3/4 pound pasta — such as orecchiette or small shells
1/4 teaspoon ground nutmeg
1/4 cup fresh basil leaves — lightly packed, chopped
1/4 cup heavy cream
1/2 cup Parmesan cheese — freshly grated, plus extra for serving

1. Heat 2 tablespoons of olive oil in a large (12-inch) skillet over medium-high heat. Add the onion and saute for about 5 minutes, then add ground sirloin and cook, crumbling the meat with a wooden spoon, for 5 to 7 minutes, until the meat has lost its pink color and has started to brown. Stir in the garlic, oregano, and red pepper flakes and cook for 1 more minute. Pour 1 cup of the wine into the skillet and stir to scrape up any browned bits. Add the tomatoes, tomato paste, 1 teaspoon salt, and 1 1/2 teaspoons pepper, stirring until combined. Bring to a boil, lower the heat, and simmer for 20 minutes.
2. Meanwhile, bring a large pot of water to a boil, add a teaspoon of salt, a splash of oil, and the pasta, and cook according to the directions on the box.
3. While the pasta cooks, finish the sauce. Add the nutmeg, basil, cream, and the remaining 1/4 cup wine to the sauce and simmer for 8 to 10 minutes (or up to 20 if you think it needs it), stirring occasionally until thickened. When the pasta is cooked, drain and pour into a large serving bowl. Add the sauce and 1/2 cup Parmesan and toss well. Serve hot with Parmesan and more basil on top.
Per Serving: 729 Calories; 33g Fat (42.4% calories from fat); 32g Protein; 68g Carbohydrate; 6g Dietary Fiber; 91mg Cholesterol; 521mg Sodium.

Two years ago: Red Pepper and Walnut Spread, with pita bread
Four years ago: Chicken Bamako (very easy baked chicken breast and bacon dish)

Posted in Uncategorized, Veggies/sides, on August 11th, 2011.

hatchchiles

Do you know about Hatch chiles? I didn’t, really, until some years ago when I visited Santa Fe, New Mexico, and learned about this unique variety of chiles, grown only in the hills and plains in New Mexico, from an area in and around the town of Hatch. It’s a hybrid, developed in 1912 by a local farmer who combined some of his favorite chiles and created the Hatch. They’ve become a huge success, a favored chile by most everyone who lives in New Mexico. Santa Fe even has an annual chile fest over Labor Day weekend that’s all about the Hatch chile. People drive from all around, to buy them – when the chileheads have big roasting baskets so you buy them already roasted. They’re a mild chile, about 1,000 to 2,500 on the scale. Less hot on the scoville scale than a jalapeno chile which is about 5,000 scoville units.

You have an opportunity, if you live in L.A. or Orange County, to buy some fresh or roasted Hatch chiles. This is a first – I’ve never been able to buy Hatch chiles here in California. Freida’s Produce has hooked up with Ralph’s grocery stores to sponsor some chile-roasting events this month.

If I’ve read the information correctly, you have to buy 10 pounds or 30 pounds of Hatch chiles (raw) and they’ll roast them at no charge. Or you can buy a smaller quantity, but then you’ll need to roast them yourself. People from Freida’s will be available at these events to discuss the chiles, recipes and helpful hints about handling and preparation. We’re going to go to the local one closest to us, so I’ll tell you all about it.

This Saturday, August 13, 2011, 10-4 or until they run out: Ralphs Costa Mesa, 380 E. 17th St. and Ralphs La Canada, 521 W. Foothill Blvd.

Next Saturday, August 20th, 2011, 10-4 or until they run out: Ralphs Los Angeles, 11727 Olympic Blvd and Ralphs Huntington Beach, 5241 Warner

And the following Saturday, August 27th, 10-4 or until they run out: Ralphs Tustin, 13321 Jamboree Rd and Ralphs Pasadena, 3601 E Foothill Blvd

New Mexico had a tough growing season this year, so prices are probably up (according to some info I read online). This venture won’t be cheap, but so far I have two friends who will share the bounty with me. It should be fun watching them being roasted.

Here’s a link to Freida’s Hatch site, with info and recipes.

Posted in Utensils, on August 10th, 2011.

bob_kramer

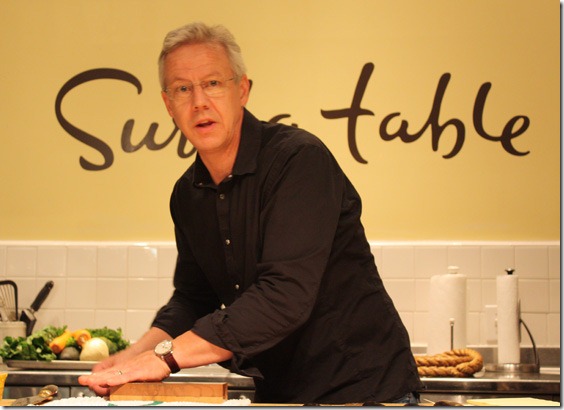
Until a few months ago I’d never heard of Bob Kramer. First I read about him in one of my cooking magazines. And then I noticed he was teaching a class at Sur la Table. My DH is the one who carves meat and sharpens the knives most of the time. Though, I’m the one who bought the Furi knives a few years ago – stainless steel ones – and also purchased a knife sharpening system from Furi too. Those I use in my everyday cooking. But we – neither one of us – seem to have perfected the sharpening process very well. Some months ago Dave spent an hour or more with all the equipment out on the kitchen counter trying to get a good edge on my most favored knives. Unsuccessfully.

So, when I saw the Bob Kramer knife and sharpening class at Sur la Table, I signed us up for it. This was not a cheap expedition, I’ll tell you. The class was $100 apiece, so we decided to make that our birthday presents to each other.

Also, I’ll tell you that I have lots of knives in my kitchen. Years and years ago (this would have been the early 1970’s) I’d acquired a full set of Cutco stainless steel knives. They’re very good knives, and they’ve been a sturdy go-to group all these years. I have nearly every knife they make. Once you have Cutco knives, you can send them back to the factory to be re-sharpened (no charge except for the shipping to them). But it takes a couple of weeks to get them back. A nuisance, for sure. I try to remember to do it when we’re about to leave on a vacation. That way I won’t miss them so much! In the meantime, though, I mentioned above, I bought a couple of Furi knives too – the Santoku style. And those have been my day to day knives for mincing and chopping.

This Bob Kramer class, though, was fascinating. I was riveted to his every word (he’s a great story-teller) as he shared his life history and how he came to be a knife maker. A custom knife maker. But he also (now) has contracted with Henckels to make a specialized line of knives, using his lifetime knowledge of how to construct a knife (including the forging aspect of it) and sells them at Sur la Table. Some years ago he even spent time at a steel forge so he would really understand the composition of steel and the process of hand forging. He came to the conclusion after years of work that carbon steel is the only way to go to make a knife and keep it sharp.

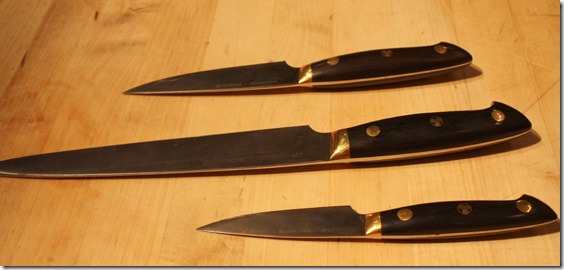
bob_kramer_knivesHe didn’t disparage stainless knives at all; he just doesn’t use them. He finds them much harder to hone an edge, and the edge doesn’t hold as long as knives made with carbon steel. The only problem is that carbon steel will stain and discolor. He suggested that whenever you’re using a carbon steel knife keep a dry cloth next to your cutting board and use it frequently to keep the knife dry. Even water will stain a carbon steel.

Kramer also sells a line of stones (sharpening stones). His are water stones (not oil, as some are), and you can buy several types. We bought one. I learned a lot about stones during the class. I remember watching my dad sharpen knives for my mother when I was a child. He’d spit on the stone and use the same round motion Bob Kramer uses. The trick is the angle. We learned that most knife sharpening units (the free standing types you pull a knife through) are set to sharpen at about 20° tilt. He recommended about 12-15°. He also explained that to get an edge you need to exert about 4-6 pounds of pressure on the knife. How do you know? Simple! Get out your kitchen scale, set a soft surface on it (like a towel), zero out the weight, then press the knife blade onto the scale until you reach 4-6 pounds. It’s a whole lot more pressure than you think. It’s clear to me that whenever I’ve sharpened knives before I’ve never exerted enough pressure on the blade.

He also talked about testing the burr. That’s the little tiny edge (bend) that develops from using your knives on a hard surface (cutting boards). The chopping motion eventually curls the edge over slightly. And as long as there’s a burr, you’ll never get the knife sharp. I knew that part – from another class I took some years ago, and at that time I bought a Chantry which I’ve used with regularity ever since. Successfully. But now that I know more about better sharpening methods (using the water stone) I’ll probably retire my Chantry.

In the process of sharpening he tested each blade periodically – he did the magazine test, he calls it – you take a page out of a magazine, or a piece of newsprint and cut with the knife. If it doesn’t slice right through it, it’s not sharp enough. Back to the stone it went. And he tested it at several places on the knife edge – you want that sharpness the full length of the blade. If you use a larger, longer knife for chopping, and you  use the pivot method (leaving the knife point down, just picking up the back end and moving it over to continue chopping) or something close to it, you know that the bulk of the cutting action is done toward the rear – nearer the handle end of the blade. And all the way to the rear end of it too.

In demonstrating the sharpening process (with the wet stone he’d soaked in water for about 20 minutes), after he’d finished sharpening each knife, he took them a couple of feet away where he had taped down a regular, ordinary piece of cardboard. Probably about 6 x 14 inches long, approximately. He gently massaged the knife on the cardboard – just like he was honing with the stone. That smooths out the edge. Cleans it, too, of any steel shavings. Then he wiped it very clean with a cloth. All of his knives are stored with a knife guard too. Good thing since they were razor sharp when he got done! You can buy those at Sur la Table also.

The knives he manufactures have a few unique characteristics. All things he learned over the years of professional cooking he did, and during the years he ran a knife sharpening business (mostly for restaurant chefs) in Seattle (he doesn’t have time for that anymore). He makes all of his knives with wider blades, because he (like most cooks) uses the flat side of the blade to carry mounds of food to a bowl or cooktop. He also rounds the top of the blade (the non-cutting edge) because he learned that most professional chefs develop a mean callus from constant pressure on that part of the blade. Made sense to me! He also constructs a heftier handle. He does make custom knives (now he does an auction on his website for them – you don’t even want to know how much they sell for – but they’re stunningly beautiful) and makes different shapes of handles with different woods. This line of knives at Sur la Table, though, all have the black handles as you’ll see in the photo above.

imageThere were lots of questions at the end, which he was happy to answer. One was meaningful to me – he recommended using an end grain wood cutting board.  Here’s a photo of the Boos brand available at Williams-Sonoma, although you can find them at numerous kitchenware stores.  You can tell they’re an end grain because it has a checkerboard look to it – each square is an end cut of wood. The point is that chopping is what’s hard on a knife, obviously. An end-grain board is softer because the knife blade will be cushioned slightly by the grain itself. He also said that bamboo boards are inherently soft, so they’re okay too. He particularly discouraged us from using the type of boards I use all the time – I have several of them, the Epicurean line (I bought them because they have a very tight grain, they’re actually some kind of wood composite, can go in the dishwasher and supposedly inhibit bacteria growth). Unfortunately, for just those reasons, the surface is extremely hard, so it’s hard on knives. I don’t own an end grain board, so guess that will need to be added to my wish list in the future.

My DH had said before we went to the class, that he thought we should buy one of the knives. We did. I’d really liked to have purchased two of them, but they’re pricey. Beyond pricey, so one will be fine for now. If you want to learn more about his sharpening techniques, he has videos with better explanations than I’ve given you. Click on over to the sharpening page on his website for that.

If you have a Sur la Table store near you, you might look to see if Bob Kramer is teaching there. I’d definitely recommend the class. You’re going to want to buy one of his knives, though, so take your checkbook or credit card!

Two years ago: Sizzling Rib Eyes with Red Pepper Sauce
Four years ago: Goat Cheese Chive Muffins

Posted in Miscellaneous, on August 8th, 2011.

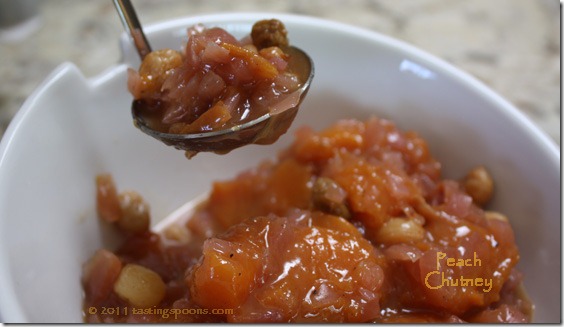
peach_chutney

With a glut of fresh peaches on my kitchen counter, and having made a couple of peach desserts already, I decided to make a chutney that I’d serve with a grilled pork roast dinner we were going to have a few nights later. It used up 3 of the 8 peaches, 2 onions and a few raisins. The rest of the ingredients are normal kitchen shelf staples.

Finding the “right” recipe was the trick. I went to my favorite resource – Eat Your Books – that online listing I’ve made of most of my cookbooks. It told me to look in about a dozen of them. I discarded a few and was surprised to find this one in my cookbook, The Thrill of the Grill. It’s an old cookbook of mine (published in 1990) but one I turn to often when I’m going to barbecue.

peach-chutney-cookingI chose this particular chutney version because it wasn’t loaded with spices or herbs. The pork roast I was making was covered in herbs and I didn’t want the chutney to take away anything from the grilled pork.

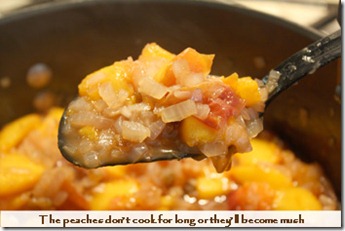
The chutney itself is very easy to make. Onions are cooked, peaches are added, some salt and pepper, brown sugar and molasses plus some vinegar and lemon juice and it stews away for a short time. You don’t want to overcook this as the peaches would turn to mush, but cook just enough to soften the peaches. Raisins are added (I only had golden) and it was done. I chilled it for a couple of days, although you could use it immediately, I’m sure.

If you have some peaches you need to use – make this and freeze it for a later date. I’m going to need to do that with what I have remaining – even after a dinner for 6, I still have about 2 cups left. It may not get used in time, so freezing is a good option. It will keep for about 6 weeks, according to the recipe.

printer-friendly PDF
MasterCook 5+ import file

Georgia Peach Chutney

Recipe By: From The Thrill of the Grill (cookbook), 1990
Serving Size: 24
Serving Ideas: Goes really well with pork – and works particularly well with anything grilled. Would go well with grilled chicken or fish too.

2 large yellow onions — diced small
2 tablespoons vegetable oil
4 whole peaches — pitted, sliced or chunked
4 tablespoons brown sugar — packed
4 tablespoons sugar — [or Splenda]
1 tablespoon molasses
1/4 cup raisins — golden or dark
1 teaspoon salt
1/2 teaspoon freshly ground black pepper
1/2 cup white vinegar — divided use
2 tablespoons lemon juice

1. In a saucepan over medium heat, saute the onion in the oil until transparent, about 5-7 minutes. Do not brown.
2. Add the peaches, stir and cook gently for about 4 minutes.
3. Add all the remaining ingredients except 1/4 cup of the vinegar and the lemon juice. Simmer, uncovered, over low heat for about an hour, stirring occasionally. Be careful the mixture does not burn – if it starts to dry – add a small amount of water to prevent the mixture from burning.
4. Remove from heat and add the lemon juice and remaining vinegar. The chutney will have the texture of thick, chunky applesauce, and thinner than bottled chutneys. Serve at room temp. It will keep, refrigerated, for about 6 weeks.
Per Serving: 42 Calories; 1g Fat (23.4% calories from fat); trace Protein; 8g Carbohydrate; 1g Dietary Fiber; 0mg Cholesterol; 90mg Sodium.

Two years ago: Cocoa Crème Fraiche Cupcakes
Three years ago: Wellesley Chocolate Chip Cookies
Four years ago: Spinach Salad with Mango

Posted in Brunch, Chicken, on August 6th, 2011.

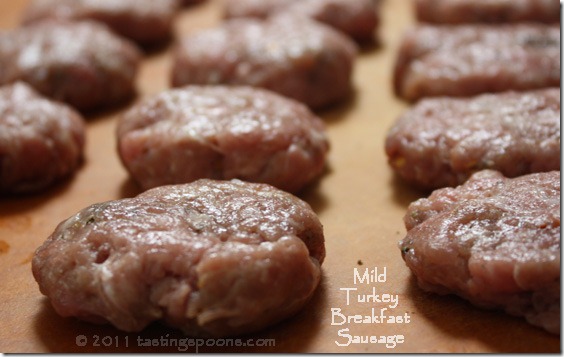
mild_turkey_breakfast_sausage

Periodically I mix up a batch of turkey sausage – the breakfast sausage type. When I want to feel a bit more virtuous. When I want to watch calories and fat. Usually I freeze them, 4 little patties to a package wrapped in plastic wrap, with plastic in between the layers. Will I say they taste just like pork sausage? Well no, they don’t. But they’re good enough, and certainly better for us. My DH and I have one little patty each with our breakfast of yogurt and fruit and a half a piece of whole grain toast.

They’re really simple to make – it’s just some fresh ground turkey (do use some dark meat otherwise the sausage will be very, very dry) – and add in the herbs. A couple of years ago I posted a recipe for some very spicy turkey breakfast sausages. They’re really highly seasoned with not only herbs but a lot of heat-spice too. These are different – they’re quite mild – similar to the kind of spice you’d find in store-bought pork breakfast sausage. My friend Sue made these for us when we visited her recently. A friend of hers had given her the recipe. It’s a good one.

My only advice is that when you sprinkle in the herbs, sprinkle them all over the meat. Turkey meat is harder to mix up (like when you’re making meatloaf with ground beef) and you may end up with one part of the meat with all the herbs. Form into patties and fry up them or freeze as I mentioned above. The photo at top is the raw patties.

What I liked: that it’s turkey, not pork; that it’s lower in fat; and the mild seasonings in it.

What I didn’t like: nothing really. Just know that it’s not trying to substitute for pork.

printer-friendly PDF
MasterCook 5+ import file

Mild Turkey Breakfast Sausage

Recipe By: From my friend Sue, from a friend of hers
Serving Size: 12-15

1 pound lean ground turkey
1 teaspoon dried sage
1 teaspoon salt
1/2 teaspoon freshly ground black pepper
1/8 teaspoon dried marjoram
1 pinch red pepper flakes
1 pinch ground cloves

1. Place turkey in a mixing bowl. As you add the seasonings, sprinkle them all over the meat, which makes it easier to distribute it when you mix it in.
2. As gently as possible mix in the herbs and form into about 12-15 small patties.
3. Fry them up immediately or wrap in plastic wrap and freeze. When frying them, add just a little jot of canola oil to the pan and cook them over medium to medium-low heat, mostly covered. Cooking over high heat will make them dry and tough.
Per Serving: 44 Calories; 2g Fat (43.6% calories from fat); 6g Protein; trace Carbohydrate; trace Dietary Fiber; 20mg Cholesterol; 164mg Sodium.

Two years ago: Plums – everything you want to know about them
Three years ago: Summer Shrimp Salad
Four years ago: Green Beans with Shallots and Balsamic Vinegar

Posted in Lamb, on August 4th, 2011.

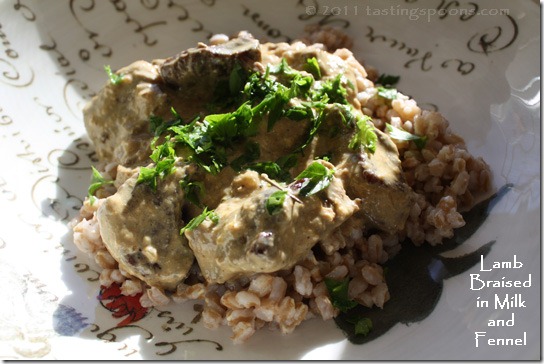
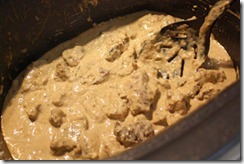
lamb in milk fennel

As usual, it’s difficult photographing brown food. It was dinnertime with waning sunlight coming in through the kitchen window, so I finally took the bowl there and snapped this photo. It doesn’t begin to do justice to the dish. It’s hard to see the meat – I did prop up one piece (at 11:00 in the photo) so you could at least see a piece of the meat that wasn’t completely enveloped in the milky sauce. But with the shadow, it’s hard to tell, isn’t it?

It’s not really the season for stews and braises, but I had a 2 1/2 pound chunk of leg of lamb in the freezer that needed to be used. We’ve agreed to buy 1/4 of a Berkshire pig this summer, through our friend who has 4H boys and girls using her farm pens. So I need to make room in the garage freezer. I have some room, but perhaps not enough, so I need to get busy using up some of the larger type pieces in there.

Actually I have a 6 pound pork roast in there and it needs to be used too. Soon, since the Berkshire pig will go to slaughter this next week. They’ll deliver it probably at the end of next week (I’m writing this a couple of weeks ago . . .).

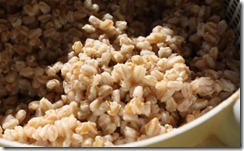
lamb_milk_braisingfarro_cookedAnyway, back to lamb here. I’d copied off a recipe over at Simply Recipes a couple of years ago. Elise said it was based on a Mario Batali recipe, and she raved about it. Indeed, this dish IS really delicious. For a summer evening, it was coolish as we sat outside having dinner, so it ended up being a great night for a lamb stew. I made farro also, which Elise recommended. All I did to that was add in salt and some broth (rather than straight water) to the cooking water. The lamb I made according to the recipe with no variations. It’s quite simple – I actually made it in my crockpot, but am not sure I’d do that again – FYI: 6 hours on low was too long. So, just use the recipe below. The use of milk (and a little bit of cream) makes a fantastic creamy sauce to go with the lamb, and gives it lots of luscious stuff to go along with the farro too. Kind of like mashed potatoes and a milky chicken gravy, except this was farro and lamb.

lamb_braise_ingredients

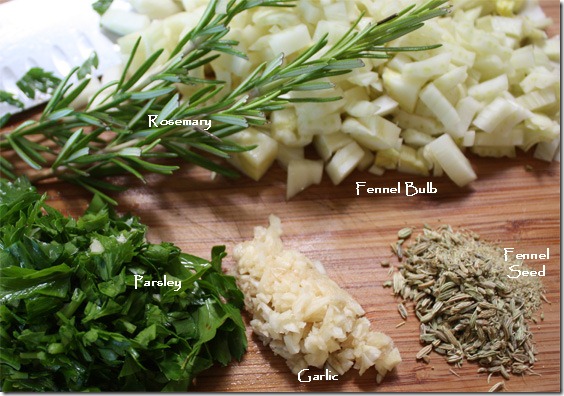
The lamb cubes need to be browned sufficiently to generate some good flavor, then everything is put together for the braise. After the meat is done, remove it and boil down the juices. They’ll look kind of awful – most things made with milk will separate – but boil it down anyway, then puree in a blender to smooth it out. Add back into the pot with the lamb and heat through. And serve!

printer-friendly PDF
MasterCook 5+ import file

Lamb Braised in Milk with Fennel

Recipe By: Simply Recipes blog (adapted from a Mario Batali recipe)
Serving Size: 6
NOTES: The farro will make enough to serve 6 people, maybe with a little bit left over. Farro is a type of wheat. Substitute brown rice if you can’t find the farro.

1/4 cup olive oil
2 1/2 pounds lamb shoulder — boneless, trimmed and cut into 2-inch pieces
Salt and pepper
1 fennel bulb — diced
2 garlic cloves — minced
1/2 cup Italian parsley — finely chopped
1 teaspoon fennel seeds — crushed (use mortar and pestle, or chop finely with a chef’s knife)
2 cups milk
1/2 cup heavy cream
1 sprig rosemary
2 cups farro, dry — or substitute brown rice
Salt

1 In a large (5 to 6 quart) thick-bottomed Dutch oven, heat 2 Tbsp of olive oil on medium high. Pat dry the lamb pieces. Season well with salt and pepper. Working in batches, place lamb pieces in the pan (do not crowd). Do not stir. Turn only once a side has browned. Brown all sides. Remove from pan and set aside.
2 Reduce heat in pan to medium. Add remaining 2 Tbsp olive oil. Add the diced fennel and cook a few minutes until softened, scraping up any browned bits from the pan. Add the garlic, parsley, crushed fennel seeds.
3 Add the meat back into the pot. Add the milk and cream. Bring to a simmer. Reduce heat to low, add the sprig of rosemary, cover. Cook for 1 1/2 to 2 hours until meat is tender.
4 While the lamb is cooking, prepare the farro (or brown rice). The farro will take about 45 minutes to cook, after which it can be kept warm, so time accordingly. Rinse farro through a sieve until the water runs clear. Add it to a large, thick-bottomed saucepan. Cover with about two inches of water and add about a tablespoon of salt. Bring to a boil. Reduce the heat to a low simmer, partially cover and let cook for 45 minutes or until tender. Drain of excess water and set aside until you are ready to use it.
5 Once the lamb is tender, remove the pieces from the pot and set aside. Discard the rosemary. Bring the milk cream sauce to a boil over high heat and reduce to about 2 cups. Working in batches, purée in a blender (or with an immersion blender) until smooth. (When puréeing hot liquids in a blender it’s best to work with relatively small amounts, filling just maybe a quarter of the blender. Otherwise the pressure can blow the top off the blender and make a hot mess.) Return the sauce and the lamb to the pot and if needed heat until warm through. Season to taste with salt and pepper. Before serving, stir in the fresh chopped parsley. Serve the braised lamb over warm farro.
Per Serving: 611 Calories; 51g Fat (75.7% calories from fat); 29g Protein; 8g Carbohydrate; 2g Dietary Fiber; 146mg Cholesterol; 162mg Sodium.

Three years ago: Vinaigrette
Four years ago: Grandgirl’s Fresh Apple Cake

Related Posts Plugin for WordPress, Blogger...