


Archives
Recent Posts
Currently Reading

Here are the tastingspoons players. I’m in the middle (Carolyn). Daughter Sara on the right, and daughter-in-law Karen on the left. I started the blog in 2007, as a way to share recipes with my family. I’m still doing 99% of the blogging and holding out hope that these two lovely and excellent cooks will participate. They both lead very busy lives, so we’ll see.
– – – – – – – – – – – – – – – – – – – – – –
BOOK READING (from Carolyn):
Music of Bees, Eileen Garvin. Absolutely charming book about a woman in midlife, lonely, who raises bees, also makes unlikely friends. Heart-warming and very interesting about beekeeping.
A Postcard from Paris, Alex Brown. Really cute story. Dual time line, 1940s and present day about renovating an old apartment in Paris, things discovered.
Time of the Child, Niall Williams. Oh such a good book. Very small village in Ireland, 1960s. A baby is left on the doorstep. The town all whispers and helps. I listened to an interview of the author, which made me like him and his books even more.
Sipsworth, Simon Van Booy. If you like animals you’ll swoon. An old woman who really wants to die finds a tiny mouse in her house and befriends it and finds a reason to live. Utterly charming book.
The Forger’s Spell, Edward Dolnick. True story. For seven years a no-account painter named Han van Meegeren managed to pass off his paintings as those of Johannes Vermeer.
If You Lived Here, You’d be Home by Now, Christopher Ingraham. Could hardly put it down – about a journalist who takes on a challenge to move to small town in Minnesota and write about it. He expects to hate it and the people and place, but he doesn’t. Absolutely wonderful true story.
The River We Remember, William Kent Kreuger. 1950s, Minnesota. A murder and the aftermath. Could hardly put it down. Kreuger has such a vivid imagination and writing style.
How the Lights Gets In, Joyce Maynard. An older woman returns to New Hampshire to help care for her brain-injured son. Siblings and family, lots of angst and resentments.
The Filling Station, Vanessa Miller. Every American should read this book. A novelized retelling of the Tulsa massacre in 1921. Absolutely riveting.
The Story She Left Behind, Patti Callahan Henry. Love this author. Based on a true story. A famous author simply vanishes, leaving her husband and daughter behind. She had invented a mystical language no one could translate. Present day, someone thinks he’s solved the riddle, contacts the family. Really interesting read.
The Girl from Berlin, Ronald Balson. Love anything about Tuscany. An elderly woman is being evicted from a villa there, with odd deed provenance. Two young folks go there to help unravel the mystery. Loved it.
The Island of the Colorblind, Oliver Sacks, M.D. Nonfiction. The dr is intrigued by a remote Pacific island where most of the inhabitants are colorblind. He also unravels a mystery on Guam of people born with a strange neurological problem. Medical mysteries unveiled. Very interesting.
The Bookbinder, Pip Williams. Post 1914 London. Two sisters work at a bookbindery. They’re told to not read the books. One does and one doesn’t. One has visions beyond her narrow world; the other does not. Eventually the one gets into Oxford. Lovely story.
The Paris Express, Emma Donoghue. 1895 on a train to Paris, a disaster happens. You’ll delve into the lives of many people who survived and died in the crash.
A Race to the Bottom of Crazy, Richard Grant. This is about Arizona. Author, wife and child move back to Arizona where they once lived. Part memoir, research, and reporting in a quest to understand what makes Arizona such a confounding and irresistible place.
The Scarlet Thread, Francine Rivers. A woman’s life turned upside down when she discovers the handcrafted quilt and journal of her ancestor Mary Kathryn McMurray, a young woman who was uprooted from her home only to endure harsh frontier conditions on the Oregon Trail.
A Place to Hide, Ronald Balson. 1939 Amsterdam, an ambassador has the ability to save the lives of many Jewish children. Heartwarming.
Homeseeking, Karissa Chen. Two young Chinese teens are deeply in love, but in China. Then their families are separated. Jump to current day and the two meet again in Los Angeles.
North River, Pete Hammill. He always writes such a good story. A doctor works diligently healing people from all walks of life. His wife and daughter left him years before. One day his 3-yr old grandson arrives on his doorstep.
A Very Typical Family, Sierra Godfrey. A very messed-up family. Three adult children are given a home in Santa Cruz, Calif, but only if the siblings meet up and live in the house together. A very untypical scenario but makes for lots of messes.
Three Days in June, Anne Tyler. The usual Anne Tyler grit. Family angst. This wasn’t one of my favorites, but it was entertaining and very short.
Saved, Benjamin Hall. Author is a veteran war reporter. Ukraine, 2022, he nearly loses his life to a Russian strike. Riveting story – he survives, barely.
Grey Wolf, Louise Penny. Another Inspector Gamache mystery in Quebec. She is such an incredible mystery writer.
All the Colors of the Dark, Chris Whitaker. A missing person mystery, a serial killer thriller, a love story, a unique twist on each. Could hardly put it down.
Orbital, Samantha Harvey. Winner of 2024 Booker Prize. I don’t usually like those, but I heard the author interviewed and she hooked me. This is not a normal book with a beginning, a story and an end. It’s several chapters of the day in the life of various astronauts at the ISS (Int’l Space Station). All fictional. She’s been praised by several real astronauts for “getting it” about space station everyday life.
The Blue Hour, Paula Hawkins. An island off Scotland. Inaccessible except when the tide is out. Weird goings on. An artist. A present day mystery too.
Iron Lake, William Kent Krueger. A judge is murdered and a boy is missing. Riveting mystery.
Tell the Wolves I’m Home, Carol Ricks Brunt. 1980s. A 14-yr old girl loses her beloved uncle. Yet a new friendship arises, someone she never knew about.
Four Treasures of the Sky, Jenny Zhang. 1880s, a young girl is kidnapped in China and brought to the United States. She survives with many hurdles in the path.
The Boy Who Fell out of the Sky, Ken Dornstein. Memoir, 1988. The author’s brother died in the PanAm flight that went down in Lockerbie, Scotland. A decade later he tries to solve “the riddle of his older brother’s life.”
Worse Care Scenario, T.J. Newman. Oh my. Interesting analysis of what could/might happen if a jet crashed into a nuclear plant. Un-put-downable.
Song of the Lark, Willa Cather. Complicated weave of a story about a young woman in about 1900, who has a gifted voice (singing) and about her journey to success, not without its ups and downs.
Crow Talk, Eileen Garvin. Charming story which takes place at a remote lake in Washington State, about a few people who inhabit it, the friendships made, but also revolving around the rescue of a baby crow.
The Story Collector, Evie Woods. Sweet story about some dark secrets from an area in Ireland, a bit magical, faerie life, but solving a mystery too.
A Sea of Unspoken Things, Adrienne Young. A woman investigates her twin brother’s mysterious death. She goes to a small town in California to figure it out, to figure HIM out.
The King’s Messenger, Susanna Kearsley. 1600s England, King James. About one of his trusted “messengers,” and his relationship with a young woman also of “the court.” Lots of intrigue.
In the Shadow of the Greenbrier, Emily Matchar. Interesting mystery in/around the area of the famous resort in White Sulphur Springs, West Virginia.
Isola, Allegra Goodman. Hard to describe, survival story on an island in the 1600s.
Save the Date, Allison Raskin. Rom-com, witty, LOL funny. Clever.
The Sirens, Emilia Hart. Numerous time-lines, Australia. Mysteries abound, nightmares, abandoned baby, weird allergies.
Red Clay, Charles Fancher. LOVED this book. Mostly post-Civil War story about the lives of slaves in Alabama during Reconstruction.
Stars in an Italian Sky, Jill Santopolo. Dual time line, 1946 and recent time. Love stories and a mystery.
Battle Mountain, C.J. Box. Another one of Box’s riveting mysteries. Love his descriptions of the land.
Something Beautiful Happened, Yvette Corporon. A memoir of sorts in Greece, tiny island of Erikousa, where the locals hid Jews during WWII. All elusive stories told by the author’s grandmother.
The Jackal’s Mistress, Chris Bohjalian. 1860s Virginia, about a woman who saves the life of a Union soldier. Really good story.
Song of the Magpie, Louise Mayberry. Really interesting story about Australia back in the days when it was mostly a penal colony. Gritty strength of a woman trying to thrive with her farm.
The Boomerang, Robert Bailey. A thriller that will have you gripping the book. About a lot of secrets surrounding the president (fictional novel, remember) and his chief of staff and about cancer. A cure. Such a good story.
Care and Feeding, Laurie Woolever. Really interesting memoir of a woman driven to succeed in the restaurant business. She worked for Mario Batali and then Anthony Bourdain. Gritty stories.
Everything is Tuberculosis, John Green. Maybe not a book for everyone. A real deep dive into the deadly tuberculosis infection, its history. I heard the author interviewed and found the book very interesting.
The Book Lovers Library, Madeline Martin. Fascinating read about Boots’ drug stores’ lending library. And the people who worked in them.
The Arrivals, Meg Mitchell Moore. LOL funny, about a middle-aged couple whose children (and their various family members) return to the family home and the chaos that ensues.
My Life as a Silent Movie, Jesse Lee Kercheval. About grief. A big move to Paris, finding herself a new life with a new set of real blood family.
Escape, Carolyn Jessop. Another memoir about a woman really in bondage in Utah, Mormon plural marriage.
Tasting Spoons

My blog's namesake - small, old and some very dented engraved silver plated tea spoons that belonged to my mother-in-law, and I use them to taste my food as I'm cooking.
Scroll down to the bottom to view my Blogroll
Posted in Uncategorized, on December 24th, 2012.


Yet another (good) recipe for grilled chicken. Can’t ever have enough. This one is marinated with a variety of things (nothing difficult or odd) and a few tablespoons of Grand Marnier, then it’s grilled. Done. Easy.
Making this chicken was kind of an afterthought. I had decided I was going to make the Summer Grilled Panzanella Salad. But I knew we needed something else with it – some protein. So I opened up one of my favorite cookbooks, Hugh Carpenter’s Hot Barbecue. This recipe popped out at me. Although the orange flavoring didn’t exactly fit with the panzanella bread salad, I decided it was good enough. I had all of the ingredients on hand (goody!) so it was simple to combine the marinade and let it chill out for awhile before grilling.
It was altogether easy to make. The marinade ingredients are combined, divided in half (you marinate the chicken in half and glaze the grilling chicken with the other half and pour any left over marinade on the chicken when it’s served) and then you let the chicken chill for 1-8 hours. The chicken is grilled at a medium heat (350°) for 12 minutes per side, then you just keep grilling it until it reaches 160° on an instant read thermometer. I think it took about 30 minutes altogether. Serve it right away. I’d purchased drumsticks and thighs (you could do breasts, but it will take less time on the grill, and I think I’d turn down the heat a little after the initial grill-mark marking).
What I liked: the marinade gave the chicken a very nice, mellow orange flavor – I liked it. A lot. I’d make it again for sure with no changes to the recipe at all. It’s also EASY.
What I didn’t like: nothing at all.
printer-friendly PDF
MasterCook 5+ import file – right click to save file, run MC, then File|Import
Chicken Grand Marnier
Recipe By: Adapted from Hot Barbecue by Hugh Carpenter and Teri Sandison
Serving Size: 4
1 pound chicken thighs
1 pound chicken drumsticks
MARINADE:
3 tablespoons Grand Marnier — or other orange liqueur
2 tablespoons fresh lime juice
1 1/2 tablespoons low sodium soy sauce
1 1/2 tablespoons honey
1 teaspoon chili garlic sauce
1/2 teaspoon salt
1/2 tablespoon orange zest
2 tablespoons fresh ginger — grated
2 tablespoons fresh basil — chopped
1 whole green onion — chopped
1. MARINADE: Combine ingredients and pour half of it into a zip type plastic bag. Add the chicken pieces to the bag, seal and refrigerate for 1-8 hours. Reserve remaining marinade in refrigerator.
2. Remove chicken from refrigerator at least 30 minutes ahead of grilling.
3. Preheat grill to medium (350°). Cook chicken about 12 minutes per side, and continue to cook until the internal temperature (dark meat) reaches 160°. Use an instant-read thermometer to determine. Use the remaining marinade to brush on the chicken each time you turn the pieces. If any marinade remains, pour it over the chicken when serving.
Per Serving: 387 Calories; 20g Fat (51.1% calories from fat); 31g Protein; 13g Carbohydrate; trace Dietary Fiber; 137mg Cholesterol; 630mg Sodium.


Posted in Uncategorized, on December 22nd, 2012.

These camels were part of a nativity scene from Africa. The animals (instead of cows) included hippos and a lion. They all were made from thin strips of aluminum from soft drink cans, woven into a wire frame. They were absolutely adorable, and I’d have bought one if they’d been for sale.

Posted in Appetizers, on December 22nd, 2012.

Baking Brie in a pastry crust is anything but new – except that this one is made with dried cherries and pecans (or you can use hazelnuts if you like them) and honey. It’s quite easy to make, everything considered, and after baking, it needs to sit out for about 30-40 minutes before you cut into it, so you can bake it before your party and have it come out of the oven half an hour before people arrive.
A few days ago I mentioned that I had a cooking class at my home. There are any number of recipes on my blog from classes with Tarla (just do a search for Tarla and they’ll all come up). Here’s another one – an easy one and very, very festive. Perfect for the holidays. Make this at home up to the point of baking, and take it to someone else’s home and bake it there. It’s just that it MUST sit for 30-40 minutes – if you cut into it sooner the cheese will just ooze out completely. You don’t want that! So just plan ahead.
 The puff pastry you buy ready made (I wouldn’t wish anyone to try to make the stuff – much, much too labor intensive). The Brie you buy in a round and cut off the top crust, then place it on top of the puff pastry. The dried cherries, nuts and honey are mixed together and spread on top of the Brie. Then you fold the edges up over the Brie, brush it with an egg wash, then prick it in a few places to allow the steam to escape, and bake for about 20 minutes. Cool on a rack for the requisite 30-40 minutes, then move to a platter and serve with crackers. If you want, serve this with small plates. Lots of folks won’t want crackers with this – Tarla served it with some – but I preferred just having the Brie and the crust alone. Your choice, of course! You’ll want to eat it up right away – once you cut into it, it cools very fast and it’s not so delicious once it’s at room temp. The best thing would be to cut little wedges and serve them to people right then and there.
What’s good: how easy it is to make – as long as you have all the ingredients – puff pastry thawed, the right size 8-ounce round Brie (our Costco carries them), the dried cherries and nuts. I’m assuming you have honey and an egg for the wash. It’s a very pretty presentation. I love Brie, so it was a no-brainer that I’d like it. The honey adds a different touch. That I liked. Next time I’ll make it with hazelnuts.
What’s not: nothing really – this stuff is good, albeit high in fat & calories!
printer-friendly (Cute PDFWriter) PDF
MasterCook 5+ import file – right click to save file, run MC, then File|Import
* Exported from MasterCook *
Brie en Croute with Dried Cherries, Pecans and Honey
Recipe By: Tarla Fallgatter, cooking instructor and caterer
Serving Size: 8
8 ounces puff pastry (one sheet)
8 ounces Brie — round wheel, top rind removed
2 tablespoons dried cherries
1/4 cup pecans — (or hazelnuts) toasted, coarsely chopped
2 tablespoons honey
1 medium egg — beaten with 1 T. water
Crackers to serve along side (if desired)
1. Preheat oven to 400°. Cover the cherries with very hot tap water and let sit for 2 minutes. Drain and dry cherries on paper towels.
2. On a lightly floured surface, roll the puff pastry to a 14-inch square. Place Brie (with the top rind removed) on top of pastry.
3. In a small bowl mix together the cherries, nuts and honey. Scoop out on top of the Brie.
4. Gently gather the opposite coners of the puff pastry on top of the Brie and make a little “package,” gently pressing the pastry together at the seams.
5. Brush the top with the egg glaze, then poke a few slits in the top with a sharp knife (to allow steam to escape).
6. Bake Brie for about 20 minutes, or until the pastry crust is a golden brown. Remove from oven and remove Brie to a rack.
7. Allow Brie to sit for 30-40 minutes before cutting into it. If you cut it earlier the cheese will melt out of the crust. Serve immediately with crackers, if desired.
Per Serving: 306 Calories; 22g Fat (62.7% calories from fat); 9g Protein; 20g Carbohydrate; 1g Dietary Fiber; 55mg Cholesterol; 258mg Sodium.


Here’s another of those – TRUST ME – recipes. When I tell you these are worth making, please just do it, right? Do you like vivid orange flavors? And chocolate? This positively is a match made in heaven. And they’re super easy too.
Muffin Tips:
(1) don’t over-mix the batter; and (2) bake to 205° internal temp (use a thermometer for that part)
A group of women was coming to my home to attend a cooking class, and each time we meet, the hostess (me this time) provides beverages (hot and cold) and some breakfast sorts of things (croissants maybe, fresh fruit, occasionally champagne) and a bread – perhaps banana bread or muffins. Even cookies. I had nothing particular in mind, but turned to one of my favorite little tiny cookbooks. What I’ve learned over the years is that every recipe in this book, Muffins: Sixty Sweet and Savory Recipes… From Old Favorites to New is reliable. Written by Elizabeth Alston,

Our daughter Sara, and her 15 & 7/8 year old daughter Sabrina
it’s out of print, but you can still find it in a used book store. And if you click on the link there, you’ll find some used copies for a penny (plus shipping, of course). I bought it for myself in 2003, when it was new (along with the companion book about Scones – Biscuits and Scones: 62 Recipes from Breakfast Biscuits to Homey Desserts). I also gave these to my daughter Sara, because she and her daughter love to bake. She was telling me a few weeks ago that it’s her go-to cookbook for anything close to a muffin (there are all kinds from savory to sweet, and biscuits too). What’s good about this one is that every single recipe I’ve ever tried (and Sara says the same thing) has been exceptionally good.
 Looking online to see what other people thought, I found several versions of this recipe, all with a few little changes. Never did find the exact recipe, so I stuck with Alston’s original, using yogurt as the dairy (you can use buttermilk too).
You might be skeptical at the amount of orange zest in the recipe – 12 muffins require the zest from 2 oranges. My oranges were very large, so I probably had more than usual – about nearly 3 tablespoons that I got using the microplane. And it uses 3 ounces of bittersweet chocolate. I rarely use anything but the best chocolate (SharffenBerger in this case), and the bittersweet is worth seeking out. I did NOT use chocolate chips, and I’m glad I didn’t because they’re too sweet and too uniform – it’s nice to have dots of larger pieces of chocolate. You know you’re eating a really good chocolate that way.
 The muffins are standard as far as mixing – cream the butter and sugar, add eggs and beat until light and fluffy. Add the yogurt, orange juice and zest, then the dry ingredients are gently stirred in with the chocolate at the last. There are two secrets to making muffins: (1) don’t over mix the batter – just stir until you don’t see any errant streaks of flour; and (2) bake them to EXACTLY 205°. In my oven that took 18 minutes. I used my fantastic Thermapen thermometer to test them and they were 204.9° exactly. Perfection. I cooled them in the muffin tin for about 10 minutes, then carefully used a plastic knife to release them and let them cool to room temp. And I’m absolutely guilty as heck – I ate one while they were still barely warm. Oh – my – gosh. Was it ever good. Ideally bake them within an hour of serving, when the chocolate is still almost molten, but not quite. As it was, I made them the day before and kept them in a ziploc bag overnight. Reheat them if you’re going to make them ahead – but not for long as they would dry out, I’m sure.
What’s good: oh, the orange flavor and the chocolate. As they say, those are two flavors that are marriage material. Loved the intense orange flavor – much more orange-y than usual in a baked good – but it wasn’t over the top (as in bitter). And the irregular pieces of chocolate were such a sweet surprise as you eat it. Definitely a make-again muffin.
What’s not: absolutely nothing at all.
printer-friendly (Cute PDFWriter) PDF
MasterCook 5+ import file – right click to save file, run MC, then File|Import
* Exported from MasterCook *
Chocolate Orange Muffins
Recipe By: From “Muffins” by Elizabeth Alston (2003)
Serving Size: 12
NOTES: If you use a mini-muffin tin, you’ll get 36.
1 cup sugar — (I used about 7/8 cup)
6 tablespoons unsalted butter — softened
2 large eggs
1/2 cup buttermilk — or plain, unsweetened yogurt
1/4 cup orange juice — freshly squeezed
2 cups all-purpose flour
1 teaspoon baking powder
1/2 teaspoon baking soda
1 tablespoon orange zest — (I used about 2+ T because the oranges were large)
3 ounces semisweet chocolate — chopped in irregular small pieces
1. Preheat oven to 400° (200° C). Lightly grease a 12 cup muffin pan, or line with paper liners. May also use mini-muffin tin (if so, use shorter baking time)
2. In a medium bowl, mix flour, baking powder, and baking soda.
3. In a separate mixing bowl, with an electric mixer, cream together butter and sugar until smooth. Beat in the eggs one at a time and continue mixing until the mixture is light and ribbony. Add orange zest, orange juice, and buttermilk (or yogurt). Use a spoon to add the flour mixture and stir it in just until mixed and there are no streaks of flour. Add the chocolate pieces and stir just until combined. Divide batter into muffin cups.
4. Bake for 15 to 25 minutes in the preheated oven (to an internal temperature of 205°) or until a toothpick inserted into the center of a muffin comes out clean. Let muffins cool in the pan on a wire rack for at least 10 minutes before removing from the pan. (My batch of these took 18 minutes. Do NOT over bake them or they’ll be dry. If making ahead, reheat them gently and for a short time.)
Per Serving: 244 Calories; 9g Fat (32.3% calories from fat); 4g Protein; 38g Carbohydrate; 1g Dietary Fiber; 51mg Cholesterol; 118mg Sodium.

Posted in Uncategorized, on December 19th, 2012.

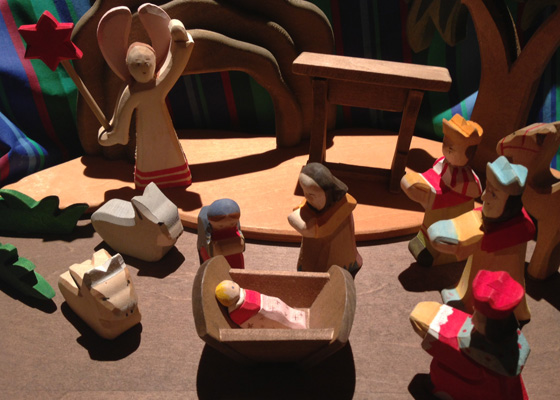
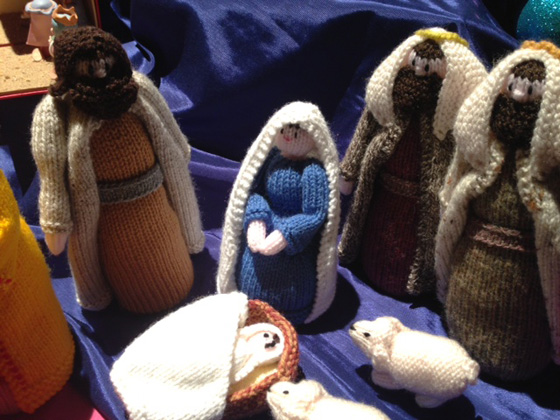
A couple of weeks ago we visited a wonderful exhibit at a Mormon church near us. Every year for a few days they have crèches on display from all over the world (and some lively choirs and vocal ensembles singing in the adjoining auditorium). There must have been 100+ of the crèches. They’re displayed well, on stands, on Christmas themed tables, etc. They take all forms. This one was from Africa, as I recall, and it’s a ceramic teapot (made for the purpose, obviously) with the nativity scene inside. In the next week, each day I’m going to post a photo of one. I took jillions of photos, but the lighting wasn’t the best for iPhone photos. These you’ll see are the better ones.

Posted in Miscellaneous, on December 18th, 2012.

Do you ever wish when you served a simple dinner (like a piece of grilled fish, or a chicken breast) that you had something to put on it, or next to it. Something that would fancy it up a little bit and give the protein some other texture and flavor? Something that you already had on hand – not something you had to make – but could just grab from the refrigerator? This is it. It will keep for at least 6 months in the refrigerator.
Are you like me – on some nights when I make dinner, I just don’t have the energy to create some kind of sauce or relish. I don’t want to make rich, calorie and fat laden sauces all the time. I love-love the Mississippi Comeback Sauce a lot. But it’s composed of mayo – at least half of it is mayo. Not all that healthy. I also love-love the Bell Pepper Relish for Meat too. That one’s not particularly fat-driven, but it’s sweet. Not always the right thing, depending on what kind of meat you serve it with. Oh, and the Siciliana Sauce is also a good one. It’s a tomato-based sauce, also somewhat sweet. And Romesco Sauce too. That one is served with Shrimp in the recipe I have here on my blog, but I always have leftovers and I use it on a bunch of different things. It is mostly composed of bread, peppers and almonds. I think the first time I had that it was with pork. But it would be equally good with chicken too.
What I was doing was catching up on my blog-reading – I probably subscribe via RSS to about 100 blogs. Probably too many, but fortunately they don’t all post every day. If I go a week without looking at them it can take me a couple of hours or more to go through them all. Anyway, I was reading Food52 and the story about this recipe caught my interest. Torrisi’s is a venerable restaurant in New York City. They have a sister restaurant called Parm, too. Anyway, this is a sauce adapted some from Torrisi’s owner and written up in New York Magazine. So this is their authentic sauce. In the story about it that caught my eye – they said somebody had cradled the sauce on the train for an hour or so to bring it in to the Food52 team. That got my attention.
 The write-up suggested that you could throw this together from canned stuff on your pantry shelves. Well, maybe New Yorkers always stock cherry peppers. I don’t, so those had to be purchased (canned). The only problem was, the cherry peppers at our market aren’t hot – they’re peppers, in multi-colors, mostly red, but they’re called “Sweet Cherry Peppers,” although there isn’t any added sugar in it at all. Or heat. So I had to improvise a little bit. I’ll have to look at our local Italian deli and see if they have hot cherry peppers. Anyway, this contains the (hot) cherry peppers, roasted red peppers, a few fresh tomatoes, olive oil, red chili flakes, dried oregano, sugar and salt.
It’s very cinchy easy to make – throw everything in the food processor, whiz, and it’s done. Yea! Pour into a container and chill. Or not if you’re using it immediately. I think it would make a great (and easy) dip to put out with bread. Or sturdy crackers maybe. It’s more liquid-y than I had anticipated from the photo at Food52, but it doesn’t distract from the taste.
Because the cherry peppers were sweet, not hot, I added some Sriracha sauce (or you could add any kind of hot-sauce-heat, like Cholula, Tabasco or whatever). I added about 2 T. of Sriracha for the cup of Spicy Sauce. Add more if you like it hotter. Here are the possibilities for using this: on eggs (fried, scrambled, in a frittata), in sandwiches, with roast pork and potatoes, on stir-friend greens, on brisket, or stirred into soups, stews and pots of beans. I served it with some roast chicken. All of those sound good! It’s also pretty darned good straight out of the container on a spoon!
What’s good: how easy it was to make – pile everything in the food processor and whiz. Done. I’m sure this will keep for weeks – the only “fresh” thing in it was a few cherry tomatoes and those would be mostly “pickled” with all the other ingredients. It should be fine for a long time – the recipe indicates 6 months!
What’s not: it’s a thin sauce (not watery, as there isn’t any in it, but the cherry peppers are brined and did have a bit of liquid). There’s not much of any way to avoid that. Be careful not to over-process it – you don’t want it to be a puree – it needs some substance.
printer-friendly (Cute PDFWriter) PDF
MasterCook 5+ import file – right click to save file, run MC, then File|Import
* Exported from MasterCook *
Torrisi’s Spicy Sauce
Recipe By: A restaurant in NYC, but it was written up on Food52 Serving Size: 16 Description: A spicy sauce that goes with just about everything!
NOTES: This is the house hot sauce at Torrisi and its little sister Parm (New York City), where they mix it with sautéed broccoli rabe and spread it on roast turkey sandwiches. Other places to put it: on eggs, fried, scrambled, fritattaed. On roast pork and potatoes. On stir-fried greens. On banh mi or brisket sandwiches. In soups, stews, and pots of beans. And how about grilled fish and roast chicken?
4 ounces cherry peppers — stemmed, B&G hot, (or other pickled hot peppers)
2 ounces roasted red peppers — (canned, bottled)
2 ounces tomato — crushed
1/4 cup olive oil
1/4 teaspoon red chili flakes
1/4 teaspoon dried oregano
1/4 teaspoon sugar
Salt to taste
Note: if the cherry peppers aren’t HOT, then add Tabasco, Cholula or Sriracha sauce. It needs to be very spicy.
1. Combine all ingredients in a food processor or blender, and mix until slightly smooth.
2. Don’t over-process as you want the mixture to have some texture. Store in refrigerator. Will keep for about 6 months.
Per Serving: 34 Calories; 3g Fat (88.3% calories from fat); trace Protein; 1g Carbohydrate; trace Dietary Fiber; 0mg Cholesterol; 106mg Sodium.


Leave a Comment!