Get new posts by email:

Archives

Currently Reading

Here are the tastingspoons players. I’m in the middle (Carolyn). Daughter Sara on the right, and daughter-in-law Karen on the left. I started the blog in 2007, as a way to share recipes with my family. I’m still doing 99% of the blogging and holding out hope that these two lovely and excellent cooks will participate. They both lead very busy lives, so we’ll see.

– – – – – – – – – – – – – – – – – – – – – –

BOOK READING (from Carolyn):

Music of Bees, Eileen Garvin. Absolutely charming book about a woman in midlife, lonely, who raises bees, also makes unlikely friends. Heart-warming and very interesting about beekeeping.

A Postcard from Paris, Alex Brown. Really cute story. Dual time line, 1940s and present day about renovating an old apartment in Paris, things discovered.

Time of the Child, Niall Williams. Oh such a good book. Very small village in Ireland, 1960s. A baby is left on the doorstep. The town all whispers and helps. I listened to an interview of the author, which made me like him and his books even more.

Sipsworth, Simon Van Booy. If you like animals you’ll swoon. An old woman who really wants to die finds a tiny mouse in her house and befriends it and finds a reason to live. Utterly charming book.

The Forger’s Spell, Edward Dolnick. True story. For seven years a no-account painter named Han van Meegeren managed to pass off his paintings as those of Johannes Vermeer.

If You Lived Here, You’d be Home by Now, Christopher Ingraham. Could hardly put it down – about a journalist who takes on a challenge to move to small town in Minnesota and write about it. He expects to hate it and the people and place, but he doesn’t. Absolutely wonderful true story.

The River We Remember, William Kent Kreuger. 1950s, Minnesota. A murder and the aftermath. Could hardly put it down. Kreuger has such a vivid imagination and writing style.

How the Lights Gets In, Joyce Maynard. An older woman returns to New Hampshire to help care for her brain-injured son. Siblings and family, lots of angst and resentments.

The Filling Station, Vanessa Miller. Every American should read this book. A novelized retelling of the Tulsa massacre in 1921. Absolutely riveting.

The Story She Left Behind, Patti Callahan Henry. Love this author. Based on a true story. A famous author simply vanishes, leaving her husband and daughter behind. She had invented a mystical language no one could translate. Present day, someone thinks he’s solved the riddle, contacts the family. Really interesting read.

The Girl from Berlin, Ronald Balson. Love anything about Tuscany. An elderly woman is being evicted from a villa there, with odd deed provenance. Two young folks go there to help unravel the mystery. Loved it.

The Island of the Colorblind, Oliver Sacks, M.D. Nonfiction. The dr is intrigued by a remote Pacific island where most of the inhabitants are colorblind. He also unravels a mystery on Guam of people born with a strange neurological problem. Medical mysteries unveiled. Very interesting.

The Bookbinder, Pip Williams. Post 1914 London. Two sisters work at a bookbindery. They’re told to not read the books. One does and one doesn’t. One has visions beyond her narrow world; the other does not. Eventually the one gets into Oxford. Lovely story.

The Paris Express, Emma Donoghue. 1895 on a train to Paris, a disaster happens. You’ll delve into the lives of many people who survived and died in the crash.

A Race to the Bottom of Crazy, Richard Grant. This is about Arizona. Author, wife and child move back to Arizona where they once lived. Part memoir, research, and reporting in a quest to understand what makes Arizona such a confounding and irresistible place.

The Scarlet Thread, Francine Rivers. A woman’s life turned upside down when she discovers the handcrafted quilt and journal of her ancestor Mary Kathryn McMurray, a young woman who was uprooted from her home only to endure harsh frontier conditions on the Oregon Trail.

A Place to Hide, Ronald Balson. 1939 Amsterdam, an ambassador has the ability to save the lives of many Jewish children. Heartwarming.

Homeseeking, Karissa Chen. Two young Chinese teens are deeply in love, but in China. Then their families are separated. Jump to current day and the two meet again in Los Angeles.

North River, Pete Hammill. He always writes such a good story. A doctor works diligently healing people from all walks of life. His wife and daughter left him years before. One day his 3-yr old grandson arrives on his doorstep.

A Very Typical Family, Sierra Godfrey. A very messed-up family. Three adult children are given a home in Santa Cruz, Calif, but only if the siblings meet up and live in the house together. A very untypical scenario but makes for lots of messes.

Three Days in June, Anne Tyler. The usual Anne Tyler grit. Family angst. This wasn’t one of my favorites, but it was entertaining and very short.

Saved, Benjamin Hall. Author is a veteran war reporter. Ukraine, 2022, he nearly loses his life to a Russian strike. Riveting story – he survives, barely.

Grey Wolf, Louise Penny. Another Inspector Gamache mystery in Quebec. She is such an incredible mystery writer.

All the Colors of the Dark, Chris Whitaker. A missing person mystery, a serial killer thriller, a love story, a unique twist on each. Could hardly put it down.

Orbital, Samantha Harvey. Winner of 2024 Booker Prize. I don’t usually like those, but I heard the author interviewed and she hooked me. This is not a normal book with a beginning, a story and an end. It’s several chapters of the day in the life of various astronauts at the ISS (Int’l Space Station). All fictional. She’s been praised by several real astronauts for “getting it” about space station everyday life.

The Blue Hour, Paula Hawkins. An island off Scotland. Inaccessible except when the tide is out. Weird goings on. An artist. A present day mystery too.

Iron Lake, William Kent Krueger. A judge is murdered and a boy is missing. Riveting mystery.

Tell the Wolves I’m Home, Carol Ricks Brunt. 1980s. A 14-yr old girl loses her beloved uncle. Yet a new friendship arises, someone she never knew about.

Four Treasures of the Sky, Jenny Zhang. 1880s, a young girl is kidnapped in China and brought to the United States. She survives with many hurdles in the path.

The Boy Who Fell out of the Sky, Ken Dornstein. Memoir, 1988. The author’s brother died in the PanAm flight that went down in Lockerbie, Scotland. A decade later he tries to solve “the riddle of his older brother’s life.”

Worse Care Scenario, T.J. Newman. Oh my. Interesting analysis of what could/might happen if a jet crashed into a nuclear plant. Un-put-downable.

Song of the Lark, Willa Cather. Complicated weave of a story about a young woman in about 1900, who has a gifted voice (singing) and about her journey to success, not without its ups and downs.

Crow Talk, Eileen Garvin. Charming story which takes place at a remote lake in Washington State, about a few people who inhabit it, the friendships made, but also revolving around the rescue of a baby crow.

The Story Collector, Evie Woods. Sweet story about some dark secrets from an area in Ireland, a bit magical, faerie life, but solving a mystery too.

A Sea of Unspoken Things, Adrienne Young. A woman investigates her twin brother’s mysterious death. She goes to a small town in California to figure it out, to figure HIM out.

The King’s Messenger, Susanna Kearsley. 1600s England, King James. About one of his trusted “messengers,” and his relationship with a young woman also of “the court.” Lots of intrigue.

In the Shadow of the Greenbrier, Emily Matchar. Interesting mystery in/around the area of the famous resort in White Sulphur Springs, West Virginia.

Isola, Allegra Goodman. Hard to describe, survival story on an island in the 1600s.

Save the Date, Allison Raskin. Rom-com, witty, LOL funny. Clever.

The Sirens, Emilia Hart. Numerous time-lines, Australia. Mysteries abound, nightmares, abandoned baby, weird allergies.

Red Clay, Charles Fancher. LOVED this book. Mostly post-Civil War story about the lives of slaves in Alabama during Reconstruction.

Stars in an Italian Sky, Jill Santopolo. Dual time line, 1946 and recent time. Love stories and a mystery.

Battle Mountain, C.J. Box. Another one of Box’s riveting mysteries. Love his descriptions of the land.

Something Beautiful Happened, Yvette Corporon. A memoir of sorts in Greece, tiny island of Erikousa, where the locals hid Jews during WWII. All elusive stories told by the author’s grandmother.

The Jackal’s Mistress, Chris Bohjalian. 1860s Virginia, about a woman who saves the life of a Union soldier. Really good story.

Song of the Magpie, Louise Mayberry. Really interesting story about Australia back in the days when it was mostly a penal colony. Gritty strength of a woman trying to thrive with her farm.

The Boomerang, Robert Bailey. A thriller that will have you gripping the book. About a lot of secrets surrounding the president (fictional novel, remember) and his chief of staff and about cancer. A cure. Such a good story.

Care and Feeding, Laurie Woolever. Really interesting memoir of a woman driven to succeed in the restaurant business. She worked for Mario Batali and then Anthony Bourdain. Gritty stories.

Everything is Tuberculosis, John Green. Maybe not a book for everyone. A real deep dive into the deadly tuberculosis infection, its history. I heard the author interviewed and found the book very interesting.

The Book Lovers Library, Madeline Martin. Fascinating read about Boots’ drug stores’ lending library. And the people who worked in them.

The Arrivals, Meg Mitchell Moore. LOL funny, about a middle-aged couple whose children (and their various family members) return to the family home and the chaos that ensues.

My Life as a Silent Movie, Jesse Lee Kercheval. About grief. A big move to Paris, finding herself a new life with a new set of real blood family.

Escape, Carolyn Jessop. Another memoir about a woman really in bondage in Utah, Mormon plural marriage.


Tasting Spoons

My blog's namesake - small, old and some very dented engraved silver plated tea spoons that belonged to my mother-in-law, and I use them to taste my food as I'm cooking.

Scroll down to the bottom to view my Blogroll

Posted in Beef, easy, on May 4th, 2015.

johnny_marzetti_casserole

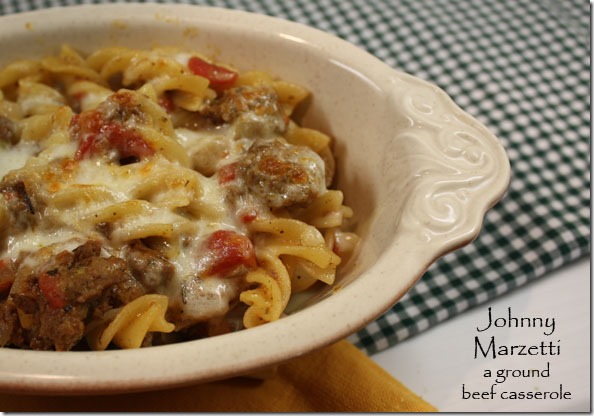
If you’d told me a couple of weeks ago that a week or so after I returned from my trip, having had pasta about 10 times in as many days while in Italy part of the trip, I’d have thought you were crazy. In a general year, I don’t eat much pasta, as you may remember if you’ve been reading my blog for any length of time. I love the stuff, but I just try to limit those kinds of carbs.

But then, since I don’t think I’ve talked about it, my friend Cherrie and I both returned home with food poisoning. She was ill on her return flight. I didn’t get sick until the moment I walked into my house, and then I was just about down flat for 4 days, and only slightly better after that. She and I have pinpointed the culprit as a savory flan we both ordered at our “farewell to France” dinner, our last night in Paris. It’s the only thing just she and I ate at the restaurant meal. It took a full 10 days for that illness to work its way through my system. And I didn’t know it was food poisoning until I went to a doctor. I ate so much oatmeal, rice, yogurt, applesauce, toast and bananas that I don’t know if I ever want any of those things again. Well, except yogurt. I haven’t lost my love of yogurt. Anyway, finally, the day I made this, my tummy began to feel better and I hadn’t had any of those stomach-wrenching pains I’d been having for 10 days, and food began to sound good again.

And I craved pasta, but not just any pasta – I had in mind this casserole I used to fix years and years ago (back in the 60s and 70s). Over the years I’ve adapted it here and there, and never put it on my blog (I guess) because it’s such a simple dish. For me, though, it represented comfort food. I didn’t want mac and cheese, but I wanted some ground beef and tomatoes and pasta. So, it took no time at all to throw this together and I now have 4 more ample single-serving casseroles of it in the freezer.

This is just a combo of ground beef, onions, garlic, seasonings, canned tomatoes, cheddar (or Velveeta in my case because I had some in the refrigerator – because I’d tried to eat a toasted cheese sandwich one of my days when I was really sick) and Mozzarella. I also added a little jot of Worcestershire sauce too, though that was never in my original recipe. If  you do a search for Johnny Marzetti, I expect you’ll get about 6 million results. It’s spelled all different ways (like Marzett, Mazetti, Mazetter), and who knows who Johnny was, way back when. But a dish is named after him.

Casseroles in general are meal stretchers – this one with pasta and tomatoes in it, it resembles spaghetti. Actually, when I made it I scooped some into a single-serving casserole dish, topped it with Mozzarella and didn’t even bake it – I stuck it under the broiler in my toaster oven until it turned golden brown. But baking for about 15 minutes will heat it full, all the way through. If you’re in a gigantic hurry, don’t bother with the baking – just stir in the cheese until it melts and scoop it onto plates.

What’s GOOD: This is a really easy and simple dish to throw together in about 30 minutes or so. While the pasta water is heating, make the sauce. Once the pasta is done, combine everything, add the cheese and you’re done. Or bake for a little bit. It’s a kid-pleaser and will feed a crowd for not a lot of $$.

What’s NOT: it isn’t a sophisticated dish in the least – just good old plain food – but tasty. No down side that I can think of.

printer-friendly CutePDF

Files: MasterCook 5+ and MasterCook 14 (click on link to open recipe in MC)

* Exported from MasterCook *

Johnny Marzetti

Recipe By: My own version of a very old recipe from a community cookbook, circa 1965.
Serving Size: 7 (or fewer if you have big appetites)

12 ounces pasta — your choice (penne, linguine, spaghetti, spirals)
1 pound ground beef
1 large yellow onion — diced
2 cloves garlic — minced
15 ounces diced tomatoes — including juice
2 teaspoons Italian seasoning
1 tablespoon dried oregano — crushed in your palms
1 teaspoon salt
1/2 teaspoon ground black pepper
1 1/2 teaspoons Worcestershire sauce
2/3 cup shredded cheddar cheese — (I used Velvetta because I had it open)
12 ounces Mozzarella cheese — shredded

1. Bring a large pot of water to a boil. Add about a teaspoon of salt and stir well. Add pasta and simmer it until it’s not quite done, but just about.
2. Meanwhile, in a large skillet brown the ground beef until no pink remains. Add onion and continue cooking for 5-10 minutes until onion is fully translucent. Add tomatoes and juices.
3. Preheat oven to 350° F.
4. Add the garlic, seasonings, salt, pepper and Worcestershire.
5. Drain pasta well, then pour into the skillet with the meat mixture. Add the cheeses, saving some of the Mozzarella to sprinkle on top.
6. Pour into individual ramekins or into a 8×10 or other shaped baking dish. Top with cheese and bake for 10-15 minutes until cheese is melted. If you like the cheese browned, turn on the broiler just until the cheese begins to get golden brown. Remove from oven and allow to sit for 5 minutes, then serve. Serve with a green salad and an Italian vinaigrette.
Per Serving: 603 Calories; 34g Fat (50.7% calories from fat); 31g Protein; 43g Carbohydrate; 3g Dietary Fiber; 110mg Cholesterol; 637mg Sodium.

Posted in easy, Pork, on June 24th, 2014.

southern_fried_pork_chops

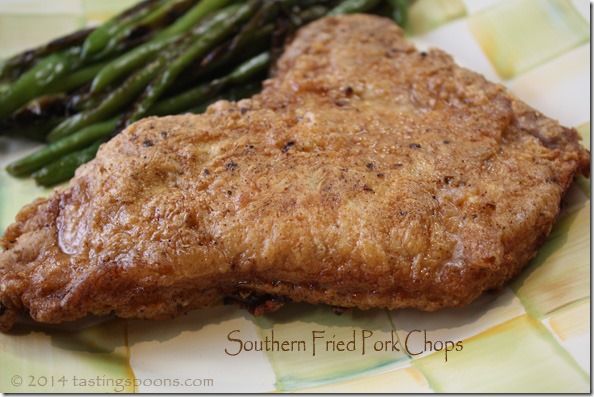
If you’ve been a reader of my blog for any length of time you know I don’t usually FRY things. Sauté yes, but really fry in oil, no. My bottle of canola oil gets used mostly for salad dressings. But I just decided to do something different. In the background on the plate above there are the dry-pan roasted green beans that I’ve made 10 times in the last 6 months they’re so good. And easy.

I searched around the ‘net for “pork chop recipes”, and southern fried pork chops were the top 8 or so. Really?  So I clicked over to several (one on epicurious, and two others from blogs, but were almost identical. I kind of made my own way once I got the gist of the main recipe. A flour-based breading mixture is made (flour, cornstarch, herbs, salt, pepper) and set aside. Another is made with an egg and some milk or buttermilk. The pork chops are dipped first into the flour, then egg, then back in the flour, and ever-so gently placed into the 1/4 inch of medium-hot oil.

One thing I learned (and don’t know if it’s true) is that when you fry foods like this, it’s best to raise the heat of the oil in a gentle manner – i.e., use low heat and then raise it over the course of 10 minutes or so. If you turn the flame up to high right from the get-go, you’ll end up with oil that’s too hot. Some of that makes sense, but some of it sounds crazy. Heated oil is heated oil. Isn’t it? Any of you chemistry types out there know?

Anyway, the pork chops were dutifully dipped in the proper pans and lowered into the oil, and they were done in no time flat. One of the bloggers mentioned using a heat test before you start cooking – dropping a pinch of the flour mixture into the oil – if it bubbles, then it’s hot enough. And during the cooking you do only want the oil to bubble around the meat and not burn the coating.

The cornstarch in the flour mixture gives the breading/coating a lighter texture. Not exactly like a tempura batter, but not far from it. It was nice. I liked it. I used seasonings in my flour mixture (other than the usual salt, pepper, garlic powder, paprika that was in most of these recipes). I reached for Penzey’s Fox Point Seasoning and added a couple of teaspoons. I don’t really know that I could taste it once it was fried, however. So you could use whatever suits you – like an Italian blend perhaps – or don’t add any at all. In the South I think they’d go for the plain stuff (salt, pepper and garlic powder).

The pork chops bubble around the edges as they’re frying. Be sure the chops aren’t touching – I used a pan that probably could have held more – because several recipes stressed that the chops need lots of space around them. They browned in no time flat, so I turned the heat down just a little bit and turned them over and cooked the 1/2 inch thick chops about 4 minutes per side – my guess. I didn’t time it. It was all by color.

What’s GOOD: how easy it was – only time consuming thing was mixing up the coating mixture. I got everything else finished before I even started the pork chops so I wouldn’t be distracted. They were really good. Not in the “outstanding” category, but it was an easy, quick dinner that was satisfying.
What’s NOT: well, some folks don’t like frying – like deep frying – although these weren’t deep in oil – I used only about 1/4 inch (half way up the chops).

printer-friendly CutePDF
Files: MasterCook 5+ and MasterCook 14 (click link to open in MC)

* Exported from MasterCook *

Southern Fried Pork Chops

Recipe By: Adapted from a website called Taste of Southern
Serving Size: 4

32 ounces pork chops — center cut, bone in (four 1/2 inch chops)
1 cup all purpose flour
2 tablespoons cornstarch
1 large egg
2 tablespoons milk — or buttermilk (or water)
1 tablespoon mixed herbs — I used Penzey’s Fox Point Seasoning
1 teaspoon garlic powder
1/2 teaspoon salt
1/4 teaspoon black pepper
1 teaspoon paprika
Cooking oil for frying the chops (canola or vegetable)

1. BREADING: In a small mixing bowl, add the flour, cornstarch, herbs, garlic powder, salt, black pepper and paprika. Stir all ingredients well. Set aside.
2. EGG: Break one egg into a small low sided dish. Add milk and use a fork to mix it well. Mix well enough that there are no little globs of egg white.
3. MEAT: One at a time, dip a pork chop in the flour and coat both sides. Dip the chop into the egg mixture, coat both sides well. Lift and let any excess drip off. Place the chop back into the flour mixture and coat both sides and edges.
4. FRYING: Place about 1/2 inch of cooking oil in a large skillet over medium heat. Test the oil by sprinkling in a little pinch of the bread mixture – if it sizzles, the pan is hot enough. Lower the chops into the hot cooking oil, one at a time. Do not crowd them (they don’t want to be touching). Cook for 4-6 minutes.
5. Watch the bottoms of the chop and when they start to brown, flip the pork chops over. Let the chops fry for about 4-6 minutes or until done but not over cooked. Test a chop by cutting into the center to make sure it’s not rare. A little bit of pink is fine. Remove the cooked chops from the skillet, place on a paper towel lined plate and let drain. Serve warm.
Per Serving: 507 Calories; 24g Fat (44.0% calories from fat); 40g Protein; 29g Carbohydrate; 1g Dietary Fiber; 165mg Cholesterol; 378mg Sodium.

Posted in Desserts, easy, on May 10th, 2014.

tres_leches_cake_slice

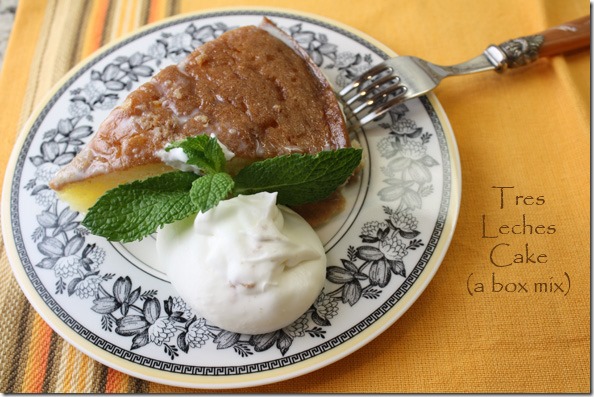
If you’ve never had Tres Leches (in Spanish that means 3 milks) cake, you’re really missing something. And I’m just going to say that this one, made from a Nestle boxed mix, is just about as good as any homemade version I’ve ever had. And since it IS a boxed mix, that means it’s super easy. It also means I’m going to go get another box so I can have it on the shelf. (Although, you won’t want to keep sweetened condensed milk – which is in the box – on your pantry shelf for more than a few months as it thickens and darkens.)

My thought was that Tres Leches Cake was Mexican in origin, but when I searched on wikipedia, I found out that it actually may originate from Europe. However, it became popular in Central tres_leches_kitAmerica in the early 1900s (probably when canned milk and sweetened condensed milk proliferated and apparently Carnation and/or other brands included a recipe on the label and since it was distributed throughout Central and South America it became a national dessert in several countries). See the article if you’d like.

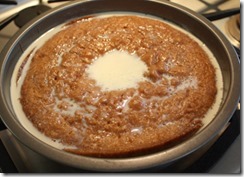
Essentially it’s a butter-rich cake (the mix is enough for a 9-inch round cake pan – and do NOT make it in an 8-inch pan – it will never fit) that’s baked, and once it’s cooled for a few minutes you poke jillions of holes all over the cake and pour over it a mixture of sweetened condensed milk, evaporated milk and straight milk (some recipes call fortres_leches_cake_inpan heavy cream but the mix suggests whole milk which was plenty rich enough). The milk mixture is not thick, really, and it just fills in all the little holes throughout the cake. It does not sink to the bottom. There at right you can see the cake after it was baked and just after I poured the milk mixture all over it. It sat out on my counter for about 30 minutes while the cake cooled, then into the refrigerator it went. Within about an hour or so every bit of the milk had been absorbed in the cake. Ideally it’s refrigerated for about 4 hours. This is a cake you can NOT leave out on your kitchen counter overnight – all that milk would spoil.

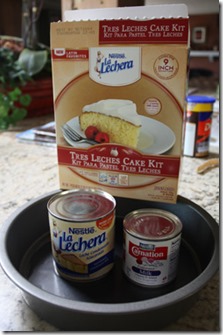
In the photo above left you can see the mix – although the bag with the cake mix I’d already emptied into my mixing bowl. This one is made by Nestle and I found it at my regular supermarket. It contains the cake mix bag, the sweetened condensed milk can (on the left) and a can of evaporated milk (on the right). I also caution you to not use a 9-inch pan that’s shallow. It may fit in a standard 9-inch cake pan, but I happen to have a deeper 9-inch one that was perfect. The cake did shrink some once baked and all the milk mixture did fit in the pan.tres_leches_slice_close

What I want you to notice is that in the photo above, on the plate toward the back of the cake slice you can see just a little bit of the milk/cream. The entire cake is just saturated with the milk, but it doesn’t ooze all over. Just a tiny bit. We had whipped cream with it.

Some recipes you’ll find online have a frosting on top. For me that would be over the top – this cake is very rich and to put frosting on it (unless it was just a whipped cream mixture) would make it too sweet and heavy for me. If you don’t like cake mixes, just do a search for Tres Leches Cake and you’ll find dozens of them to make from scratch. I’ll definitely make this again. I think kids would love this cake.

What’s GOOD: I really, really liked this. Because it’s so moist. It’s also rich and sweet too. It was EASY, which I liked a lot too. Very suitable for guests. For me, the cake has sort-of the texture of bread pudding, but it’s not weight-heavy like bread pudding is. Fabulous.

What’s NOT: I don’t want to know how many calories each slice contains. Just don’t tell me, okay?

Posted in easy, Pork, on March 8th, 2014.

skillet_pork_chops_apples_onions

Did we have pork chops in the freezer? Check. Apples? Yes, one. Check. Onions? Yes, always one of those on hand. Check. Italian Parsley? Yup. Check. Lemon juice? Oh yes. Check.

I’m sure you’re all just like I am – we eat different meats in rotation. Sort of. Chicken, chicken, fish, chicken, pork, chicken, fish, and way down the rotation list, lamb. This particular night I was in the mood for pork and sure enough, we still had two more pork chops from the Berkshire pig. I think this dinner will be the last, however. We have a Berkshire ham, which we’ll probably have for Easter, and I think I have one more pound of ground pork. When those are gone, I’ll be completely empty of Berkshire. Sadly.

Lucky is the word for me when it comes to pleasing my hubby – Dave never complains no matter what I serve him. Only when we’ve had the same leftovers 3 times does he grumble a little. I rarely do that – I try to insert something else in between, or I try to re-invent the dish somehow. But with some things that’s not possible. When I’ve defrosted meat to begin with, made something, I don’t like to re-freeze it. It’s already been frozen and I’ve read that meat just loses flavor when you do that. I’ve been known to do it with soup, when the protein comprises very little of the taste in the soup itself. Like tonight, for instance, as I’m typing this, I have meatballs in the refrigerator, chilling. From a couple of pounds of defrosted ground beef. (I’m making something close to Ikea’s Swedish Meatballs – if it’s good, I’ll post it in a few days.) I made a big batch – bigger than I should have I think – and my only hope is that we’ll have a guest over to help eat it up. Because I don’t want to freeze them.

Okay, back to pork chops. I’d saved this recipe in MasterCook – and so my notes say, I found it on Oprah’s website, although it’s a Mark Bittman recipe. Must have been awhile ago. But I searched for pork chop recipes within my to-try recipes and this one just seemed the best fit. And talk about easy!

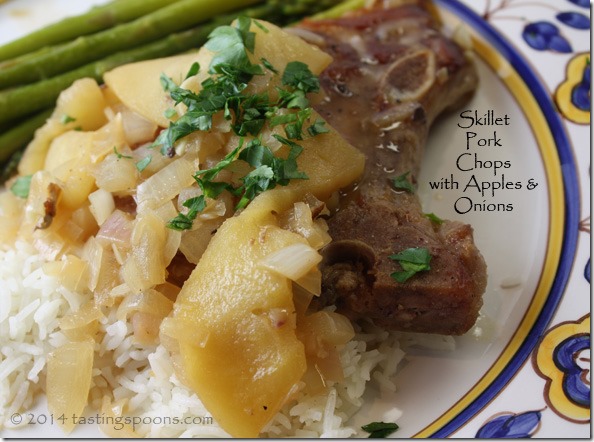
The chops were seasoned with salt and pepper, browned in a skillet. Some vermouth was added to the pan along with a minced-up shallot. The chops are removed, and then you add the sliced apples and onion and cook that for awhile with some chicken stock, then the chops go back into the pan for a little while – maybe 10 minutes – while the sauce reduces down a bit. That’s it. Add a tidbit of butter (as a finish to the sauce) and garnish with Italian parsley. Done. I had a smidgen of rice left over from the chicken tikka masala I’d made the other night, so I added just enough to give the plate a rounding-out. It was enough for the sauce to soak into, which was delicious.

What’s GOOD: how quick and easy the dish was to make. My DH loved it – but then, he loves pork chops just about any way I’ll make them. Loved the interplay between the savory sauce and the sweet apple. Apple and pork really do go together well.

What’s NOT: nothing at all, really. Liked the dish a lot.

printer-friendly CutePDF

Files: MasterCook 5+ and MasterCook 14 (click on link to open in MC)

* Exported from MasterCook *

Skillet Pork Chops with Apples

Recipe By: Mark Bittman’s How To Cook Everything Basic (via Oprah’s website)
Serving Size: 4

2 pounds pork chops — preferably bone in (6 to 8 ounces each) 1″ thick [I used chops that were 1/2″ thick so cooked it for less time]
2 tablespoons olive oil
Salt and freshly ground black pepper
1/2 cup dry white wine — or light-bodied beer [I used vermouth]
2 tablespoons chopped shallot — or red onion
3 medium apples — peeled, cored, halved, and sliced [I used less]
1 large onion — halved and sliced
1/2 cup chicken stock — or more as needed
1 tablespoon fresh lemon juice
1 tablespoon butter
2 tablespoons parsley — chopped fresh for garnish

1. Blot the chops dry with a paper towel. Put a large skillet over medium-high heat and add the olive oil. When it’s hot, add the chops, turn the heat to high, and sprinkle with salt and pepper. When they brown and release from the pan easily, turn the chops, season again, and cook this side the same way. The whole process should take about 2 minutes per side or 3 to 5 minutes total.
2. Reduce the heat to medium and add the wine—be careful here; the wine may splatter a bit when it hits the hot oil—and the shallot and cook, turning the chops once or twice, until the wine is almost evaporated, 1 or 2 minutes. Transfer the chops to a plate and return the pan to the heat.
3. Add the apples and onion to the hot pan and stir until they start to stick, 1 or 2 minutes. Add the stock, stirring and scraping up any browned bits from the bottom of the pan. Return the chops to the pan, along with any juices accumulated on the plate. Bring the mixture to a boil, reduce the heat so it bubbles steadily, then cover.
4. Cook, stirring occasionally and turning the chops once or twice, until the chops are tender, 5 to 10 minutes; add another 1/2 cup stock or water if the apples start to stick. When the chops are done, they will be firm to the touch, their juices will run just slightly pink, and when you cut into them the color will be rosy at first glance but turn pale within seconds. By this time the apples and onions will also be soft. Stir in the lemon juice and butter and taste and adjust the seasoning. Serve the chops with the sauce on top, garnished with the parsley.
Per Serving: 535 Calories; 32g Fat (56.7% calories from fat); 36g Protein; 20g Carbohydrate; 3g Dietary Fiber; 119mg Cholesterol; 390mg Sodium.

Posted in Chicken, easy, on March 6th, 2014.

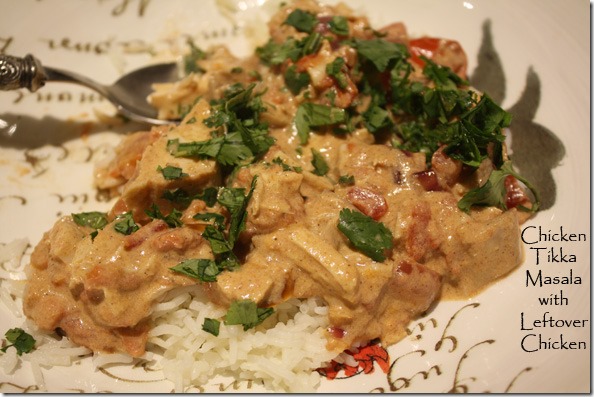
easy_chicken_tikka_masala_leftover_chicken

Last week I was just craving Indian food. We have a couple of Indian restaurants in our vicinity, but since I was craving chicken tikka masala, I knew I’d prefer my own version rather than a less flavorful restaurant variety. However, I had left over chicken, not fresh, raw. What to do? Easy  solution – make my favorite recipe but adapt it using the already cooked chicken.

Spotting a nice little Kosher chicken at Trader Joe’s a week ago, I bought the 3.5 pound baby and we had a really lovely roast chicken dinner from my favorite-est recipe. It was loverly, as they say. The meat was so very moist and tender. When we finished, I still had half a chicken left over, so I picked all the meat off the bone and stuck it in a Zip-loc bag and put it in the refrigerator, having no idea what I’d do with it. So when the Indian food craving hit, I just decided I’d adapt my recipe I already have for chicken tikka masala, but here I’d use the already cooked chicken.

It wasn’t hard to do, and I put the dinner together in a jiffy. First I got out all the ingredients – I chopped up the chicken meat, got out all the spices, prepped the vegetables, opened the can of tomatoes, minced the garlic and ginger. Then I got out my Breville BRC600XL The Risotto Plus Sauteing Slow Rice Cooker and Steamer to make rice (it has a standard rice setting which made just perfect Basmati rice). Once that was going I started the sauce. I tossed the chicken pieces with the spices first, then I added in the  yogurt. That was set that aside while I fired up the pan on the range. It was quick work with the onion and garlic, added in some other spices, and the canned tomatoes including their juices.  When everything was ready I added in the chicken which had been “marinating” in the yogurt and garam masala and stirred it into the pan. This recipe does contain a little bit of cream – I used less than usual and I mixed it with some whole milk I had. I allowed it to come up to a very slow simmer – I didn’t allow it to actually simmer, though, as the dish was “done” at that point. If I’d allowed it to boil, even gently, it might have separated from using some milk in it. Maybe not, but I wasn’t taking any chances.

What I wanted was for the chicken to be done at the precise time the rice was done. The basmati rice prepared in the risotto cooker is perfection when the heat switches off, so I was all ready and scooped rice out on the plate, then added some of the chicken in masala sauce on top, sprinkled with cilantro and we were ready to eat.

What’s GOOD: I think this was every bit as good as the original recipe made with raw, bone-in chicken. Of course, the kosher chicken was ever-so moist anyway. This recipe was super-easy. And super good too. I’d definitely make this again when I have left over chicken.

What’s NOT: nothing at all. Altogether good dish.

printer-friendly CutePDF

Files: MasterCook 5+ and MasterCook 14 (click on line to open in MC)

* Exported from MasterCook *

Quick and Easy Chicken Tikka Masala

Recipe By: Adapted from America’s Test Kitchen
Serving Size: 3

CHICKEN:
1/4 teaspoon ground cumin
1/4 teaspoon ground coriander
1/8 teaspoon cayenne pepper
2 teaspoons garam masala
1 1/2 cups cooked chicken — approximately, chopped
1/2 cup yogurt — whole-milk preferably
MASALA SAUCE:
1 1/2 tablespoons vegetable oil
1/2 medium onion — diced fine (about 1 1/4 cups)
1 medium garlic clove — minced or pressed through a garlic press (about 2 teaspoons)
2 teaspoons fresh ginger — grated
1/2 serrano pepper — ribs and seeds removed, flesh minced (see note above), or one large jalapeno [optional]
1/2 tablespoon tomato paste
1/2 tablespoon garam masala
14 ounces canned tomatoes — use chopped or chop yourself
1 teaspoon sugar
1/4 teaspoon table salt
1/3 cup heavy cream — or whole milk
1/8 cup fresh cilantro leaves — chopped (or mint, if preferred) for garnish

1. FOR THE CHICKEN: Combine cumin, coriander, cayenne and garam masala in medium bowl. Add the cooked chicken pieces and stir until the chicken has picked up all the dry spices. Then add the yogurt and combine; set aside.
2. FOR THE SAUCE: Heat oil in large Dutch oven over medium heat until shimmering. Add onion and cook, stirring frequently, until light golden, 8 to 10 minutes. Add garlic, ginger, chile, tomato paste, and garam masala; cook, stirring frequently, until fragrant, about 3 minutes. Add crushed tomatoes, sugar, and salt; bring to boil. Reduce heat to medium-low, cover, and simmer for 15 minutes, stirring occasionally. Stir in cream and return to simmer. Remove pan from heat and cover to keep warm. If using milk instead of cream, don’t allow the mixture to boil or it will separate.
3. Add the chicken yogurt mixture to the pan. Allow the mixture to warm up gently and when it’s hot, taste for seasonings. Add chicken broth if needed if the sauce is too thick. Stir in cilantro or sprinkle it on top as a garnish and serve over hot basmati rice.
Per Serving: 345 Calories; 22g Fat (55.6% calories from fat); 25g Protein; 13g Carbohydrate; 2g Dietary Fiber; 101mg Cholesterol; 477mg Sodium.

Posted in Appetizers, easy, on February 28th, 2014.

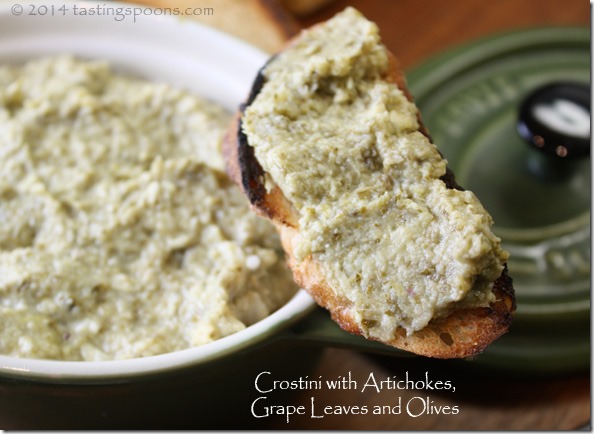
crostini_grape_leaves_olives

Need an easy artichoke heart mixture to serve to guests that’s tasty and very quick to put together? And has no mayo or sour cream in it?

This recipe has been in my arsenal for years, from a decades-ago class I took from Joanne Weir. I’d forgotten all about it, but noticed that it didn’t have a photo attached to it (this in my MasterCook software program I use for all my recipes). That’s an automatic signal that I took the class long before I began taking a quick pix of the food when I attended the class. It also meant I’d not written it up here on my blog either! Since it’s an easy recipe to make, I chose to include it for a dinner party we were having recently.

Making it the day before is no problem – in fact it helped me to get at least one dish done ahead of time. This topping/dip keeps for about a week or so. In the class Joanne just chopped up the ingredients on a cutting board. It calls for canned or defrosted artichoke hearts, not marinated type, a few brined grape leaves, garlic, green olives –  Joanne called for picholine but I couldn’t find that type the day I went shopping so I used a plain green olive – some Parmigiano cheese, lemon juice and just a little bit of EVOO to smooth it out. That’s IT. Easy, huh? Changing the type of olive in this would likely change the flavor profile a little bit. Don’t use kalamata – they would overpower the mixture. Don’t use ripe olives, and don’t use the green stuffed olives either.

When I made this I used the food processor – I was into “easy” that day. If you’d prefer a bit more texture to the spread, then definitely do the mince and chop version. Do allow the mixture to refrigerate for a few hours – so the garlic isn’t so harsh and it has time to permeate it all.

What’s GOOD: how easy it is to make, plus it keeps for awhile. Make it 2 days ahead – that’s fine too. Very tasty – you definitely know it’s artichoke hearts but you can’t exactly pick out the grape leaves (it adds just a little bit of sharpness) along with the lemon juice. Very delish appetizer that I’ve made over and over.
What’s NOT: you might not have brined/jarred grape leaves on hand (I didn’t) but I found them easily enough at my local upscale market. And you might not have the right olives – but I substituted some other small green olives instead.

printer-friendly CutePDF
Files: MasterCook 5+ and MasterCook 14 (click link to open in MC)

* Exported from MasterCook *

Crostini with Artichokes, Grape Leaves and Olives

Recipe By: From a cooking class with Joanne Weir
Serving Size: 8

6 large artichoke hearts — frozen, defrosted (or canned, drained)
4 whole grape leaves — bottled, rinsed
1/3 cup green olives — Picholine, pitted, chopped
1 clove garlic — minced
1/2 teaspoon grated lemon peel
8 shaves Parmigiano-Reggiano cheese — crumbled
1 1/2 tablespoons extra virgin olive oil
1 tablespoon lemon juice
Salt and pepper to taste
24 pieces French baguette sliced
lemon wedges for garnish

Notes: This can be made ahead, but don’t add garlic until just before serving. Use a country bread – coarse textured, about 2 inches in diameter. You can also grill the bread slices rather than bake them. I made this in a food processor until it was smooth, so I didn’t do quite so much mincing and chopping and let the processor do all the work.
1. Remove the stems from the grape leaves before mincing.
2. In a bowl combine the chopped artichoke hearts, grape leaves, olives, cheese, garlic and lemon zest. Pour mixture onto a cutting board and continue to chop together until coarsely chopped. Place mixture back in the bowl and add cheese, olive oil, lemon juice, salt and pepper to taste. Use plenty of salt, as once you put it on bread, it dilutes the salt. Taste for additional lemon juice as well. If made ahead, allow mixture to sit out at room temp for at least 30 minutes.
3. Coat the thin bread slices with olive oil and a little salt, then bake in a 400° oven until just crisp. Do not overbake. Serve crostini with a thin slather of the artichoke mixture.
Per Serving: 292 Calories; 7g Fat (21.3% calories from fat); 11g Protein; 47g Carbohydrate; 6g Dietary Fiber; 4mg Cholesterol; 709mg Sodium.

Posted in Breads, Brunch, easy, on February 12th, 2014.

apricot_jam_pastry

Oh my goodness, is this ever fantastic. The problems with this are: (1) finding good, tender and rich brioche bread; and (2) keeping your fingers out of the finished pastry. They are just so delicious. The base is a thick slice of brioche bread (the one above is about 1/2 inch thick, maybe just slightly thicker), spread with a ground almond and butter mixture (an almond cream, it’s called), spread with a little bit of apricot jam, some almonds sprinkled on top and baked briefly, then generously sprinkled with powdered sugar.

The other morning we were at one of my book group meetings, at our friend Peggy’s establishment, (Peggy & Gary own it along with their son) Mead’s Green Door Café in old-town Orange. Every other month we meet at their little café and enjoy a latte or cappucino and some lovely treat Peggy has baked while we discuss our current book selection. Peggy and her husband used to own a restaurant in Orange, but sold it a few years ago and bought a derelict building and spent over a year renovating it to the Café it is now. Cute as a bug, Old-world style, country-ish, eclectic, offbeat, catering a lot to the young Chapman University crowd nearby. They serve vegetarian and vegan food only, with usually at least one GF item too. They specialize in breakfast and lunch. Peggy does 90% of the baking. Peggy’s #1 seller (of her pastries) is her sweet potato scone, which is delish also, I can attest!

This little number, which blew me away, is so easy to make. Disclaimer here – I didn’t make the one you see above – Peggy did. But it’s so very easy, I was fairly certain you wouldn’t mind me showing you hers. If I made this now, I’d be gobbling it down. The recipe came from Sunset Magazine (earlier last year). First you must start with good brioche. Maybe one of our local bakeries (like Panera or Corner Bakery) will have it – I’ll have to look. You slice it thick (the recipe said 1-inch; I think Peggy sliced hers closer to 1/2 inch. Anyway, thick brioche. Then you spread the top with a little apricot jam, then a mixture of butter, granulated sugar, salt, egg, and half-and-half that’s been whizzed  up in the food processor. Then the top is sprinkled with almonds and sugar. Baked for 20 minutes or so, sprinkled with powdered sugar. Done. Very easy. Very special.

What’s GOOD: certainly the taste is first and foremost! These things are just delish. Worth making. You can make the almond cream ahead and it will keep for several days. The almond cream makes more than what you’ll use to make 8 – so perhaps cut down on the quantity first time.

What’s NOT: really nothing.

printer-friendly CutePDF

Files: MasterCook 5+ and MasterCook 14 (click link to open in MC)

* Exported from MasterCook *

Almond and Jam Pastries

Recipe By: Sunset Magazine, March, 2013
Serving Size: 8

ALMOND CREAM: (you’ll have more than is needed)
1 cup sliced almonds
1/2 cup granulated sugar — divided
2/3 cup unsalted butter
1/4 teaspoon kosher salt
1 large egg
2 tablespoons half and half — or milk
TOASTS:
8 slices brioche — or challah bread, 1/2 in. thick or thicker
1/2 cup apricot jam — or other flavor
2 cups sliced almonds — about 2 T per toast
Powdered sugar

1. Preheat oven to 350°. Whirl 1 cup almonds with 1/4 cup granulated sugar in a food processor until finely ground. Transfer mixture to a bowl.
2. Blend butter and remaining 1/4 cup granulated sugar in a food processor until smooth. Add salt, egg, and half-and-half and pulse just to blend. Add reserved ground almonds and blend until mixture is smooth.
3. Line a baking sheet with parchment paper. Spread about 1 tbsp. jam, then 2 tbsp. almond cream, on each slice of bread (you’ll have almond cream left over). Sprinkle each with about 2 tbsp. sliced almonds.
4. Bake until almond cream is golden brown and almonds are toasted, about 20 minutes. Sprinkle with powdered sugar.
5. Make ahead: Chill extra almond cream airtight up to 2 weeks and use for making more pastries.
Per Serving (not accurate because you make more almond cream than you’ll use): 831 Calories; 55g Fat (57.6% calories from fat); 20g Protein; 71g Carbohydrate; 5g Dietary Fiber; 141mg Cholesterol; 371mg Sodium.

Posted in easy, Fish, on January 31st, 2014.

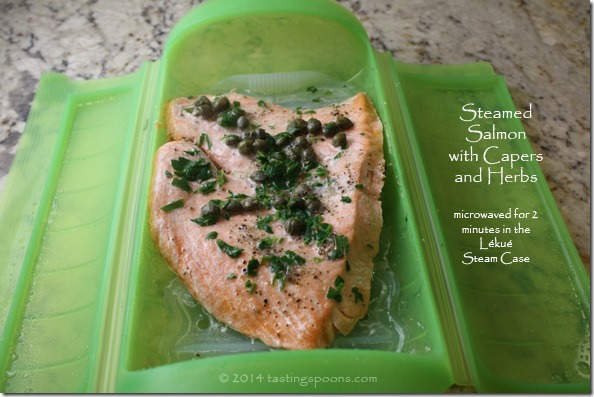
salmon_capers_lekue

If you’re not into new gadgets, you may as well skip on by this post. I’d been eyeing this new thingamabob for several months and finally decided to bite.

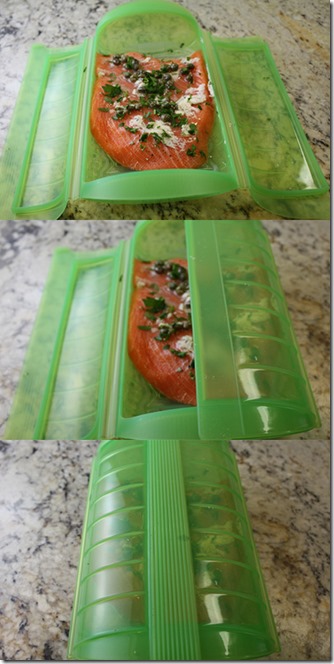
The company that makes Lékué is in Spain. And when you try to SAY the word, speak it fast – you don’t languish the word out but quick step it fast. The product appears to be made of silicone (like Silpats, for instance – it has a similar feel to it), but nothing says exactly what or how. Other than it can withstand microwaving at 800 watts and the oven up to 400° F. It’s not a hard surface – it’s very soft and pliable but sturdy enough to stay put, although if you have food in the steam case (that’s what I bought – they have lots of other products as well) it will bend. Hence you walk from counter to microwave holding both ends of the Lekue Steam Case with Tray for 1 to 2 Persons.

Obviously the products have met the standards of the EU, since it’s manufactured in Spain. Everything says its very safe for storing, cooking, baking and microwaving. I’ll take their word for it since the EU is far more strict about these kinds of things than we are here in the U.S. Photo at left is from the company’s website. (Yes, they make them in green like mine, or orange or clear.)

What you see there is the smaller of the two types of steam cases. It has a slightly rounded bottom, but the little soft, silicone tray sits inside it (removable because you can cook without it).

Since I’m retired, you’d think I’d have endless time on my hands to cook whatever and whenever with no concern for the time involved. Not so. I don’t know how I found time to work, back when I did. I’m SO busy. I treasure my time at home on the occasional day when I don’t have any plans. The evening I used my new steam case I was pressed for time. I’m guessing you are also, so ride along with me as I explain how I made dinner in about 15 minutes flat.

Recently Updated2

There you can see my about-to-be cooked dinner. The tray thing is in the bottom – the fish is sitting on it.

Into the bottom I poured in about 1/3 cup of water, then I squeezed a half of a lemon in the water also. The water or liquid is below the tray and although the tray has holes in it, the fluid didn’t come up over the edges. The tray went in and I gently placed the fish on top.

I sprinkled the top of the salmon with kosher salt and freshly ground black pepper, then I spread about 2 teaspoons of butter as best I could all over the salmon. That part was a bit difficult because the salmon was moist and the butter, although soft, didn’t really want to spread. You can see how well I did there in the top photo.

Next I drizzled the top of the salmon with a little tiny bit of olive oil. I don’t exactly know why since I’d already spread butter on it, but the recipe said to use both. Okay.

Then I sprinkled about a tablespoon of capers on top of that and sprinkled about a tablespoon or more of freshly chopped Italian parsley on top of that. The lid was closed. Easy. Up to this point I think it took me about 2 minutes, including the time it took to walk out to the garden to find Italian parsley. Well, I may be a little off – maybe 3 minutes total.

Into the microwave it went to 2 minutes. I do need to go find my instruction booklet for my Dacor microwave because I think mine is higher wattage than 800, and the recipes are all for 800 watts. So I might need to cook whatever I do make in this at a lower power setting.

The recipe I followed was for fillet of sole, and my salmon was actually quite thin – not much thicker than sole, but I did cook it for 2 minutes, rather than the 1 1/2 minutes suggested for the sole. And sure enough, it was perfectly cooked. Wow.

The rest of the dinner was all ready (yellow crookneck squash and a big green salad with lots of vegetables in it and my favorite Creamy Garlic Blue Cheese Dressing that I make many times a year). I quick-like dished up the vegetables and the salad, then lastly I put the salmon out on our dinner plates and we sat down. It might have been better had I taken the steam case to the dinner table – it would stay hotter longer – but it was still piping hot when we ate our first bites.

What’s GOOD: first and foremost, the speed at which I got this dinner on the table. Wow. The vegetables were left overs, so all I had to do was warm them up. The salad took about 15 minutes to make. The recipe was a good one – we could taste the citrusy aspect of this, and of course, the capers give it lots of flavor anyway. Sometimes fish is just best done the simplest way. It was juicy and tender. Only a couple of little edges (that leaned up against the inside wall of the steam case) were a bit overcooked, but still edible. I’ll watch that next time. So far so good, I’d say, with my new cooking utensil investment. I’ll be trying other dishes. One intrigues me – you can make scalloped potatoes (like au gratin) in no time flat.
What’s NOT: so far, nothing at all. I like this thing, this Lékué and I liked the recipe.

printer-friendly CutePDF
Files: MasterCook 5+ and MasterCook 14 (click link to open in MC)

* Exported from MasterCook *

Steamed Salmon with Capers in the Lékué

Recipe By: Adapted from the Lekue cookbook
Serving Size: 2

10 ounces salmon fillets
2 tablespoons water Juice of 1/2 lemon
Salt and freshly ground black pepper to taste
2 teaspoons soft butter
2 teaspoons olive oil
1 tablespoon capers — drained and rinsed
1 tablespoon Italian parsley — divided use

1. Using the small (1-2 person serving) Lekue case, pour in water and lemon juice. Insert tray.
2. Place salmon fillet on top of the tray and sprinkle with salt and pepper.
3. Spread the fish with the butter and drizzle with olive oil.
4. Add capers and half of the Italian parsley. Fold lids closed.
5. Microwave at 800 watts for 2 minutes (if using thicker salmon, it will take longer). Remove Likue case from microwave and leave the lid closed for one minute longer (it continues to cook).
6. Serve on heated plates and garnish with additional parsley and lemon wedges, if desired.
Per Serving: 228 Calories; 12g Fat (48.6% calories from fat); 28g Protein; trace Carbohydrate; trace Dietary Fiber; 81mg Cholesterol; 161mg Sodium.

Posted in easy, Fish, Grilling, on January 19th, 2014.

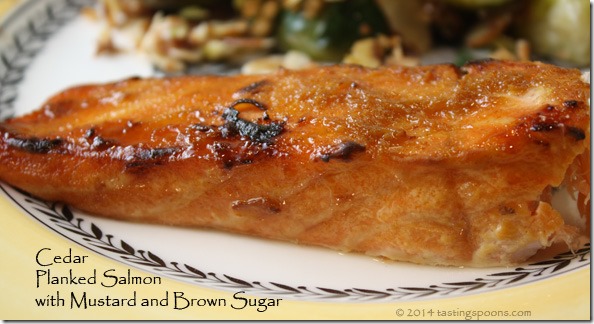
cedar_planked_salmon_mustard_brownsugar

Are you looking for a super-easy dinner with salmon? You’ve come to the right recipe – this one’s so simple – as long as you’re willing to do the cedar-plank thing on the grill.

Not taking a lot of time to hunt for a recipe this time, I just googled “cedar plank salmon.” The #1 recipe came from the Food Network. It’s a Steven Raichlen recipe, but from what I read, Bobbie Flay must have had him on his BBQ show and prepared this dish. What convinced me was the 5-star rating. I read through some of them – a few people didn’t like the quantity of mustard or thought it was bitter. My thought is that they used cheap Dijon. If you use the real stuff, particularly the Maille brand, there won’t be any bitterness. I did reduce the quantity of both mustard and brown sugar, and we were ooohing and aaahing as we ate it.

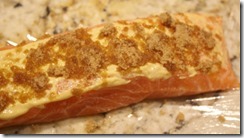
First we soaked a cedar plank (one worked for the portion we were grilling, but you might need 2) for about 2 hours in cold water. Then the plank itself went onto a medium-hot grill for about 4 minutes. That gave it time to steam-out most of the water, but got the plank super-hot. Then my DH salmon_mustard_sugarturned the plank over and carefully placed the lightly slathered and brown sugared salmon fillet (pictured at left with the slather and sugar ready for grilling) on top of the plank. The lid was closed, the heat reduced just slightly, and 10 minutes later the salmon had reached 135°F and it came off. When Dave lifted the lid the last time (he checked the temp of the fish twice) a big plume of smoke engulfed him and burned his sinuses a little. He had a honkin’ headache for the rest of the evening, poor guy. Beware of that, my friends! He said the plank was slightly in flames too, but it didn’t reach the fish. Obviously, you toss the plank once it’s used. You could also do this in the oven, I suppose, but not with the cedar plank – unless you do it at a lower temp. You don’t want that kind of smoke swirling around in your oven.

The salmon needed nothing else – perhaps I could have served it with a little wedge of lemon – but it truly didn’t need it. It was a tiny bit crispy along the edges (from the brown sugar) and the mustard added just a lovely character to the fish. It was perfectly done, juicy, flaky. Delicious.

What’s GOOD: rip-roaring easy and tasty. That’s about all I can say, it should be enough for you to try this super-simple recipe. Good enough for guests too. I haven’t tried oven roasting this, but it should be easy to do that if you don’t want to cedar plank it.
What’s NOT: nada, nothing!
printer-friendly CutePDF
Files: MasterCook 5+ or MasterCook 14 (click link to open in MC)

* Exported from MasterCook *

Cedar Planked Salmon with Dijon and Brown Sugar

Recipe By: Adapted slightly from a Steven Raichlen recipe, via the Food Network
Serving Size: 4

one cedar plank (6 by 14 inches)
1 1/2 pounds salmon fillets
Salt and freshly ground black pepper
3 tablespoons Dijon mustard
3 tablespoons brown sugar

1. Soak the cedar plank(s) under water for 2 hours or more.
2. Preheat grill to medium-high. Place the cedar plank on the grill, cover and allow to pre-heat for about 4 minutes.
3. In the kitchen, spread the salmon fillets with a coating of Dijon, then sprinkle the brown sugar evenly on top. Do this just before you’re ready to grill – otherwise the sugar will begin to melt off the fish, even sitting at room temp.
4. When the cedar plank is super-hot, carefully turn the plank over with tongs and place the fish on top/center of the plank. Close lid, reduce heat just slightly (you don’t want the plank to burn, if at all possible). Depending on the thickness of the fish, cook for 10-15 minutes, or until the internal temperature reaches 135° (use an instant-read thermometer). If the edges of the plank start to catch fire, have a spray bottle of water handy and carefully spray the wood (not the salmon) and perhaps lower the heat slightly. Remove from grill and serve immediately.
Per Serving: 231 Calories; 6g Fat (25.5% calories from fat); 34g Protein; 7g Carbohydrate; trace Dietary Fiber; 89mg Cholesterol; 258mg Sodium.

Posted in easy, Pork, on January 1st, 2014.

milk_braised_pork_chops

Surely you’ve heard somebody talk about milk braising a pork roast. I know I had, but somehow, even though I’d read and heard it was a really tasty way to prepare pork, I’d never actually done it. Plus, I’d simply pictured a curdled gloppy sauce. Who boils milk with any expectation of something pretty!

What I had were pork chops, not a roast. Time was at a premium that day (when I made this a couple of weeks ago I was deep in a quagmire of gift wrapping and Christmas card mailing), I quickly scanned through some recipes for pork and stopped at milk-braised pork. Hmmm. The original recipe I had would take too long, so I researched online and came across this extra-easy and quicker method (although it does take about 1 1/2 hours from start to finish) that was perfect for my timing.

I didn’t even print out the recipe – it was that kind of simple, although I did double check the cooking time and the last-minute saucing. The recipe came from about.com. the Southern Food section of that site, from Diana Rattray, who has provided most, if not all, of the recipes. And this is simple with a capital S! First you make a flour, salt and pepper mixture (and there is very little flour) and coat the chops. You shake off any excess. Into a hot frying pan they go (with a little oil and butter). Meanwhile, you use whatever amount of flour is left over from the dipping (not much) and use a whisk to combine it with some milk. You want to remove all the lumps. Once the chops are browned for about 3 minutes per side, you pour off most of the drippings, and add the milk/flour mixture, reduce heat to a simmer, and cover. It cooks for about 30 minutes or so, stirring every so often. You don’t want the sauce to reduce-down too much and burn.

Not realizing the nuances of the flour, I’d put a bit too much in the bowl, so I had to add additional milk so this mixture was soupy, not thick. If it’s thick it will likely burn and/or boil away. It won’t be pretty! If you have a low-enough burner, it’ll cook very gently. That’s the goal. After 20-30 minutes, you turn the chops over and add more milk. The amount can vary because of the flour amount used. I added just a little bit of my Penzey’s chicken soup base to add more flavor. Again, stir it around, cover and simmer for about another 30 minutes. During this time, check the sauce – if the gravy is too thick, add more milk, but don’t add too much. I added some dried thyme to this, as it’s my go-to herb when I want to add some flavor. Then you take off the cover and allow the pork to continue bubbling away, but the sauce will reduce and get thicker. In that time I quick-like made a salad and some mashed potatoes.

My DH thought he was back home as a kid. Growing up, his mother and dad had a housekeeper named Sarah, a loving Black woman who cooked and cared for the family nearly her whole life. She was from the South, and often cooked kale, turnip greens, black eyed peas and the like. This dish just reminded him of the meals she used to prepare. He wanted to sop up every single bit of the gravy (since I don’t make this kind of a meal very often).

What’s GOOD: how easy this was to make, although it does take more than an hour of just simmering – you want that pork to be fork tender. The sauce was lovely. It’s NOT a fancy sauce – it’s just milk, flour, salt and pepper, so don’t expect some deep character kind of gravy here. Do make some kind of carb (rice would be fine too, or even noodles) to eat with the sauce. I’ve added a note in the recipe about throwing in some mushrooms to this. I didn’t, but if I’d had any, I’d have used them in the sauce. Definitely a keeper of a recipe. Comfort food, for sure.
What’s NOT: probably the lengthy cooking – for pork chops, 1 1/4 hours is a long time to simmer. Hard to do with a table full of hungry children waiting. If you can plan ahead, by all means do it.

printer-friendly CutePDF
Files: MasterCook 5+ and Master Cook 14 (click link to open in MC)

* Exported from MasterCook *

Milk Braised Pork Chops

Recipe By: Adapted from about.com, Diana Rattray
Serving Size: 4

4 pork loin chops — about 3/4 to 1-inch thickness
2 tablespoons all-purpose flour
1/4 teaspoon salt
1/4 teaspoon freshly ground black pepper — or more, or seasoned pepper
3/4 teaspoon dried thyme — [my addition]
2/3 cup milk
2 teaspoons butter
2 teaspoons vegetable oil
3/4 cup milk — added at the end (may not need all of it)
1/2 teaspoon Penzey’s chicken soup base — or other paste-type chicken base
1 cup mushrooms, sliced (optional)

1. Trim excess fat from the pork chops.
2. Combine flour, thyme, salt, and pepper in a large food storage bag. Add chops; shake to coat them with the seasoned flour mixture. Remove chops from bag; pour remaining flour mixture in a medium bowl and gradually whisk in 2/3 cup milk. Whisk to remove any and all lumps.
3. In a skillet over medium heat, melt butter with the vegetable oil. Add pork chops and cook for 3 minutes on each side, or until browned. Pour off all but 2 teaspoons of the drippings. Add milk and flour mixture to the skillet. Stir well until it’s smooth, adding more milk if needed, so it’s a soupy sauce, not a thick one or it will burn during the braising process.
4. Cover, reduce heat to low, and cook for 30 minutes, stirring occasionally.
5. Turn the chops over. Add remaining milk and chicken soup base (paste); stir to dissolve; cover and cook 20 to 30 minutes longer, stirring occasionally. Add mushrooms, if you’d like to during this section of cooking. If the soupy sauce boils away too soon, add more milk and reduce heat.
6. Uncover skillet and cook the chops for about 15 minutes longer, or until the liquid is reduced to about 1/4 cup, or to your desired consistency.
Per Serving: 235 Calories; 12g Fat (48.1% calories from fat); 22g Protein; 8g Carbohydrate; trace Dietary Fiber; 64mg Cholesterol; 309mg Sodium.

Related Posts Plugin for WordPress, Blogger...