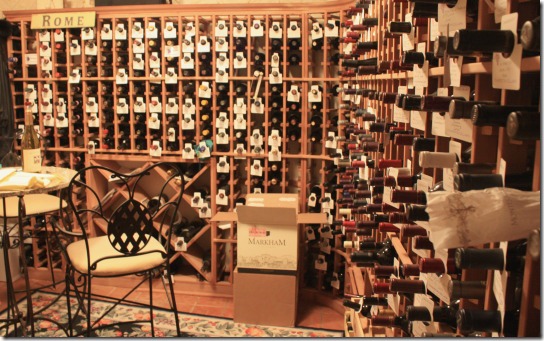
The above is our wine cellar. It’s about 10 x 8, I’d guess, with room for the small table you see, although we’ve yet to sit down there except to catalog some wine (the room is below ground) and sip something because it’s too gosh-darned cold. We have a special refrigeration unit that keeps the wine cellar at a consistent 58. There’s also a little low cubbyhole off to the left (out of view) that can hold about another 8 cases of boxed wine. The cellar itself (with more shelving over on the left side) holds about 900 bottles. You can see that it’s nearly full. Everything you see above is red wine. White is over on the left side, and it’s only about half full since we drink so little white wine.
Archives
Recent Posts
Currently Reading
Tasting Spoons
Posted in Veggies/sides, on February 25th, 2010.
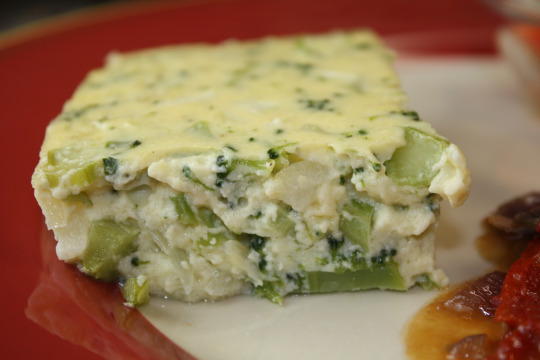
This is an oldie. But a goodie. It used to be a regular on my holiday menu – whether it be Easter, Thanksgiving or Christmas. Or even just for a dinner for guests. I’ve made it with fresh broccoli (like this time), but hey, it tastes just great with frozen chopped broccoli. So if you don’t feel like fussing with fresh, you’ll not be disappointed using frozen chopped. I decided to post it, in case you’re thinking about some easy, but different casserole to make for Easter dinner. It can be prepared ahead and popped in the oven when dinner is close. My recollection is this recipe came from an ancient Sunset Magazine. I searched their website but couldn’t find it. I got it from a distant relative, Gerry Black, a loo-ooo-ng time ago. But it’s weathered the ages. Well.
Somehow, we’ve gotten out of the habit of making cream sauce. Well, you know, maybe it’s not so good for us, especially if you use butter and cream. But, this one CAN be made with non-fat milk and a bit less butter if you want. It calls for mayo, so you can use non-fat mayo (Veganaise works well here_ if you want. So, you may alter the recipe any way it suits you.
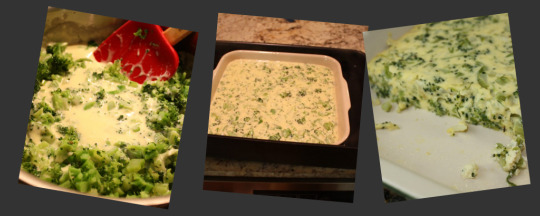
There’s the dish, L-R: Mixing in the broccoli to the cream sauce; in the hot water bath ready to go in the oven; easy serving right out of the casserole.
A note about the onion. I think I’ve mentioned here on this blog before, that when I was a young woman and still learning to cook (this, when I was in my 20’s) I was a bit loose with the herbs and spices. I figured that if a teaspoon of thyme (one of my favorite herbs, still is) was good, then 2 teaspoons would be better. It probably worked fine with thyme, maybe not so well with curry powder. Time, age and humility have set in, though. I now use what the recipe calls for first. THEN, if I want to, I’ll diddle with the proportions. Hence with this and the onion. The original called for about a tablespoon of onion. Well, I don’t know about you and onions, but with me — who uses a tablespoon of onion, for heaven’s sake? So, I started using more. But then I noticed that it tasted more like an onion casserole with a green veggie in it, instead of a broccoli casserole. That’s the humbling part of it – I learned that this recipe really doesn’t like tons of onion in it. So be gentle. But I’ll tell you that the mayo is an important component – don’t skimp on it, be it full fat or low or non. Of course, it makes it delicious.
printer-friendly CutePDF and MasterCook file (click link to open recipe)
Broccoli Casserole
Recipe By : Gerry Black, via Sunset Mag, probably about 1970
Serving Size : 6
NOTES : This can be made with egg substitutes, non-fat mayo and less butter, and it’s still quite tasty, but this is close to the original recipe (I added more onion). I also add just a tiny sprinkling of nutmeg to the cream sauce.
10 ounces chopped broccoli, frozen
3 tablespoons butter
3 tablespoons flour
1/4 teaspoon salt
1 dash pepper
1 dash nutmeg
1 cup milk
1/4 cup onion — minced (very finely minced)
3/4 cup mayonnaise
3 whole eggs — beaten
1. Preheat oven to 350°F. Cook broccoli in a little water until barely done. Drain and set aside. Meanwhile, make a white sauce: in a saucepan melt the butter, add flour, salt, pepper and then milk all at once. Stir until thickened. Add the mayo, onion and eggs. Gently stir in the broccoli and pour into a buttered baking dish.
2. Place that pan in a larger pan of hot water and bake for 30-45 minutes (depends on how deep the dish is), until knife inserted in the middle comes out clean. It may still be a little jiggly, but if the knife comes out clean it will continue cooking for several minutes.
Per Serving: 251 Calories; 24g Fat (83.3% calories from fat); 5g Protein; 6g Carbohydrate; 1g Dietary Fiber; 101mg Cholesterol; 278mg Sodium.
A year ago: Bailey’s (Irish Cream) Cream Cheese Brownies (very rich, very sweet)
Two years ago: Warm Bean & Brie Dip (very easy, a quite delish)
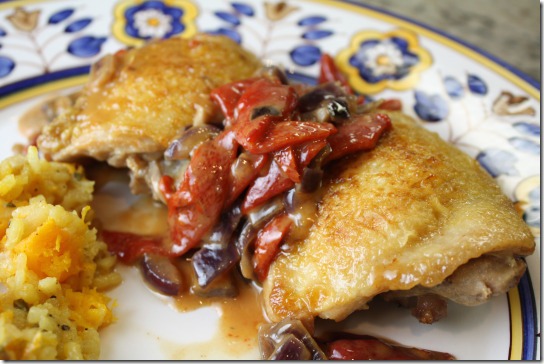
Why, oh why, don’t I go online before I try ANY recipe, to read what others have said? Well, I know why in this case . . . I’d read about piquillo peppers, a mild red pepper from Spain, and I had purchased a can of them (imported, mind you) a couple of months ago. I wanted to try them, assuming they were going to have a unique taste. Something different. Something more piquant than ordinary roasted red bell peppers. Having paid $5.00+ for the can, I truly thought they’d be extraordinary. Nope. Tasted like any old ordinary canned red bell peppers to me.
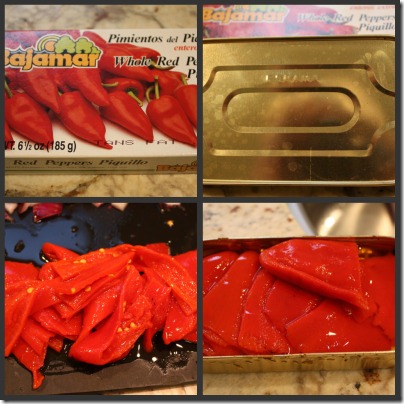
Here’s a photo collage of the peppers: clockwise from top left – in the box, the can, the whole peppers, and chopped.
The recipe came from the book Spain…A Culinary Road Trip by Mario Batali and Gweneth Paltrow. My friend Cherrie gave me the book a year or so ago for Christmas, and I had yet to try a recipe out of it. This recipe was also printed in Food & Wine awhile back, so you can read the story about it, if you so choose. Apparently the recipe is a common one in Spanish cuisine. The ingredients are simple (salt, onion, garlic, chicken, white wine and the piquillo peppers) and the preparation is also very easy. I just thought the dish would be more tasty than it was. Not that it wasn’t good – it was. It was moist, juicy. I liked the sauce. But . . . well . . . it was just chicken with red peppers.
printer-friendly PDF
Chicken with Piquillos
Recipe By: Spain: A Culinary Road Trip by Mario Batali
Serving Size: 4
4 whole chicken thighs — bone-in
2 whole garlic cloves — sliced
Kosher salt
2 tablespoons extra-virgin olive oil
1 large onion — coarsely chopped
9 ounces piquillo peppers — drained, widely sliced
1 cup dry white wine
1. Rub the chicken with the garlic and 1 tablespoon of kosher salt. Cover and refrigerate for 1 hour.
2. Heat the olive oil in a large, deep skillet. Scrape the garlic off of the chicken pieces. Add the chicken to the skillet in a single layer and cook over moderately high heat, turning occasionally, until browned all over, about 12 minutes. Transfer the chicken to a platter.
3. Add the onion to the skillet and cook over low heat, stirring occasionally, until very tender, about 10 minutes. Add the piquillo peppers and white wine and bring to a simmer, scraping up any browned bits.
4. Return the chicken and any accumulated juices to the skillet. Cover partially and cook over low heat until the chicken is tender and cooked through and the sauce is thickened, about 30 minutes. If the sauce is too thin, bring to a boil and reduce it until there is about 2-3 T. of liquid. Transfer the chicken to a platter, spoon the sauce on top and serve.
Per Serving: 328 Calories; 21g Fat (66.0% calories from fat); 17g Protein; 7g Carbohydrate; 2g Dietary Fiber; 79mg Cholesterol; 77mg Sodium.
A year ago: Slow-Cooker Tamale Pie
Two years ago: Armenian Parsley Salad
Posted in Breads, on February 23rd, 2010.
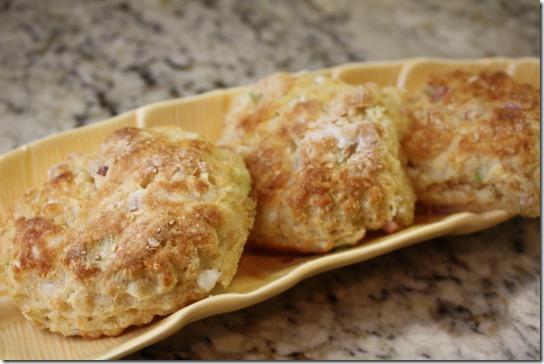
With our split pea soup dinner the other night, we surely didn’t NEED more carbs. But actually split pea soup is fairly low on the carb scale, believe it or not. And these biscuits were downright tasty – with a bit of minced-up ham (which could be eliminated if you didn’t have any) and some crumbles of goat cheese mixed through it. As with most quick breads, the least amount of stirring or kneading you can do will provide the lightest and flakiest texture. These are no exception. You can see a little blip of goat cheese in the closest biscuit on the lower right edge.
Obviously, this is a good choice if you happen to have a leftover ham (I did), some goat cheese (yes, I had that too), and some cornmeal (yup, that always lives in my pantry). These aren’t overly cornmeal-y, if there is such a word, but you definitely do get the granular kind of crunch of cornmeal with every bite. And a great accompaniment to a bowl of hot soup.
printer-friendly PDF
Cornmeal Biscuits with Ham and Goat Cheese
Serving Size: 12
As with most quick breads, the least amount of stirring or kneading you can do will provide the lightest and flakiest texture.
1 2/3 cups all-purpose flour
1/3 cup cornmeal
1 tablespoon sugar
1/2 teaspoon salt
2 1/2 teaspoons baking powder
1/2 tablespoon baking soda
3 tablespoons unsalted butter — cold, cut into chunks
1/2 cup goat cheese — crumbled
1/2 cup ham — diced
3 whole green onions — diced
2/3 cup buttermilk
1. Preheat oven to 425. Prepare a cookie sheet with Silpat or parchment paper.
2. In a medium sized bowl combine the dry ingredients.
3. Add the cubed butter and crumbled goat cheese. Using a pastry blender combine the dough until mixture resembles coarse crumbs (there will be small pieces of visible goat cheese, and that’s fine).
4. With a spatula, stir in the minced ham and green onions.
5. Make a well in the middle of the dry mixture and pour in the buttermilk. Stir gently until it comes together is a raggedy mass. (If it’s too dry to come together drizzle about a tablespoon of buttermilk in the dough until it does come together).
6. Pour out onto a lightly floured board and knead gently 3-4 times. Press the dough into a round, about 3/4 inch thick. Cut dough with a 2-inch round cutter and place biscuits on the baking sheet, leaving at least a 2 inches between each.
7. Bake for 12-14 minutes until browned and crusty. Serve hot.
Per Serving: 145 Calories; 6g Fat (34.2% calories from fat); 5g Protein; 19g Carbohydrate; 1g Dietary Fiber; 16mg Cholesterol; 454mg Sodium.
A year ago: Steak & Mushroom Soup
Two years ago: White Lady (a tasty alcoholic drink)
Posted in Soups, on February 22nd, 2010.
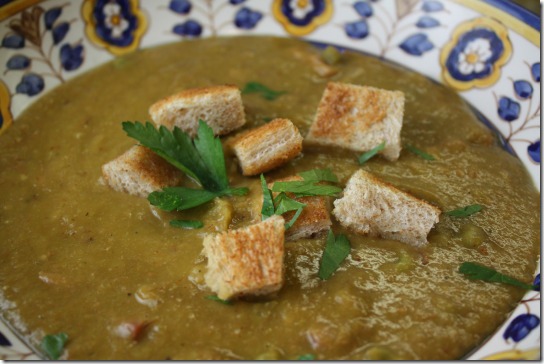
Is there anything much more comforting than split pea soup? I think not. I had a lovely ham bone that was just itching to provide some great flavor to something. And I had a hunk of pancetta that also needed using, so they were the flavor peak in this simple soup. With onion, leeks, celery, carrots, thyme, chicken broth and split peas there’s little else you need. The entire meal came together with about 30 minutes of simmering, but there was a bit of chopping and mincing going on – the pancetta and vegetables before, then the ham from the ham bone (plus a bit more). But I now have several nights of hearty soup dinners in the freezer. Since the soup is thick to begin with, you can thin it down if you’d like – either with water or some added chicken broth. You can also not puree the soup as much as I did – that’s totally up to you. I like the texture contrast of the toast croutons (I just used a thick piece of whole wheat toast, toasted in the toaster, trimmed and very lightly buttered and chopped), then a little bit of green with the Italian parsley. And you’re done.
printer-friendly PDF
Split Pea Soup with Ham, Pancetta and Green Peas
Recipe By: Combined from several recipes on the internet.
Serving Size: 8
NOTES: If you like to see carrots in your soup, reserve about a cup of raw ones (dice them up fairly small) and add in after you’ve pureed the soup. Cook carrots for about 5 minutes, then add the peas and heat through. You can also use a ham bone (rather than the hock) if you have it – just leave some of the meat on the bone as it adds a lot of flavor to the broth. Once the soup is cooked, remove the bone and chop up the meat just as for the ham hock, discarding any fat. If you prefer your soup more chunky, puree about half of it and leave the remainder as-is. If you prefer your soup thinner, just add more chicken broth or water to make it the consistency you like. I cool the soup, then pour 4-cups worth (that’s 2 1/2 servings in my house) into a large Ziploc freezer bag, chill, then lay flat in the freezer until frozen solid. Then I stand it up with all the other frozen soups I have in my freezer. The ham and pancetta add a ton of flavor to this soup, but you can eliminate the pancetta if you don’t have it on hand.
3 ounces pancetta — minced
2 ounces unsalted butter — (half a cube)
1 large onion — (if small, use two), chopped
3 stalks celery — coarsely chopped
2 medium leeks — cleaned, chopped
8 cups chicken broth — (or 1 T Penzey’s soup base concentrate)
3 cloves garlic — peeled, mashed
4 whole carrots — coarsely chopped
2 tablespoons dried thyme
1 1/2 pounds ham hock — with some meat on the bone
2 cups ham — minced
2 cups frozen peas
2 whole toast slices — use thick toast if you have it, slicing off the edges
2 tablespoons Italian parsley — minced
1. Chop all the vegetables before starting to cook. Rinse the split peas well and remove any rocks or debris. Allow to drain.
2. Saute pancetta in a large, tall stockpot (use a heavy-duty pan) for about 10 minutes until some of the edges are browned. (If you want the pancetta to remain in visible pieces, remove it and set aside to add in at the end.) Add the butter, melt, then add onions, leeks and celery. Sweat for about 10 minutes. Add garlic, stir and cook for about a minute. Add the carrots, split peas, season with thyme and pepper. Bring to a boil.
3. Reduce heat, cover and simmer for about 30-45 minutes, until split peas are completely cooked through.
4. Remove ham hock and set aside to cool. Remove meat from the bone and chop into small pieces (discard the bone).
5. Allow soup to cool about 20 minutes, then 2-3 cups at a time pour into blender and puree. Don’t overfill the blender container or it will blow off the top when you begin to puree it.
6. Pour soup back into the stock pot and bring up to a simmer again. Add the reserved ham, and frozen peas. Simmer for about 5 minutes, taste for seasoning and serve in wide bowls – about 1 1/2 cups per serving. Garnish with chopped-up toast cubes (or make croutons) and a bit of Italian parsley.
Per Serving: 482 Calories; 28g Fat (53.2% calories from fat); 36g Protein; 20g Carbohydrate; 4g Dietary Fiber; 132mg Cholesterol; 1654mg Sodium.
A year ago: An explanation about Error Code 404
Two years ago: Cream of Cashew Soup
Posted in easy, Salads, Veggies/sides, on February 20th, 2010.
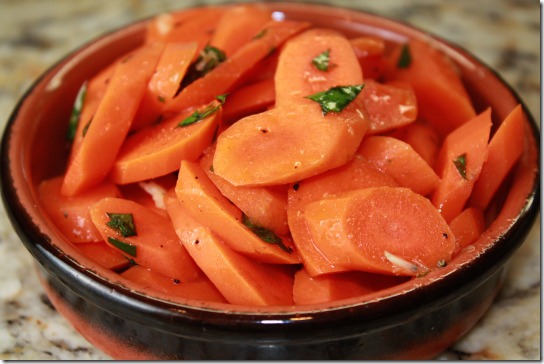 It’s been about 3 years since I posted this recipe, back in May of ‘07. And “keepers” sometimes need to be repeated – those recipes I would encourage you to make. Over and over. Cooked carrots have a bad rap sometimes. Remind people of baby food, or something. But these little gems have a burst of flavor – from garlic, olive oil and lemon juice. And a little bit of ground cumin and brown sugar. They’re especially good if you make them ahead and allow them to sit overnight in the dressing (chilled, of course). I like to let them sit out and get to room temp. You just need to briefly cook the carrots – you’ll want them to be just barely tender, or you can make them more crunchy if that’s your preference. The dressing is very easy to make (good at this time of year with ripe lemons filling bowls in my kitchen) and just stir it all up and let the carrots marinate. This is best with some kind of highly seasoned dinner – don’t serve this with a filet of sole, for instance. Not unless you’re making it with garlic and lemon juice. This recipe could also be made with zucchini – or maybe better yet, do both and serve them side by side. Would make a very colorful side dish.
What’s in this: carrots, olive oil, lemon juice, garlic, ground cumin, brown sugar and parsley. And a bit of salt and pepper too. That’s it. Click HERE for the write-up I did back in ‘07. I took new pictures of the carrots, and will insert this new one in the old recipe since this one is much closer and clear!
A year ago: A list of the 50 top blogs
Two years ago: Sugar Snap Pea Tops
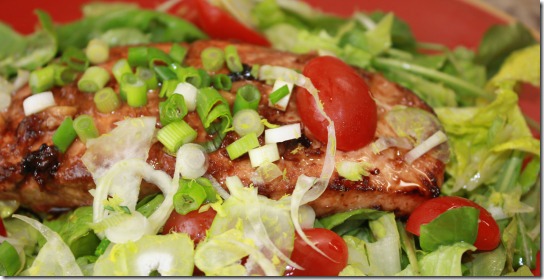
A couple of nights ago when I made this, I’d been working on our income taxes all day long. I mean all – day – long. We needed to eat dinner in a big fat hurry because it was Ash Wednesday and we were singing in the choir at services that night, with a 6:20 call time. Whew. At 5:10 I entered the kitchen. Five minutes were used up finding a recipe. I started prep at 5:15 and I had dinner ON the table by 5:35 and we were out the door at 5:55. So, does that tell you that this recipe is FAST and EASY?
 The second part is that the taste was sensational. I mean, absolutely fabulous. I think I’m going to create a new category here on my blog for EASY. Not that I have all that many recipes that would qualify, since normally I don’t mind spending time chopping, dicing, mixing, etc. The marinade came from a Steven Raichlen recipe. He’s the barbecue king, multi-cookbook author and has his own TV series, Primal Grill which will show again sometime this year. This recipe, though, came from Food and Wine, in June of ‘07. Other than the marinade, I altered all the rest of the recipe. I had no time to make a vegetable, or a carb, but I did have the makings of a salad. His recipe called for grilling the steaks. I didn’t have time to heat the barbecue. His recipe called for marinating the salmon. Oops, no time for that either except for the 5 minutes or so I took gathering and chopping all the salad ingredients. But I thought, what the heck, at least the marinade will provide some flavor. And indeed it did!
So if you’d like to grill the dish Raichlen’s way, just click over to the Food and Wine version. In the headnotes to the recipe Steven said each year he works on “one embarrassingly simple recipe, but incredibly versatile.” This was the one from ‘07. It will become a regular on my menu. AND, it would be a great company meal. Really! I had some beautiful Norwegian wild salmon (from that same home delivery meat company). And oh yes, indeed, the salmon was so flavorful. Meaty. And the sauce, although it’s a marinade, I added in at the end of cooking and it became a drizzle on the salad too. Serve the salmon with a non-tannic Pinot Noir, if you’re serving wine. If you work at it, you might be able to beat my time of start-to-finish dinner on the table in less than 20 minutes. That even beats Rachel Ray’s timing!
printer-friendly PDF
Arugula Salad with Salmon Steaks and Soy-Maple Glaze
Recipe By: Adapted from a Steven Raichlen recipe, Food & Wine, 6/07
Serving Size: 4
NOTES: Use your own choice of salad ingredients. No arugula? Use all Romaine. Just don’t use a real soft butter lettuce type or the hot salmon will wilt it to nothing. Add just enough salad dressing so the salad is barely slick – you’ll pour the marinade over the top as well.
SALMON and MARINADE:
1/4 cup soy sauce
3 tablespoons maple syrup
3 tablespoons Asian sesame oil
24 ounces salmon steaks — 4 steaks – 1/2 inch to 3/4 inch thick
One 2-inch piece of fresh ginger—peeled — thinly sliced and smashed
2 whole garlic cloves — peeled, smashed
SALAD:
4 cups arugula
2 cups Romaine lettuce — chopped
1/2 cup fennel — very thinly sliced
2/3 cup sugar snap peas — trimmed, sliced
1/4 cup vinaigrette
GARNISH:
16 whole cherry tomatoes — halved
2 whole scallions — thinly sliced
1. In a large, shallow dish, whisk the soy sauce with the maple syrup and sesame oil. Add the salmon steaks and turn to coat. Press the ginger and garlic onto both sides of the steaks. If time permits, cover and refrigerate for 2 hours, turning the salmon a few times.
2. Prepare the salad ingredients (and dressing) and set aside. Chop and set aside the garnishes.
3. Heat to medium-high a nonstick skillet (large enough to hold all 4 salmon steaks) and add a light coating of olive oil. Remove the salmon from the marinade (reserving the marinade) and saute them to sear both sides, about 2 minutes total. Reduce heat to medium-low, cover and cook the salmon until just barely done to your liking (about 3-5 minutes depending on thickness). Add the reserved marinade, cover and simmer for one minute.
3. Lightly dress the salad with your choice of vinaigrette dressing, pour out onto serving plates and place the salmon on top of the salad. Garnish with tomatoes and green onions and serve.
Per Serving: 446 Calories; 24g Fat (49.1% calories from fat); 37g Protein; 20g Carbohydrate; 3g Dietary Fiber; 88mg Cholesterol; 1166mg Sodium.
A year ago: Chocolate Sponge Roll (decadent chocolate and whipped cream)
Two years ago: Almond Bar Cookies
Posted in Breads, on February 18th, 2010.
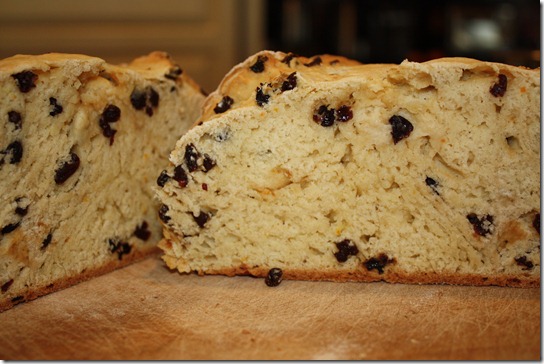
Is there some salivating going on looking at that photo of Irish Soda Bread? Should be. Especially if you were here on my end of the camera and you could smell the fresh-out-of-the-oven aroma of this bread. There surely are lots of ISB recipes out there. I even have one here on my blog. But it wasn’t as good as this one – THIS recipe from Ina Garten. And it’s not all that different (it is made with buttermilk just like the other one) except that it contains some grated orange zest and a bit more butter. Orange zest is non-traditional, but Ina was kind of cute and cheeky when I watched her make this a week or so ago on her show when she said she likes orange zest, and so what if it’s non-traditional. It tastes good, and that’s all that’s necessary to make the addition! You can see a little bit of the orange in the bread if you look closely.
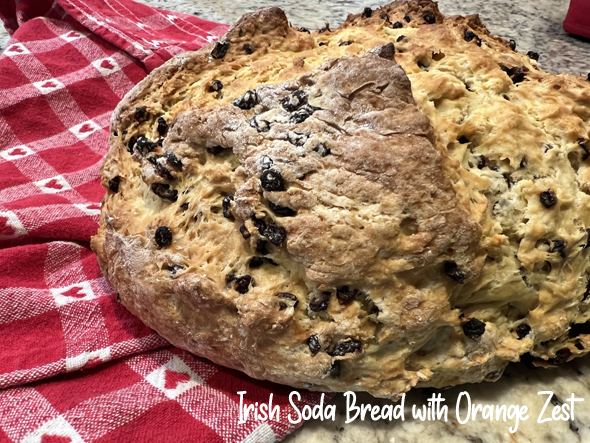 I’ve updated this post – with a new picture above. It’s very easy to make. Really it is. Almost no handling at all. Ina recommended mixing it up in a stand mixer, although surely it could be done by hand, even. Once all the ingredients are added the wet dough is rolled out onto a floured board and you literally knead it about 4-5 times adding a bit more flour if needed (mine didn’t except to keep it from sticking to the countertop), shape it into a round (I did an oblong kind of shape – this isn’t an exact thing) and into a 375 oven it goes for 45-55 minutes. I took it out at 45 and it was plum-perfect! Not only did we eat it with our ham dinner, but we had some with an elegant cheese course which was served afterwards.
Ina mentioned how fabulous this bread is as morning toast. We did have one small end leftover from our Sunday dinner and we had it for breakfast. Oh my yes. Loved it.
printer-friendly PDF and MasterCook file (click link to open recipe)
Irish Soda Bread with Grated Orange Zest
Recipe By: Ina Garten
Serving Size: 12
4 cups all-purpose flour — plus extra for currants
4 tablespoons sugar
1 teaspoon baking soda
1 1/2 teaspoons kosher salt
4 tablespoons cold unsalted butter — (1/2 stick) cut into 1/2-inch dice
1 3/4 cups buttermilk — cold, shaken
1 whole extra large egg — lightly beaten
1 teaspoon orange zest — grated
1 cup dried currants
1. Preheat the oven to 375 degrees F. Line a sheet pan with parchment paper.
2. Combine the flour, sugar, baking soda, and salt in the bowl of an electric mixer fitted with the paddle attachment. Add the butter and mix on low speed until the butter is mixed into the flour.
3. With a fork, lightly beat the buttermilk, egg, and orange zest together in a measuring cup. With the mixer on low speed, slowly add the buttermilk mixture to the flour mixture. Combine the currants with 1 tablespoon of flour and mix into the dough. It will be very wet.
4. Dump the dough onto a well-floured board and knead it a few times into a round loaf. Place the loaf on the prepared sheet pan and lightly cut an X into the top of the bread with a serrated knife. Bake for 45 to 55 minutes, or until a cake tester comes out clean. When you tap the loaf, it will have a hollow sound.
5. Cool on a baking rack. Serve warm or at room temperature.
Per Serving: 257 Calories; 5g Fat (17.6% calories from fat); 7g Protein; 47g Carbohydrate; 2g Dietary Fiber; 32mg Cholesterol; 386mg Sodium.
A year ago: About my Kindle
Two years ago: Coriander Lime Shrimp (oh yes, delish)
Posted in Veggies/sides, on February 17th, 2010.
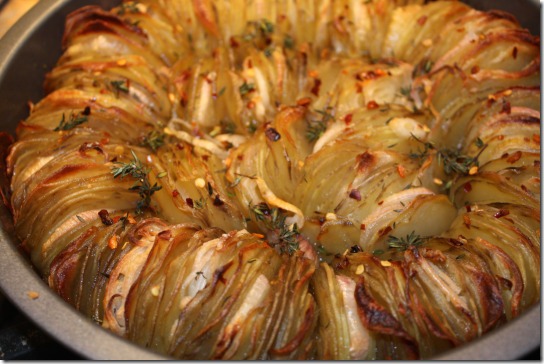
Thanks goodness for photography. I might never have made this side dish had I not seen the photo of it. Isn’t it unusual? I always like unusual. Anybody can make scalloped potatoes. Or mashed, or home fries. So somebody at Martha Stewart obviously thought outside the box – standing thinly sliced potatoes on their sides.
Posted in Veggies/sides, on February 16th, 2010.
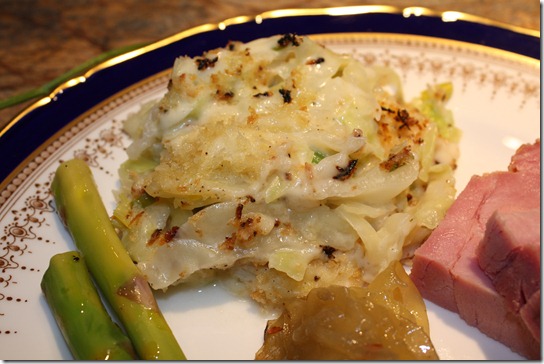
Cabbage isn’t the most photogenic blossom on the block, I’ll admit. And the leeks hiding inside didn’t much poke their heads above range, so what we have is a kind of beige looking glob. But the taste – well, that’s all that matters, isn’t it?
When I read about this recipe over at Marie’s blog, I knew my DH would love it – he adores cabbage in almost any way, shape or form. So with the addition of leeks, a cheesy cream sauce and a breadcrumb topping, I knew he’d be in seventh heaven. And he was. It’s a simple recipe, really. Just needs to be made in steps: (1) cooking the sliced cabbage and leeks in boiling water; (2) making the traditional cream sauce with butter, flour and low-fat milk, with some grated cheese and a smidgen of grated nutmeg added; and (3) preparing the buttered crumbs to sprinkle on top. I made everything the day before – just didn’t do the crumb topping until the last minute.
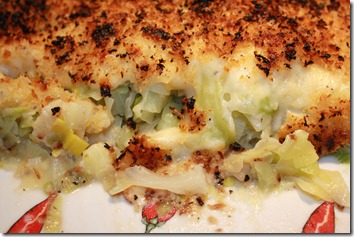 And I must tell you a story. I took this dish to our son and daughter-in-law’s home on Sunday for a festive family Valentine’s dinner. In the photo at top – – I brought the Berkshire ham you can see on the plate at right, the potatoes you can see in the foreground, and Karen made fresh asparagus. So I popped this casserole in the oven 35 minutes before serving time. Right on time I opened the oven and the casserole was still very pale looking, so I turned on Karen’s broiler. And within about a minute the infrared broiler element had set the bread crumbs on fire. I mean flames. Our son saved the day by pulling out the casserole from the oven and extinguishing the fire, fortunately. And at that point I was looking at this blackened – a la flambé – mess. Not the kind of flambé that you want, though. But once I took a flat edge to the casserole I was able to scrape all the blackened crumbs to one end and we ate it without mishap. In the picture above you can definitely see the result of my broiler mishap. But you know what? Those blackened crumbs tasted just fine! And the casserole itself was delicious. Definitely a make-again dish. Everybody loved it, me included. A keeper. Marie had suggested cheese as an addition, which I did. I used some imported England sharp cheddar, and Parmigiano-Reggiano. I also put some additional grated cheese on top of the cream sauce too, then the crumbs were sprinkled on top of that.
printer-friendly PDF
Cabbage and Leek Gratin
Recipe By: Marie, A Year from Oak Cottage blog, 2/10
Serving Size: 8
1 head cabbage
3 medium leeks
3 tablespoons butter
3 tablespoons flour
1/2 teaspoon salt
1/4 teaspoon freshly ground black pepper
freshly grated nutmeg to taste
a dash of hot pepper sauce
1 1/2 cups milk — 2% is fine
9 ounces cheese — cheddar or Gruyere and Parmesan, grated
1 cup fresh bread crumbs — (I used panko)
2 tablespoons butter — melted
1. Remove any old leaves from the outside of the cabbage. Cut it into quarters and remove the core. Shred or slice coarsely.
2. Trim the leeks, cut in half and wash them thoroughly. Shred them coarsely as well. Mix them into the cabbage.
3. Bring a large pot of lightly salted water to the boil. Add the vegetables. Bring back to the boil, and then reduce the heat to a simmer and cook them for about 5 to 6 minutes, just until barely tender. Drain in a colander and allow to sit for a brief time to drain – to get as much water out as you can. You don’t want any of the water to dilute the cream sauce.
4. Preheat the oven to 180*C/375*F.
5. Make cream sauce by melting the 3 T butter in a saucepan. Stir in the flour and cook, stirring over medium heat, for about one minute. Slowly whisk in the milk and cook, whisking constantly, until smooth and nicely thickened. Season to taste with some salt, pepper and grated nutmeg. Add a splash of hot pepper sauce to taste. Add the shredded cheese (reserving a bit of it to sprinkle on the top).
6. Put the cabbage mixture into a buttered shallow dish. Pour the cream sauce over the top and allow it to soak in for a few minutes, while you make the crumbs for on top. Sprinkle the cream sauce with the reserved grated cheese.
7. Melt the 2 T of butter and then stir in the bread crumbs, mixing all together well. Sprinkle the buttered crumbs evenly over the top of the casserole. Bake in the preheated oven for 25 to 30 minutes, until nicely bubbling and the crumbs are lightly browned on top. If the top isn’t browned, put under the broiler for a few minutes until golden brown. Watch carefully so it doesn’t burn.
Per Serving: 141 Calories; 9g Fat (56.8% calories from fat); 3g Protein; 13g Carbohydrate; 1g Dietary Fiber; 26mg Cholesterol; 268mg Sodium.
A year ago: Mushroom Bread Pudding (a real stunner of a side dish)
Two years ago: Fish Chowder with a Thai Twist



Leave a Comment!