Get new posts by email:

Archives

Currently Reading

Here are the tastingspoons players. I’m in the middle (Carolyn). Daughter Sara on the right, and daughter-in-law Karen on the left. I started the blog in 2007, as a way to share recipes with my family. I’m still doing 99% of the blogging and holding out hope that these two lovely and excellent cooks will participate. They both lead very busy lives, so we’ll see.

– – – – – – – – – – – – – – – – – – – – – –

BOOK READING (from Carolyn):

Music of Bees, Eileen Garvin. Absolutely charming book about a woman in midlife, lonely, who raises bees, also makes unlikely friends. Heart-warming and very interesting about beekeeping.

A Postcard from Paris, Alex Brown. Really cute story. Dual time line, 1940s and present day about renovating an old apartment in Paris, things discovered.

Time of the Child, Niall Williams. Oh such a good book. Very small village in Ireland, 1960s. A baby is left on the doorstep. The town all whispers and helps. I listened to an interview of the author, which made me like him and his books even more.

Sipsworth, Simon Van Booy. If you like animals you’ll swoon. An old woman who really wants to die finds a tiny mouse in her house and befriends it and finds a reason to live. Utterly charming book.

The Forger’s Spell, Edward Dolnick. True story. For seven years a no-account painter named Han van Meegeren managed to pass off his paintings as those of Johannes Vermeer.

If You Lived Here, You’d be Home by Now, Christopher Ingraham. Could hardly put it down – about a journalist who takes on a challenge to move to small town in Minnesota and write about it. He expects to hate it and the people and place, but he doesn’t. Absolutely wonderful true story.

The River We Remember, William Kent Kreuger. 1950s, Minnesota. A murder and the aftermath. Could hardly put it down. Kreuger has such a vivid imagination and writing style.

How the Lights Gets In, Joyce Maynard. An older woman returns to New Hampshire to help care for her brain-injured son. Siblings and family, lots of angst and resentments.

The Filling Station, Vanessa Miller. Every American should read this book. A novelized retelling of the Tulsa massacre in 1921. Absolutely riveting.

The Story She Left Behind, Patti Callahan Henry. Love this author. Based on a true story. A famous author simply vanishes, leaving her husband and daughter behind. She had invented a mystical language no one could translate. Present day, someone thinks he’s solved the riddle, contacts the family. Really interesting read.

The Girl from Berlin, Ronald Balson. Love anything about Tuscany. An elderly woman is being evicted from a villa there, with odd deed provenance. Two young folks go there to help unravel the mystery. Loved it.

The Island of the Colorblind, Oliver Sacks, M.D. Nonfiction. The dr is intrigued by a remote Pacific island where most of the inhabitants are colorblind. He also unravels a mystery on Guam of people born with a strange neurological problem. Medical mysteries unveiled. Very interesting.

The Bookbinder, Pip Williams. Post 1914 London. Two sisters work at a bookbindery. They’re told to not read the books. One does and one doesn’t. One has visions beyond her narrow world; the other does not. Eventually the one gets into Oxford. Lovely story.

The Paris Express, Emma Donoghue. 1895 on a train to Paris, a disaster happens. You’ll delve into the lives of many people who survived and died in the crash.

A Race to the Bottom of Crazy, Richard Grant. This is about Arizona. Author, wife and child move back to Arizona where they once lived. Part memoir, research, and reporting in a quest to understand what makes Arizona such a confounding and irresistible place.

The Scarlet Thread, Francine Rivers. A woman’s life turned upside down when she discovers the handcrafted quilt and journal of her ancestor Mary Kathryn McMurray, a young woman who was uprooted from her home only to endure harsh frontier conditions on the Oregon Trail.

A Place to Hide, Ronald Balson. 1939 Amsterdam, an ambassador has the ability to save the lives of many Jewish children. Heartwarming.

Homeseeking, Karissa Chen. Two young Chinese teens are deeply in love, but in China. Then their families are separated. Jump to current day and the two meet again in Los Angeles.

North River, Pete Hammill. He always writes such a good story. A doctor works diligently healing people from all walks of life. His wife and daughter left him years before. One day his 3-yr old grandson arrives on his doorstep.

A Very Typical Family, Sierra Godfrey. A very messed-up family. Three adult children are given a home in Santa Cruz, Calif, but only if the siblings meet up and live in the house together. A very untypical scenario but makes for lots of messes.

Three Days in June, Anne Tyler. The usual Anne Tyler grit. Family angst. This wasn’t one of my favorites, but it was entertaining and very short.

Saved, Benjamin Hall. Author is a veteran war reporter. Ukraine, 2022, he nearly loses his life to a Russian strike. Riveting story – he survives, barely.

Grey Wolf, Louise Penny. Another Inspector Gamache mystery in Quebec. She is such an incredible mystery writer.

All the Colors of the Dark, Chris Whitaker. A missing person mystery, a serial killer thriller, a love story, a unique twist on each. Could hardly put it down.

Orbital, Samantha Harvey. Winner of 2024 Booker Prize. I don’t usually like those, but I heard the author interviewed and she hooked me. This is not a normal book with a beginning, a story and an end. It’s several chapters of the day in the life of various astronauts at the ISS (Int’l Space Station). All fictional. She’s been praised by several real astronauts for “getting it” about space station everyday life.

The Blue Hour, Paula Hawkins. An island off Scotland. Inaccessible except when the tide is out. Weird goings on. An artist. A present day mystery too.

Iron Lake, William Kent Krueger. A judge is murdered and a boy is missing. Riveting mystery.

Tell the Wolves I’m Home, Carol Ricks Brunt. 1980s. A 14-yr old girl loses her beloved uncle. Yet a new friendship arises, someone she never knew about.

Four Treasures of the Sky, Jenny Zhang. 1880s, a young girl is kidnapped in China and brought to the United States. She survives with many hurdles in the path.

The Boy Who Fell out of the Sky, Ken Dornstein. Memoir, 1988. The author’s brother died in the PanAm flight that went down in Lockerbie, Scotland. A decade later he tries to solve “the riddle of his older brother’s life.”

Worse Care Scenario, T.J. Newman. Oh my. Interesting analysis of what could/might happen if a jet crashed into a nuclear plant. Un-put-downable.

Song of the Lark, Willa Cather. Complicated weave of a story about a young woman in about 1900, who has a gifted voice (singing) and about her journey to success, not without its ups and downs.

Crow Talk, Eileen Garvin. Charming story which takes place at a remote lake in Washington State, about a few people who inhabit it, the friendships made, but also revolving around the rescue of a baby crow.

The Story Collector, Evie Woods. Sweet story about some dark secrets from an area in Ireland, a bit magical, faerie life, but solving a mystery too.

A Sea of Unspoken Things, Adrienne Young. A woman investigates her twin brother’s mysterious death. She goes to a small town in California to figure it out, to figure HIM out.

The King’s Messenger, Susanna Kearsley. 1600s England, King James. About one of his trusted “messengers,” and his relationship with a young woman also of “the court.” Lots of intrigue.

In the Shadow of the Greenbrier, Emily Matchar. Interesting mystery in/around the area of the famous resort in White Sulphur Springs, West Virginia.

Isola, Allegra Goodman. Hard to describe, survival story on an island in the 1600s.

Save the Date, Allison Raskin. Rom-com, witty, LOL funny. Clever.

The Sirens, Emilia Hart. Numerous time-lines, Australia. Mysteries abound, nightmares, abandoned baby, weird allergies.

Red Clay, Charles Fancher. LOVED this book. Mostly post-Civil War story about the lives of slaves in Alabama during Reconstruction.

Stars in an Italian Sky, Jill Santopolo. Dual time line, 1946 and recent time. Love stories and a mystery.

Battle Mountain, C.J. Box. Another one of Box’s riveting mysteries. Love his descriptions of the land.

Something Beautiful Happened, Yvette Corporon. A memoir of sorts in Greece, tiny island of Erikousa, where the locals hid Jews during WWII. All elusive stories told by the author’s grandmother.

The Jackal’s Mistress, Chris Bohjalian. 1860s Virginia, about a woman who saves the life of a Union soldier. Really good story.

Song of the Magpie, Louise Mayberry. Really interesting story about Australia back in the days when it was mostly a penal colony. Gritty strength of a woman trying to thrive with her farm.

The Boomerang, Robert Bailey. A thriller that will have you gripping the book. About a lot of secrets surrounding the president (fictional novel, remember) and his chief of staff and about cancer. A cure. Such a good story.

Care and Feeding, Laurie Woolever. Really interesting memoir of a woman driven to succeed in the restaurant business. She worked for Mario Batali and then Anthony Bourdain. Gritty stories.

Everything is Tuberculosis, John Green. Maybe not a book for everyone. A real deep dive into the deadly tuberculosis infection, its history. I heard the author interviewed and found the book very interesting.

The Book Lovers Library, Madeline Martin. Fascinating read about Boots’ drug stores’ lending library. And the people who worked in them.

The Arrivals, Meg Mitchell Moore. LOL funny, about a middle-aged couple whose children (and their various family members) return to the family home and the chaos that ensues.

My Life as a Silent Movie, Jesse Lee Kercheval. About grief. A big move to Paris, finding herself a new life with a new set of real blood family.

Escape, Carolyn Jessop. Another memoir about a woman really in bondage in Utah, Mormon plural marriage.


Tasting Spoons

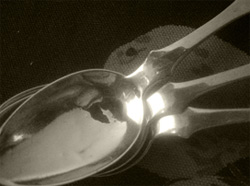
My blog's namesake - small, old and some very dented engraved silver plated tea spoons that belonged to my mother-in-law, and I use them to taste my food as I'm cooking.

Scroll down to the bottom to view my Blogroll

Posted in Grilling, Pork, Sous Vide, on April 13th, 2012.

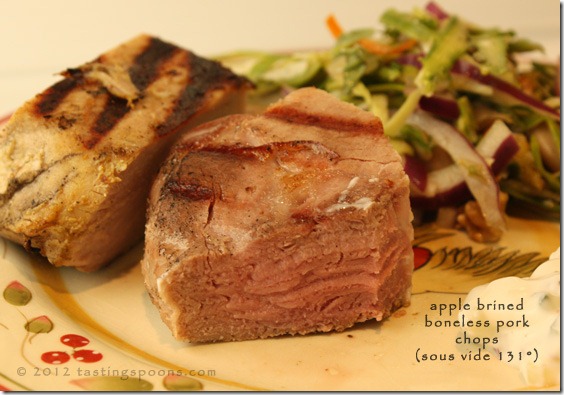
boneless_pork_chops_sous_vide_131

Even using the sous vide, the prep work may require a couple of steps – as in this case. First I soaked the pork chops in an apple brine for 24 hours, then they went into the sous vide for several hours with some seasonings. Worth the effort for sure.

After several weeks, I’m still learning my way through using the SousVide Supreme Sous Vide Water Oven. The process doesn’t come naturally like stove top sautéing, or grilling or simmering. But I’m getting the hang of it. This time I pulled some pork chops out of the freezer that I’d already prepped. I’d bought one of those big packages of boneless thick pork chops at Costco. Here’s what I did to the whole batch:

  1. Soaked them in a big Ziploc bag in Tyler Florence’s Spiced Apple Brine. For 24 hours. I drained it, then . . .
  2. Put two small chops each into vacuum pouches (still left open at this point).
  3. Added to each pouch a little sprinkling of capers, about 1 teaspoon of Dijon mustard and kind of mushed it around on one side of the meat, about 1/2 teaspoon of fresh chopped rosemary and some pepper. Then I sealed them up with the vacuum sealer.

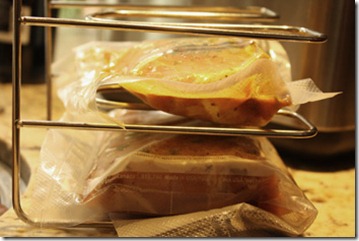
pork_chops_bagged_rackAt this point I froze them so it would be easy to prepare once they were defrosted, which I did 24 hours ahead of serving. The day of, I put them in 131° water in the Sous Vide, and let them cook for about 6-7 hours (the range is 5-8 hours – meaning they’d be done in 5 but they can hold at that temp for up to 8 hours). My DH fired up the gas grill and just seared them for about 1 1/2 minutes per side. I made a kind of a raita sauce on the side (sour cream, fresh chives, minced cucumber, lemon juice, a little jot of champagne vinegar, some fresh herbs, salt, pepper). I’d also done some of the pork in a curry kind of flavoring mix, but none of us cared for it much – so that’s why I made the raita style side. Raita goes mostly with Indian food (you can see the yellow curry in the upper pouch), but it was nice enough with this.

So how was it? Wonderful! The meat was tender as could be – it was perfectly cooked through, pink in the middle too. If you are cooking pork from a raw state the USDA recommends you cook it to 143° to kill the pathogens. But using a sous vide, several hours of that slow cooking provides the same bug-killing at 131° (according to my sous vide information). In my sous vide cookbook, it indicates that pasteurization of meat (beef, lamb, pork) occurs  after 2 hours (1 1/4 inch thick meat). Thinner meat takes less time. So even though the meat was pink in the middle, it was completely cooked and safe.

What I liked: just how tender the meat was, and how flavorful the little seasoning in it was. Brining was definitely the way to go.

What I didn’t like: really nothing. I’d definitely make this again. I’ll likely make a different sauce.

printer-friendly PDF
MasterCook 5+ import file – right click to save file, run MC, then File|Import

Pork Chops with Spiced Apple Brine (Sous Vide 131°)

Recipe By: My own concoction
Serving Size: 4

30 ounces boneless pork top loin chops — about 1″ thick
2 T. Tyler Florence’s Spiced Apple Brine
3 cups water
POUCH SEASONINGS:
4 tablespoons capers — drained
2 teaspoons Dijon mustard
1 1/2 teaspoons fresh rosemary — chopped
Freshly ground black pepper

1. In a large Ziploc plastic bag combine the apple brine mixture (a flavored salt) and water. Add pork chops, seal bag and rest in refrigerator for 24 hours, turning at least once.
2. Remove chops from brine, drain and pat dry with paper towels.
3. Place 1-2 chops into vacuum seal bags and divide the seasonings (capers, mustard, rosemary and pepper) amongst the bags. Spread the mustard over one side of each chop. Seal bags using vacuum sealer. Pouches can be frozen at this point if desired. When ready to use, defrost for 24 hours in refrigerator (or put them in a bowl of cold water for about 3 hours at room temp).
4. Preheat sous vide to 131°. Place pouches in the water for 5-8 hours.
5. Remove from sous vide, cut open pouches and sear the meat on an outdoor grill (or on an indoor stovetop grill) for about 1 1/2 minutes per side, just to give the sides an attractive appearance. Serve immediately.
Per Serving: 249 Calories; 9g Fat (35.5% calories from fat); 38g Protein; trace Carbohydrate; trace Dietary Fiber; 96mg Cholesterol; 193mg Sodium.

Posted in Salads, on April 11th, 2012.

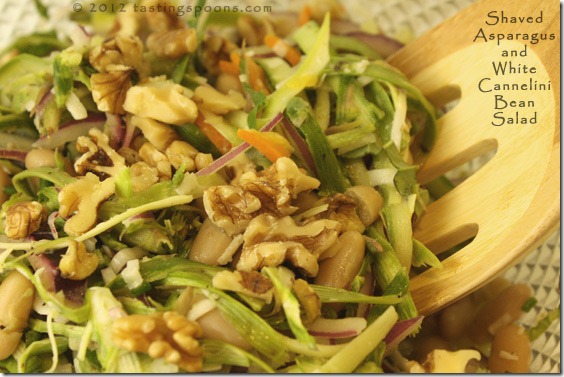
shaved_asparagus_bean_salad

My daughter-in-law Karen told me about this salad and raved as she handed me the recipe, telling me I had to try it. Indeed. It’s SO very unusual – literally it’s shaved raw asparagus [done with a potato peeler], red onion, canned white cannellini beans, a citrus dressing that’s almost negligible on the oil side, some walnuts, and I added some chives and a few little slivers of kumquat (not in the original recipe). Totally worth making.

Until recently I’d never even heard of the magazine, Clean Eating. My daughter in law subscribes to it and has mentioned several recipes she’s tried and really liked. In case you haven’t heard of it either, here’s a sentence I copied out from their website: [Clean Eating] is all about consuming whole food in its most natural state, or as close to it as possible. And when she handed me the print-out from their website, she said I just had to try this recipe for the shaved asparagus salad. With asparagus in season, I wanted to give this one a go right away, before asparagus disappears from our local markets.

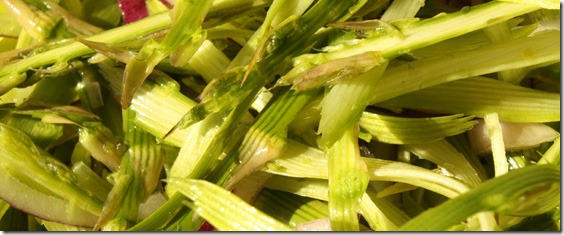
shaved_asparagus

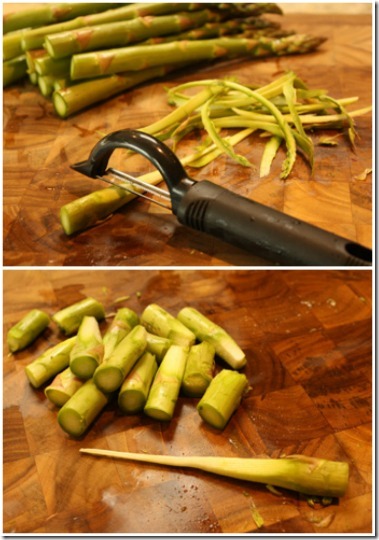
There you can see the shaved asparagus. The ridges on each sliver are from the peeler itself. Everything you shave with this peeler has that distinct marking.

shaved_asparagus_collageThat peeler is a treasure in my gadget arsenal – one of my favorite things (shown in photo at left) – full name Messermeister Pro Touch Swivel Peeler. I use this thing nearly every day in my kitchen. Anyway, I grabbed each asparagus stalk and peeled away, which gave me a really big pile of asparagus. And no, you don’t cook the asparagus – it’s shaved raw and served raw.

I prepared a half of a recipe, which would serve about 5 people, and used about a pound of asparagus, plus one can of cannellini beans.

As it happened, I cut off the very bottoms of all the asparagus stalks, but probably I didn’t have to do that, as I could have used those fibrous ends to hold onto. So I ended up with these little nubbins, which I tossed out. Actually, I ate all the little spikes from each spear I took a photo of the last one before I ate it :-).

You don’t need to make the dressing separately – it’s just fresh orange juice, fresh lemon juice, a little jot of champagne vinegar and you do toss the asparagus in a tiny amount of olive oil. The 10-servings salad calls for one tablespoon of oil. I made just half a recipe, as I mentioned and I still used a full tablespoon. And I just squeezed one orange and a half of a lemon into the bowl. So my measurements were not exact. Then you add some Pecorino cheese shavings (delicious addition since I love-love Pecorino cheese almost more than Parmigiano), fresh basil and toasted walnuts. Because we have fresh chives abounding in my herb garden, I threw in some of that, and our kumquat tree is just loaded with them, so I added some slivered peel (about 4-5 of them) to the salad as well. Those latter items weren’t in the original recipe. My DIL added fresh shaved fennel to her salad (I didn’t have any, so obviously that was left out of mine).

On the website’s recipe they suggest that if you have any leftovers of this, add a can of tuna and you have a full lunch salad. My friend Linda came for dinner, and we ate ample portions each – but we have just enough leftover, I think, to serve 2 people a small serving for lunch tomorrow.

What I liked: I understand the “clean eating” idea – this salad is just simple, but substantial and tasty food, with a “clean” citrus dressing that just adds, but doesn’t distract from the flavors of the asparagus and beans. I’d definitely make this again. The ONLY thing I’ll do differently next time is soak the onion for half an hour in water to remove some of the raw sharpness. Do note the very low calorie and low fat content here – this is a very healthy salad!

What I didn’t like: absolutely nothing. This is a definite keeper!

printer-friendly PDF
MasterCook 5+ import file – right click to save file, run MC, then File|Import

Shaved Asparagus and Cannellini Bean Salad

Recipe By: Adapted slightly from Cara Lyons, for Clean Eating Magazine
Serving Size: 10
NOTES: This salad makes a unique and healthy side dish for easy entertaining. It yields enough for a crowd, but if you have leftovers, combine with tuna the next day for a satisfying and delicious lunch. My suggestion: soak the onion in water with just a tiny jot of vinegar added to it – this will take away that sharp, raw onion flavor, then just drain and add to the salad.

2 pounds fresh asparagus
1 tablespoon olive oil
1 medium red onion — thinly sliced
30 ounces canned cannellini beans — canned, drained and rinsed well
2 tablespoons fresh orange juice — (or more if desired)
2 tablespoons fresh lemon juice — (or more if desired
1 tablespoon champagne vinegar
1/2 cup walnuts — chopped, lightly toasted
1/2 cup Pecorino Romano cheese — shaved, or Parmigiano cheese (2 oz)
1/4 cup fresh basil — cut in slivers
Sea salt and fresh ground black pepper — to taste
3/4 cup fennel bulb — shaved (optional)
2 tablespoons fresh chives — minced (optional)
2 tablespoons kumquats — halved, seeded, finely slivered (optional)

1. Hold each spear of asparagus by its thick stem and lay it down on a cutting board. Using a vegetable peeler, shave asparagus into long ribbons. Place ribbons in a large bowl and discard remaining stems. (You should be left with about 1 lb shaved asparagus.) Drizzle oil over asparagus and toss to coat.
2. Add onion, beans, orange and lemon juices, and vinegar. Toss to combine.
3. Fold in walnuts, cheese and basil. Season with salt and pepper. This salad can be served immediately or prepared in advance; chill, covered, for 4 to 6 hours in refrigerator.
Per Serving: 157 Calories; 6g Fat (31.8% calories from fat); 10g Protein; 21g Carbohydrate; 3g Dietary Fiber; 3mg Cholesterol; 352mg Sodium.

Posted in Beef, Grilling, Sous Vide, on April 9th, 2012.

ribeye_steaks_sous_vide_131

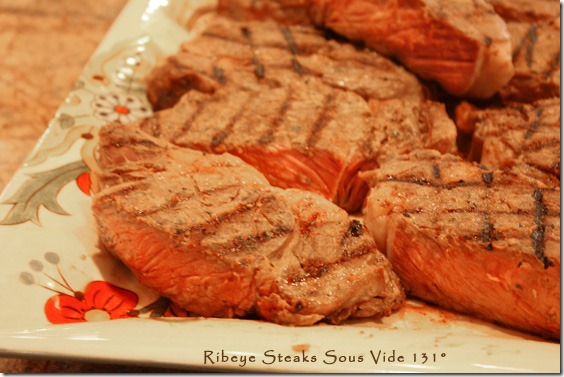
Whether or not you have a sous vide, you could still make the deliciously spicy (horseradish) and pungent (Dijon mustard), yet sweet (honey) and herby (fresh mint) glaze that goes on the steaks. I loved the glaze and would definitely make it again. The steaks were good too!

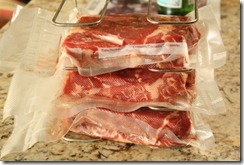
steaks_stacked_in_rackWe had offered to take ribeyes to our son and daughter-in-law. For Sunday dinner. So, I decided to sous vide them, since I hadn’t done that before, with steaks. $35 worth of steaks (3 very thick choice ones from Costco) went into individual pouches (pictured left, in the rack that comes with the SousVide Supreme Sous Vide Water Oven. I cooked them at 131° for about 2 1/2 hours. The sous vide directions say you can cook these for 2 to 8 hours. What that means is they’re done in 2 hours, and you can hold them at that temp for a max of 8 hours. After 8 hours the meat will begin changing its chemistry (at least that’s what I think it means). I quick-chilled them in a big bowl of water and ice once I removed them from the sous vide and took them to our kids’.

Once we were about ready to eat I removed the pouches from the refrigerator, slathered on the glaze (more about that below), put them on a hot-hot stove-top grill and seared them. I’m still learning all these techniques – and I learned another one on this occasion. When you try to sear cold steaks that have been cooked sous vide, you need to leave them out at room temp for awhile. I seared them, cut into them and discovered that the searing (about 1 to 1 1/2 minutes per side) didn’t heat the meat all the way through, so the centers were still a bit tepid. I put them back on the grill for another 3-4 minutes total and they were just perfect. It would be ideal to open the cooked pouches (when they’re at 131°) slather on the glaze and put them directly on the grill. Next time I’ll do that.

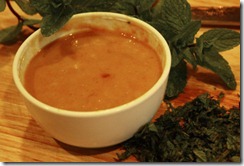
mustard_horseradish_mint_glazeNow the GLAZE . . . it’s so very simple to make. Stir in a small bowl the mustard, bottled horseradish, honey, mint and pepper (I didn’t add any salt). The only thing you need to remember is that with honey in this glaze, it will make the steaks caramelize very quickly – long cooking would make the glaze burn. Soooo, if you make this glaze for regularly-cooked barbecued steaks, don’t put it on the steaks until they’re just about finished – like during the last 3-4 minutes of cooking. You could also put it only on the top (glaze the top after you’ve seared one side and turned it over). The sauce is piquant. Mustardy. Spicy and herby. This recipe came from Jason Logsdon’s sous vide book Sous Vide Grilling.

What I liked: I loved the sauce. I’d have liked it served at the table too, so I could have dipped each piece of meat into it. A lot of the sauce ended up on the grill itself, stuck to it (I used a ridged grill to get grill marks). The steak was tender enough (not the most tender I’ve ever had) but it was consistently pink through the whole steak, which I liked too. The sous vide approach went fine – I’d just make sure to take them out of the pouches and go directly onto the outdoor grill next time.

What I didn’t like: really nothing specific. I could have wished the steak itself was more flavorful – seems to me like some steaks you buy just don’t have a lot of beefy flavor anymore. Why is that?

printer-friendly PDF
MasterCook 5+ import file – right click to save file, run MC, then File|Import

Smoky Ribeyes With Spicy Sweet Mint Glaze (Sous Vide 131°)

Recipe By: Sous Vide Grilling
Serving Size: 4

STEAKS:
2 1/2 pounds ribeye steaks
1 teaspoon chipotle chile powder
1 teaspoon thyme — powdered or crushed well
1 teaspoon sweet paprika
Salt and freshly ground black pepper to taste
GLAZE:
1/2 cup Dijon mustard
3 tablespoons horseradish — bottled
1/4 cup fresh mint — minced
6 tablespoons honey

1. Preheat sous vide oven to 131°.
2. In a small bowl mix the chile powder, thyme and paprika together and sprinkle on both sides of the steaks. Sprinkle with salt and pepper to taste.
3. Vacuum seal the steaks individually and place in sous vide for a minimum of 2 hours, and not longer than 8 hours.
4. GLAZE: In a small bowl combine the ingredients and mix thoroughly.
5. Preheat outdoor grill (or use indoor grill or use a portable torch) to high. Remove steaks and slather with the glaze. Sear steaks on both sides just long enough to acquire grill marks or to brown the meat. Your aim is not to cook the meat any further – at 131° the steaks will be medium rare already – you’re just searing the meat to look more attractive.
Per Serving: 712 Calories; 18g Fat (26.1% calories from fat); 85g Protein; 31g Carbohydrate; 2g Dietary Fiber; 200mg Cholesterol; 568mg Sodium.

Posted in Desserts, on April 7th, 2012.

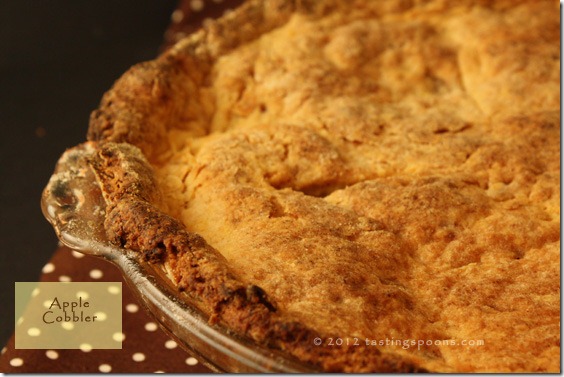
apple_cobbler

I know this doesn’t LOOK like an apple cobbler. And it doesn’t really taste like what I usually associate with the words “apple cobbler.” What this is, is an apple-pie type filling with a delicious top crust. But it’s not like a regular pie crust. It’s a kind of shortbread or cookie type top. And believe it or not, it’s also really low on sugar. That makes it a winner in my book.

With a bunch of apples in my refrigerator and a dessert I needed to make for dinner guests, I went searching for a recipe that suited me. This was it – a recipe I found at Simply Recipes a few years ago. I read what Elise had to say about this and knew I needed to try it. First you cook the peeled, cored and sliced apples with just a little bit of sugar, lemon juice, cinnamon, flour and butter. You don’t cook this long, just enough to take the edge off raw apples. It takes more apples than you might think – I think I used 6 and it could have used more. Elise’s recipe calls for 3 pounds. I didn’t weigh mine, so I really don’t know how many I had – surely it was more than 2 pounds, but it might not have been a full 3 pounds. It filled up the pie plate, but once it baked, the apples kind of slumped. Mostly it’s because I used some Gala apples – not just Granny Smiths that totally hold their shape during baking/cooking.

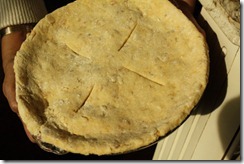
apple_cobbler_unbakedThe crust is a bit different – it has the usual kind of ingredients, but then it has orange zest and a bunch of chopped up crystallized ginger. You can vaguely make out the little bumpy things all over the raw crust, shown at left. That photo was before I baked it, obviously.

This crust also contained a little bit of butter (just 2 tablespoons) and a cup of heavy cream. That’s what provided the necessary fat to give the crust a delicious crunchy texture.

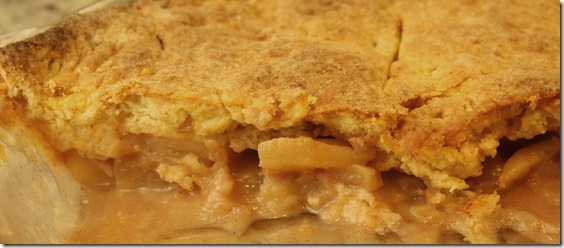
What I really liked about it was the minimal sugar necessary to make this. As I mentioned, Elise’s recipe calls for just Granny Smiths, but I had just 2 of them, and I had a bunch of Galas. Since Galas are sweeter than Granny Smiths, I cut down even more on the sugar. Elise’s recipe called for 1/4 cup in the filling. I used 2 T. of Splenda instead, so halved it. You’ll need to decide, based on what kind of apples you use, as to how much sugar to add. In the crust, it calls for 1/4 cup also – I used a scant measure of real sugar (not Splenda) as I think real sugar is more necessary in pastry. I could have put in half sugar and half Splenda, though, and it probably would have been just fine.apple_cobbler_cut

There’s a photo of the cut. It sure looks like apple pie, doesn’t it. Nope! One little tip I should add to the instructions – I used a pizza peel to slide the crust onto the top of the pie. The crust was fragile. It was thick and weighty, actually, but it was a bit on the dry side, so I knew if I tried to pick it up or roll it onto the rolling pin it would fall apart completely. The pizza peel worked perfectly and I was able to slide it gently into place over the apple filling. (I’ll also tell you that the crust was delicious raw – our son-in-law’s mother Ann was visiting and she and I polished off the scraps in short order!)

What I liked: everything about it – the taste, the texture, the apples, the ginger in it, the fact that there was a lot less sugar than usual. Loved the crust. We served it with whipped cream on top. Loverly, it ‘twas.

What I didn’t like: absolutely nothing. Definitely a make again recipe. Thank you, Elise!

printer-friendly PDF
MasterCook 5+ import file – right click to save file, run MC, then File|Import

Apple Cobbler with a Cookie Crust

Recipe By: From Elise at Simply Recipes; she got it from Gourmet Mag.
Serving Size: 8
NOTE: You can use other apple types. Granny Smiths hold their shape well, though. Others will begin to fall apart when cooked. Or use a mixture of both, as I did. If you use sweeter apples, reduce the sugar in the filling.

FILLING:
1/4 cup sugar (I used Splenda)
1 1/2 tablespoons flour
1/2 teaspoon cinnamon
2 ounces unsalted butter
3 pounds tart apples — (such as granny smith) peeled, cored, and sliced
3 tablespoons fresh lemon juice
1 teaspoon vanilla extract
CRUST:
2 cups flour
1/4 cup sugar
2 teaspoons baking powder
1/4 teaspoon salt
2 tablespoons unsalted butter — chilled and cut into small pieces
1/4 cup crystallized ginger — coarsely chopped
Zest of one orange
1 cup heavy cream

1. FILLING: In a large sauté pan over medium heat, melt butter. Stir in apples, lemon juice, cinnamon, sugar and flour. Cover partially and cook until tender, about 10 minutes. Stir in vanilla. Transfer to buttered 10″ pie dish. (This recipe has the crust only on the top).
2. CRUST: Combine flour, sugar, baking powder and salt. Cut in butter with a pastry blender or your fingertips until mixture resembles crumbs. Stir in ginger. Stir orange zest into cream; then, using a fork, stir cream into flour until it holds together. Gather dough into a ball; knead briefly then roll out to a little larger than pie dish. Transfer to dish; trim off excess. Score the center so the steam can escape while baking. Brush with cream.
3. Bake 10 minutes in a 450º oven. Reduce heat to 375º and bake 20-25 minutes. Serve warm with whipped cream.
Per Serving: 439 Calories; 20g Fat (40.5% calories from fat); 5g Protein; 62g Carbohydrate; 4g Dietary Fiber; 64mg Cholesterol; 208mg Sodium.

Posted in Salads, on April 5th, 2012.

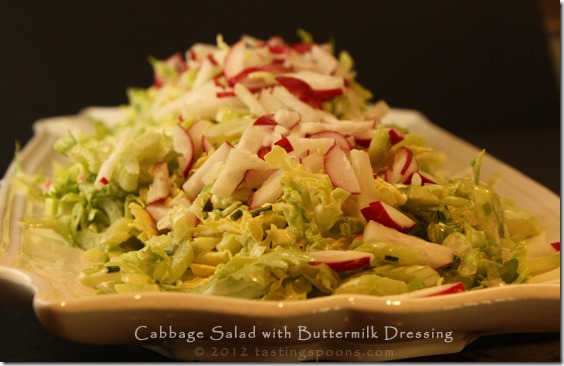
cabbage_salad_buttermilk_dressing

It was about time I got around to making this salad – it’s been in my to-try file for years. Don’t tell anybody, but this is very low calorie. It’s also delicious, crunchy and a perfect accompaniment to grilled meat. In this case I served it alongside pulled pork sliders.

It was about 4 years ago and I was reading Smitten Kitchen’s blog. She raved. I mean she raved about this salad. I put it into my MasterCook to-try file and promptly forgot it. I have hundreds and hundreds of recipes in my to-try file. I should stop, right now, reading any more food blogs, magazines or cookbooks because I have enough recipes to last me until I’m at least 389 years old. But I can’t seem to help myself. I really do try NOT to buy more cookbooks. But gosh, darned, so many people just write the most beautiful books, blogs and magazine articles! I just can’t help myself!

So anyway, needing a salad to go with the pulled pork sliders I made the other night, I thought a cabbage salad seemed appropriate and this salad fit just great. It was incredibly easy to make. Now the original recipe (which came from Gourmet magazine) called for Napa cabbage. Visiting two markets, I found only Savoy, so that’s what was used in this. Savoy and Napa are similar, although they definitely look different. But both cabbages have more tender leaves, or maybe they’re just thinner-leafed. Anyway, you probably could make this with regular cabbage, but I truly liked the Savoy.

The buttermilk dressing is so very light. It’s flavored with some finely minced shallot, and a little bit of sugar (I used Splenda). Fresh chives, radishes and celery round out the cabbage. That’s it. I liked the look of the radishes on top, so I actually left them in a separate little baggie and tossed some dressing with them and sprinkled them decoratively on the top of the salad. If you make the full 4-cup cabbage recipe, you’ll use all of the dressing. Next time I might make more dressing – not only is it good, the salad might need a bit more. It could also be used on a regular green salad too. Don’t let it sit long, though, on a regular green salad. Because the dressing is mostly buttermilk, it will wilt tender green leaves.

What I liked: well, the calorie count, for one. And truly, you’d never know it’s so low calorie. It’s overall delicious. Yes, I’ll be making it again. When I used the left over dressing I added just a tad more mayo to it (I didn’t quite have enough to dress another cabbage salad) and I liked it a lot. That would “up” the calorie and fat content of the salad, though. It’s really awfully good as it is!

What I didn’t like: nada, nothing.

printer-friendly PDF
MasterCook 5+ import file – right click to save file, run MC, then File|Import

Cabbage Salad with Buttermilk Dressing

Recipe By: Gourmet, November 2007, written up on Smitten Kitchen blog
Serving Size: 6

1/2 cup buttermilk — well-shaken
2 tablespoons mayonnaise
2 tablespoons cider vinegar
2 tablespoons minced shallot
1 tablespoon sugar — or Spenda
1/2 teaspoon salt
1/4 teaspoon freshly ground black pepper
3 tablespoons chives — finely chopped
1 pound Napa cabbage — cored and thinly sliced crosswise (4 cups), or Savoy cabbage
6 whole radishes — diced
2 whole celery ribs — thinly sliced diagonally

1. Whisk together buttermilk, mayonnaise, vinegar, shallot, sugar, salt, and pepper in a bowl until sugar has dissolved, then whisk in chives.
2. Toss cabbage, radishes, and celery with dressing. It’s perhaps more attractive if the radishes are dressed separately and sprinkled on top.
Per Serving: 69 Calories; 4g Fat (50.2% calories from fat); 2g Protein; 7g Carbohydrate; 1g Dietary Fiber; 2mg Cholesterol; 238mg Sodium.

Posted in Miscellaneous, Pork, Sous Vide, on April 3rd, 2012.

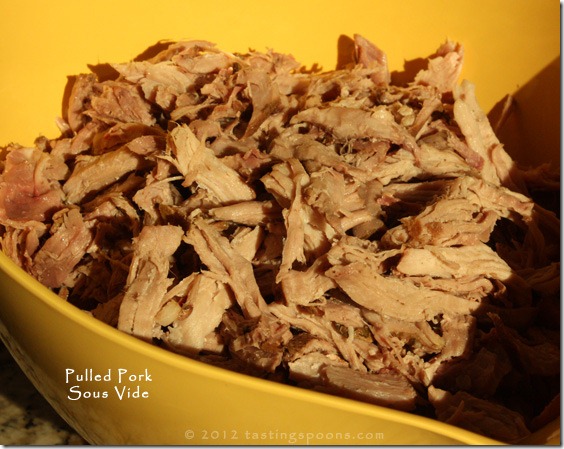
pulled_pork_sous_vide_131

Another experiment with sous vide cooking. This time I made pork shoulder (pork butt), cooked it at 140° for 48 hours. And I served it with a very tart North Carolina vinegar sauce instead of the usual ketchup-based barbecue sauce that’s more typical. Mostly I did that because my DH is a diabetic and very rarely eats pulled pork because the traditional BBQ sauce just sends his blood sugar skyrocketing.

At least once a week I’m experimenting with my SousVide Supreme Sous Vide Water Oven. Not every dish I’ve made has made it to a post on my blog, as I’m not experienced enough yet. One pork dish I made was not very good (pork chops were too thin, I think, so it overcooked). I’m liking the long, slow cooking for more things – the less tender cuts. Not steaks and such – they are best with relatively little sous vide cooking. I had a big chunk of pork in the freezer – I’d purchased a gigantic pork shoulder a month or so ago, at a great price and cut it up into smaller cooking portions. But I didn’t have a sous vide cooker then. So the meat was just vacuum sealed with nothing whatsoever in it. I decided to just go with it that way. Nothing else in the pouch but the meat. No salt. No pepper. No onions or seasonings of any kind. I knew I’d need to doctor it up with seasonings later.

So I did some reading about barbecue sauces. Goodness, but there are a lot of different types. I knew there was a Memphis style, and St. Louis style, but that was about it. Referring to one of my Steven Raichlen books, Barbecue! Bible: Sauces, Rubs, and Marinades, Bastes, Butters, and Glazes, I hunted through all the dozens of possible permutations, trying to find one that was low on sugar. We’re mostly tuned into such sauces containing lots and lots of ketchup. Then I read about the sauce that is the favorite with folks in North Carolina. It’s a vinegar sauce and has nary a teaspoon of tomato in it – like ketchup or tomato paste.

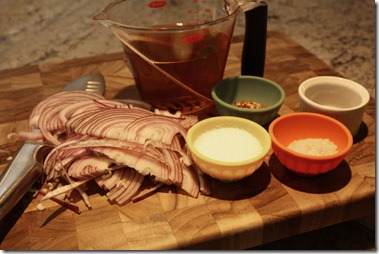
pig_picker_pucker_sauce_ingredientsSo here’s what’s in it – onions sliced thin, apple cider vinegar, water (not pictured), red chili flakes, sugar, salt and pepper. It’s not cooked. You merely combine the ingredients in a bowl (non-reactive) and stir it up. I made it ahead because I wanted the onions to soften a bit in there, which they did. Not only did they soften in texture, but the soaking takes away some of the fresh astringency from raw onions. I covered it and just let it sit out on the counter for several hours.

What you need to know about this sauce is that you combine it with the shredded pork and the meat just absorbs a lot of the vinegar sauce. No, it’s not sour (because the meat has a lot of sweetness to it). You’d think it would be sour. I was unsure enough about this sauce that I took a piece of pork and gingerly dipped it into the sauce to sample it. Oh my. GOOD. Amazing, I thought.

I cut up some green cabbage and put just a little bit of the vinegar sauce on it and served that with the sliders – to put onto the sandwich itself. The meat – so tender and juicy. I added about a cup of the onions and vinegary sauce to it and let it sit for about 5 minutes before I set out the slider buns, the meat, the cabbage. I let everyone make their own sliders. I also made a delicious cabbage salad which I’ll post in a couple of days.

What I liked: the texture and taste of the pulled pork. It was incredibly tender after 48 hours of sous vide. The vinegar sauce was outstanding. I loved it! For left overs I put out regular barbecue sauce (bottled) and some eaters had some of that too.

What I didn’t like: nothing. It was really, really good.

printer-friendly PDF
MasterCook 5+ import file – right click to save file, run MC, then File|Import

Pig Picker Pucker Sauce

Recipe By: Steven Raichlen’s Barbecue Bible: Sauces, Rubs and Marinades, 2000
Serving Size: 12
Serving Ideas: This sauce is best with pulled or chopped barbecue pork (this amount will saturate about 4-8 pounds of meat). If desired, reserve just a little bit to pour and mix over some chopped cabbage (which you can pile onto the sandwiches). This style of tart sauce is from North Carolina, an area that has no interest in sweet tomato or ketchup-based barbecue sauces.

1 1/2 cups cider vinegar
3/4 cup cold water
2 tablespoons sugar — or to taste (I used Splenda)
1 tablespoon hot pepper flakes
1 small onion — thinly sliced
1 1/2 tablespoons kosher salt — or to taste
1/2 teaspoon freshly ground black pepper

1. Combine all the ingredients in a ceramic or glass (not metal) bowl. Stir to dissolve dry ingredients.
2. Can be made ahead, but can also be made just before using. It’s best added to the meat and allowed to soak in some before serving. If it’s allowed to sit awhile it will mellow-out the onions a little bit.
Per Serving: 16 Calories; trace Fat (0.8% calories from fat); trace Protein; 5g Carbohydrate; trace Dietary Fiber; 0mg Cholesterol; 706mg Sodium.

. . .This recipe hardly even deserves an entire recipe box listing – it’s just pork shoulder, vacuum sealed, done in the sous vide for 48 hours. Done.

Pulled Pork Sous Vide 140°

Serving Size: 8

3 1/2 pounds pork shoulder

1. Preheat sous vide to 140°.
2. Vacuum seal the pork and place in sous vide. Cook for a minimum of 24 hours, and up to 48 hours (do the 48 if you can).
3. Remove meat, trim away visible fat and shred pork by hand or with a fork.
Per Serving: 352 Calories; 27g Fat (70.2% calories from fat); 26g Protein; 0g Carbohydrate; 0g Dietary Fiber; 106mg Cholesterol; 97mg Sodium.

Posted in Desserts, Miscellaneous, on April 1st, 2012.

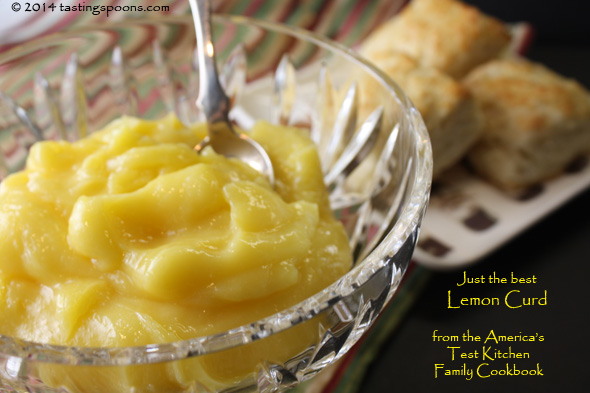
lemon_curd_ATK

Have you made lemon curd before? I’ve made it oodles of times, but not since last March. I wrote it up here on my blog then. I read a description of lemon curd in the America’s Test Kitchen Family Cookbook – they called some versions teeth-achingly sweet. Gosh, yes. That’s what mine was in 2011. The folks at ATK decided to fix it, and yes, they did. This is my new go-to lemon curd recipe. I didn’t enhance the photo at all – it’s all the egg yolks that give it that deep golden color.

I’d offered to take lemon curd to a friend’s home for a St. Patrick’s Day book group meeting. Each year the hostess and her wonderful husband make an Irish repast for our group. And mid-way through our book meeting they also serve multiple desserts. They make raisin scones too, and it’s for the scones that I usually offer to make lemon curd.

Remembering that last year’s version was too sweet, I pulled out cookbook after cookbook and compared the recipes. Some had nearly double the amount of sugar per lemon juice quantity of others. Whoa! No wonder I was overwhelmed with the sweetness! I should have just gone to my well-used The America’s Test Kitchen Family Cookbook. Every recipe turns out superbly from that cookbook. With copious lemons on our Meyer trees, it came together in a hurry. I really liked the addition of a few tablespoons of heavy cream at the end. It just smooths it out, somehow. I chose not to strain it (to remove the bits of lemon zest and any eggy things). I chilled it in a bowl over ice and gave it to the hostess. But not without a couple of teaspoons to taste, of course! It’ll be my forever favorite, I suspect.

What I liked: it’s easy. Delicious. Just the right amount of sugar to lemon ratio. It will keep for several weeks too, if it were to last that long. I gave all of it to my friend, so there isn’t any left over here at my house! Guess I’ll just have to make it again. I scaled down the recipe to use 4 egg yolks and 1 whole egg, FYI.

What I didn’t like: nothing at all. Perfection.

printer-friendly PDF
MasterCook 5+ import file – right click to save file, run MC, then File|Import

Lemon Curd (America’s Test Kitchen)

Recipe: America’s Test Kitchen Family Cookbook
Serving Size: 12 (maybe a lot more)
NOTES: This really takes no time to make and it’s SO much better than the store-bought type. I also like this recipe because it’s not teeth-achingly sweet. It’s “just right.”

7 large egg yolks
2 large eggs
1 cup sugar — + 2 tablespoons
2/3 cup fresh lemon juice
1/4 cup lemon zest
1/8 teaspoon salt
4 tablespoons unsalted butter — cut in 1/2 inch pieces
3 tablespoons heavy cream

1. Whisk the egg yolks, whole eggs and sugar together until just combined. Whisk in the lemon juice, zest and salt.
2. Transfer the mixture to a medium nonreactive saucepan, add butter, and cook over medium-low heat, stirring constantly, until the curd thickens to a thin sauce-like consistency, about 5 minutes.
3. Strain the curd immediately through a fine-mesh strainer into a clean nonreactive bowl and stir in the cream. Cool and chill completely.
Per Serving (probably high as I think this will serve more than 12 scones!): 163 Calories; 9g Fat (48.8% calories from fat); 3g Protein; 18g Carbohydrate; trace Dietary Fiber; 175mg Cholesterol; 37mg Sodium.

Posted in Beef, Sous Vide, on March 30th, 2012.

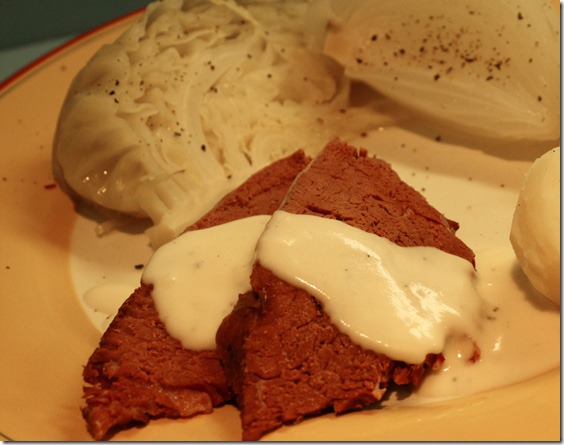
mustard_sauce_on_corned_beef

Even if you don’t own a sous vide, you could make this in your slow cooker on low. And in either case, make the microwave creamy mustard sauce to serve on the side.

It seems that the only time of year I make a corned beef is in March, near to St. Patrick’s Day. Otherwise if they’re available in the markets I just don’t “see” them. I bought mine at Trader Joe’s. And if you haven’t noticed, corned beef is mighty pricey! I was shocked. My small 3-pound corned beef was nearly $17. And it would barely serve 6 people. But I wanted to try cooking it in my SousVide Supreme Sous Vide Water Oven. For those of you who aren’t into sous vide, just skip down below to the sauce part if that’s what interests you.

Consulting a variety of sources about the sous vide corned beef (2 cookbooks and about 3-4 online recipes, plus a phone call to my sous vide expert, Russ), I finally decided to cook it for 10 hours close to 180°. By the time I decided what to do, it had gone past the point that I could cook it for 48 hours. I was down to 24, so obviously I did the 10-hour cook. Actually I set the temp to 178°.

To say that I had some difficulty would be an understatement. I’m new enough to sous vide that I was in alien territory when I came into the kitchen, 3 hours into the 10 hour cooking and found the lid of the Supreme standing nearly upright, tipped up at about 75°. At 8 that morning I’d pressed the corned beef into the Supreme’s accompanying rack, and placed the rack in Supreme, with the meat on the bottom rung, put the lid on top and left the house. In the interim time, somehow, fluid had rendered out of the corned beef which creates a gas, so there was a whole lot of air in the pouch. The gas/air was a lot stronger than the rack in holding the roast underwater and it had actually turned the rack upside down, hence popping off the top of the machine. So, the beef was more or less floating on top. Not exactly what sous vide is all about.

I had to manhandle the darned thing to get it turned back down-under, on went the lid and I put a bunch of book on top of the lid. No more mishaps exactly. BUT, after 10 hours I dismantled everything and lo and behold, the roast had come loose again and had pushed itself toward the top. About an inch of the roast was up above water line. Sigh. But, since I cooked it at 178° I knew the meat was done. No fluid had leaked out of the bag – at all – and no water had leaked into the roast. It’s a chemistry thing, though, about the gas. Next time I will have to figure out a way to weight-down the meat – something heavy that will sit on top of the meat and not have enough room to roll over when the gas creates inside. I have one particular casserole dish in mind that will probably work. Or maybe I’ll need to put a real honest brick, wrapped in foil and put into a Ziploc bag to place on top – except that a brick might turn on its side, so that probably won’t work. It would have to a a big cement paver just the right size as the interior of the Supreme!

The roast rested a bit while I made the veggies and the delicious mustard cream sauce. The meat was sliced (easily) and served on heated plates, along with some simmered potatoes, cabbage and onions. The SAUCE: it was quick to make – in the microwave. It’s all the usual steps to make a cream sauce (half and half and chicken broth for the liquid), but just requires opening the door of the microwave through several steps. It took about 4-5 minutes to make it, though. Easy enough.

What I liked: perfect texture, still moist, sliced easily, good red meat color. I’ll probably try it again at long, slow cooking, but I liked this one just fine. The SAUCE: oh gosh. Delicious. I liked it a lot as an accompaniment to corned beef. It was also just fine on the left overs.

What I didn’t like: nothing, really. I’d make them both again.

CORNED BEEF printer-friendly PDF
MICROWAVE MUSTARD SAUCE printer-friendly PDF
CORNED BEEF MasterCook 5+ import file – right click to save file, run MC, then File|Import
MICROWAVE MUSTARD SAUCE MasterCook 5+ import file – right click to save file, run MC, then File|Import

Corned Beef Sous Vide 178°

Recipe By: From a combination of online recipes.
Serving Size: 6
Serving Ideas: Serve with mustard, or make a mustard cream sauce to spoon over the meat.
NOTES: This recipe assumes you’ll buy a ready-brined corned beef that’s already packaged with spices. No additional seasoning is necessary. If you prefer, buy a beef brisket and brine/season it yourself, allowing 3-5 days to do so.

3 pounds corned beef brisket — (brined by meat packer)
1 whole onion — peeled, sliced
VEGETABLES:
1 whole cabbage head — leave root intact
2 whole yellow onions — peeled, leave root end intact
4 whole carrots — peeled
6 whole russet potatoes — peeled
5 cups low-sodium chicken broth — use concentrate, diluted in water
salt and pepper to taste

1. Open and drain the corned beef. Wash under cold running water to remove all of the seasonings.
2. Place corned beef in a large bowl and cover with cold water. Add about a cup of ice to the water and allow to sit for 30 minutes (this purges some of the salt brine from the meat).
3. Drain and dry the corned beef with paper towels. Place in a vacuum bag and add the sliced onions, half on each side or along edges. Vacuum seal.
4. Meanwhile, preheat Sous Vide to 178°. Place sealed corned beef in the sous vide machine, making sure it’s held under the water securely.
5. Cook for 10 hours, remove and cut open pouch. Place on cutting board, lightly tent with foil (if you’re not serving it immediately). Use a knife to remove some of the more visible fat, if desired.
6. During last 30 minutes prepare the vegetables. Heat a large pot of chicken stock. When boiling, add vegetables. Cut the cabbage into 8ths, leaving part of the core attached so each piece will remain intact. Peel potatoes and half of quarter them. Peel and chop carrots into 1-inch pieces. Cut onions into quarters, leaving part of the root end intact as well. Add vegetables and cook until all are cooked through, about 15 minutes. Test potatoes with a fork. Remove vegetables and drain for about 30 seconds in a colander. Serve on heated plates with corned beef, sliced across the grain about 1/4 inch.
Per Serving: 609 Calories; 36g Fat (50.4% calories from fat); 47g Protein; 33g Carbohydrate; 7g Dietary Fiber; 121mg Cholesterol; 358mg Sodium.

. . .

Microwave Mustard Sauce

Recipe By: From Sumptuous Sauces in the Microwave, by Patricia Tennison
Serving Size: 6
NOTES: Ideally, I’ve learned, that when cooking a roux, it’s better to have just a little bit more butter than flour – that way you won’t have any lumps.

2 tablespoons unsalted butter (I use a tiny bit more)
2 tablespoons all purpose flour
1 cup chicken broth
1/2 cup heavy cream
2 tablespoons Dijon mustard — smooth, not grainy
1/4 teaspoon salt
1/8 teaspoon freshly ground pepper — preferably white, but black is fine too

Note: all the timing mentioned here is a guess-timate – it all depends on your own microwave oven’s power.
1. In a 4-cup glass or microwave-safe container melt the butter for 30-60 seconds until it’s melted and bubbly.
2. Remove from microwave and whisk in the flour – making sure you see no visible white flour. Return to microwave and cook for about a minute, stopping twice to whisk again and break up any possible lumps, as the roux is bubbling furiously.
3. Remove from microwave again and thoroughly whisk in the chicken broth and cream. Return to microwave and cook for about 2 minutes until there are solid bubbles all around the edge of the sauce. Whisk again.
4. Continue cooking (you could lower the power level at this point, if you can) and watch the sauce very carefully until it’s boiling and thickens enough to coat a spoon. Taste the sauce for texture and thickness – continue cooking if needed, until it’s thick enough to your liking.
5. Remove from microwave and add the mustard, salt and pepper. Taste and adjust seasonings. Serve.
Per Serving: 122 Calories; 12g Fat (84.5% calories from fat); 2g Protein; 3g Carbohydrate; trace Dietary Fiber; 38mg Cholesterol; 287mg Sodium.

Posted in Uncategorized, on March 29th, 2012.

I know, not all of you live near a Trader Joe’s. Too bad! It is just the greatest store. We shop there for most of our food products these days. Today I just want to mention a couple of their newer items that I’d recommend. As you may know already, if products don’t “take off,” they simply stop stocking them. Period. I can’t tell you how many of their things have disappeared from their shelves – because people just didn’t buy enough of them, I suppose. So, since I want these two things to stay on their shelves, you might want to help me keep them there . . .

mac_n_cheese_bites

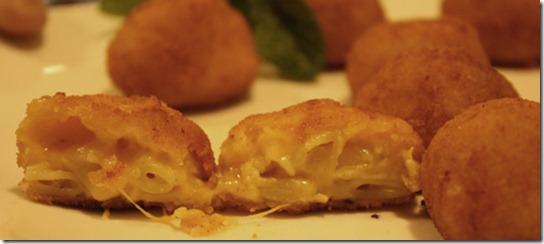
There are the Mac ‘n Cheese Bites. They’re little rounds (see the uncut ones in the picture) of mac ‘n cheese, lightly battered or crumbed, fried and frozen. You bake them (from a frozen state) in a hot oven for 10 minutes, let them rest a few minutes (otherwise you’d burn your mouth for sure) and serve. I cut one in half so you could see the interior. Absolutely delicious. If you like mac ‘n cheese, you will just love these little guys. They might also work well for picky children or grandchildren. Our grandson was very enamored with these, as I expected he would be. The adults were too. I think there are 10 in a package and they disappeared in a flash.

chile_spiced_mango

Here’s the other product. Our daughter-in-law, Karen, introduced us to these. Ordinarily I buy very little dried fruit. However, they do make a great snack item. These are pressed with a ground chile mixture. And no, the pieces are not overly hot. Spicy yes. Hot, not really. Tasty? Oh my yes. Look for the Chile Spiced Mango next time you visit. The bites were delicious with some cheese, I’ll tell you!

Posted in Salads, on March 28th, 2012.

romaine_salad_oranges_walnuts_pecorino

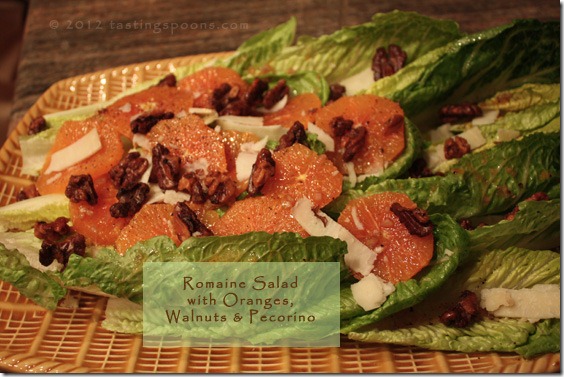
A salad that’s a bit different – different because you leave the Romaine leaves whole (and you could actually pick these up by hand if you composed the salad carefully), drizzle them with a walnut oil and sherry vinegar dressing, then garnish with slices of bright orange slices (I used Cara Cara, a type of Navel), Pecorino cheese and some easy glazed walnuts.

We were going to the home of friends for dinner and I was asked to bring a salad. The only thing I knew was that we were having pasta. I could have made a regular green salad, but since I had 3 Cara Cara oranges that needed to be used, I used a Joanne Weir recipe instead. From her cookbook, Joanne Weir’s More Cooking in the Wine Country. I knew this salad would showcase the oranges beautifully, and I assumed the relatively simple walnut oil dressing would go well enough with pasta. My only deviation from Joanne Weir’s recipe was to use Pecorino cheese (she suggested Manchego from Spain, or Parmigiano-Reggiano). I had a nice wedge of Pecorino with truffles in it and it worked very well with this. I used a lot less cheese than called for – and I didn’t use all the dressing, either (great, some leftover for another day!).

The Romaine leaves (using the hearts only) were separated gently (I trimmed off the base, up about 2 to 2 1/2 inches) and sort of flattened them as best I could onto a large platter. Next I used a big spoon to strategically drizzle some of the dressing on each and every leaf. In case any of the guests ate it in hand, you’d want each leaf to be dressing-enhanced. Next I grouped most of the oranges at one end of the platter (that was the way to cookbook’s photo showed it). If I were truly making this finger food I’d have cut the oranges into much smaller pieces and placed the equivalent of about 1/2 of a slice on each leaf. I wasn’t, so I didn’t. Therefore when serving (using a pie wedge, actually, which worked well), each person took a leaf or two and an orange slice or two. Then I shaved the Pecorino cheese all over and lastly added the glazed walnuts (they’re tossed with walnut oil, sugar, salt and pepper and oven roasted) on top.

THE MAKE AHEAD PART: The walnuts can be baked ahead. The Romaine can be prepped ahead and left chilled in a plastic bag. The cheese could be shaved ahead, but really I think doing it at the last minute was just as easy. The dressing can be made several hours ahead too (and left at room temp). So it was easily assembled at someone else’s home.

What I liked: the fact that the salad was different looking; that the dressing was composed with some walnut oil (I like walnut oil); the oranges, definitely. They added a really deliciousness to the salad. Oh, how could I forget the walnuts? They were good too – great texture addition.

What I didn’t like: nothing at all. I’ll be making it again for sure.

printer-friendly PDF

MasterCook 5+ import file – right click to save file, run MC, then File|Import

Romaine Salad with Oranges, Walnuts and Pecorino

Recipe By: Adapted slightly from Joanne Weir’s More Cooking in the Wine Country
Serving Size: 6
Serving Ideas: Alternatively, you could compose this salad to be eaten out of hand – if so, place leaves on the platter and drizzle with dressing, a bit of cheese and nuts. Cut the oranges into small pieces and evenly space them along the leaf as best as possible. You could also chop up the walnuts into much smaller pieces and sprinkle them the full length of each leaf too.
NOTES: My changes: I used 3 oranges, a lot less cheese. I added pepper to the nuts and I used less dressing on the whole salad than suggested. 

TOASTED WALNUTS:
3/4 cup walnut halves
1 tablespoon walnut oil
1 tablespoon sugar
1/4 teaspoon salt
2 pinches freshly ground black pepper
SALAD DRESSING:
1 teaspoon orange zest
3 tablespoons fresh orange juice — (squeezed from one of the oranges listed below)
2 tablespoons sherry vinegar
3 tablespoons extra virgin olive oil
1 tablespoon walnut oil
1 medium shallot — finely minced
SALAD:
2 small romaine lettuce heads — outside leaves removed (use only hearts)
4 whole oranges — Cara Cara or Navel
3 ounces Pecorino Romano cheese — shaved for garnish (or use Manchego or Parmigiano-Reggiano cheese)
Salt and freshly ground black pepper to taste

1. TOASTED NUTS: Preheat oven to 375°. Place walnuts in a small bowl, add the oil and toss to coat. Add sugar, salt and pepper. Spread nuts on a baking sheet, in one layer (line pan with foil for easy cleanup) and bake until they are just turning a medium brown (don’t burn!), about 6-8 minutes. Set aside to cool.
2. SALAD: Grate enough zest from an orange to measure 1 teaspoon. Cut orange in half and squeeze the juice (use some in the dressing below).
3. With remaining 3 oranges cut off ends, then using a paring knife carefully trim off all the peel. Turn orange on its side and slice 8-9 slices per orange. Set aside.
4. DRESSING: In a small jar combine the orange zest, orange juice, walnut oil, olive oil, sherry vinegar, shallot, salt and pepper. Shake and set aside. You may leave this at room temp for a few hours; otherwise refrigerate. Return to room temp before serving.
5. ASSEMBLY: On a large platter place the Romaine lettuce leaves (flattening them slightly, if possible). Using a spoon, drizzle each leaf with the well mixed dressing. Add the orange slices at the base end, and garnish entire salad with the Pecorino cheese and walnuts. Serve immediately with a pie wedge so each person can lift a complete leaf to a plate.
Per Serving (not accurate because you probably won’t use all the dressing): 222 Calories; 16g Fat (62.7% calories from fat); 7g Protein; 14g Carbohydrate; 2g Dietary Fiber; 11mg Cholesterol; 353mg Sodium.

Related Posts Plugin for WordPress, Blogger...