


 Brownies – oh my – so rich and decadent. A different technique.
Today, I’m also philosophizing a bit about cookbooks. If you want to jump to the recipe write-up, scroll down further.
Lately, I’ve been having a talk with myself. About my cookbooks. My couple-hundred or three-hundred cookbooks. And don’t get me wrong, I love my cookbooks. But how often do I really go to those shelves to look or hunt for recipes? Truthfully, not all that often. Case in point . . . this recipe. I had decided to make some brownies. But as I looked through my MasterCook recipes on my computer, not a one jumped out at me. I wanted to try something new, and there were only about 5 or 6 brownie recipes that I hadn’t made before, and none suited me. So I went to my more recent cookbook purchases . . . so maybe I should say here . . . I still buy cookbooks, even though I tell myself not to. Sometimes I give in and buy one anyway. I’ve had to resort to storing my cookbooks in various other places in my house. Some are upstairs in my study (mostly cookbooks I can’t give up but rarely view), others are on various shelves and cupboards in my kitchen and family room. I’ve begun having to stack a cookbook or two sideways on top of a shelf full of cookbooks. I’m running out of room. And you may recall, about 3-4 years ago I donated at least 100 cookbooks, ones I almost never referred to. It’s an addiction. What can I tell you?
So, let’s talk for a minute about cookbook writing . . . in many of my older cookbooks there are very few author notes. In the cookbook world those are called “headnotes.” That little paragraph – tucked in between the title and the list of ingredients. In most of the recipes from the Joy of Cooking, there are NO headnotes. Even some of the old tomes from Betty Crocker and such, there are no notes to give you an idea about the recipe – you know, the things like “the reduced balsamic glaze is what makes this dish special.” Or, “don’t eliminate the almond extract even though there’s only 1/4 teaspoon in it.” I do love those headnotes, so going to my more recent cookbooks there were lots of headnotes. I grabbed one book after another, still hunting for just the right brownie recipe to try, not finding anything that I fancied. I have several books that are just about baking. Nothing there, either.
I’ve been thinking, that in my spare time (oh dear, do I really have any?) I should go through all of my cookbooks and mark them with sticky notes. Maybe I should add the actual recipes to my MasterCook online file. We’re talking thousands here! What a lot of work. I don’t know that I have it in me! Would you? But when I’m thinking about a recipe, what I don’t do, usually, is go hunt in my cookbooks. Part of that is the intervention of the internet. We need only go to a browser, put in a search term, “brownies” and the internet will provide hundreds. Likely thousands of recipes. Magazine recipes seem to come up first. Now that Bon Appetit and that group charge to access their recipe files, I’m no longer a fan. I subscribe to numerous food magazines so why wouldn’t I have access to the recipes online? When my subscriptions run out for a few of them I’m going to let them lapse. This practice annoys me. So far, Southern Living, Sunset, Food & Wine, and Garden & Gun are free for internet searching and browsing. If any of those begin charging a fee to access online I might just drop those subscriptions too.
I do have a subscription to EatYourBooks, a website that keeps track of all the cookbooks one owns (obviously you have to input the titles into your “library”), and as time has gone on, people have indexed all the recipes in most cookbooks out there. And so, let’s say I want to make lamb stew. I can go to my EatYourBooks website and hunt for “lamb stew,” and it will tell me what cookbooks I own contain a recipe for lamb stew. Then I have to go find the book and look it up. I was very enamored with the idea at first, and I used it quite often. But as time has gone on, I don’t research things there very much anymore. In this case, I could have gone there, input “brownies” and probably gotten a list a mile long for brownies. I just did a search and it provided me with 130 entries. Probably if I were to be searching for a recipe for brownies that contain sour cream, I could have done a more refined search and found fewer (a more manageable) number of recipes to locate. Some of the ingredients are listed along with the titles. In this case, I didn’t have a preconceived idea about ingredients in my brownies. So that website wouldn’t have helped me unless I were willing to devote a lot of time researching brownie recipes in my cookbook results. As it is, the cookbook I eventually used I don’t have listed in my “library.” Obviously I need to update the list!
So, I kept perusing my cookbook shelves and pulled out an old one. Actually I bought the book used, probably about 10 years ago, but it’s from 1987. The Nantucket Open-House Cookbook. Sarah Leah Chase is an accomplished chef and cookbook author. She likely has 8-10 cookbooks to her name, the most famous she co-authored with Sheila Lukins and Julee Rosso (the Silver Palate Good Times Cookbook and Silver Palate Desserts). The work on those books put her on the map in the culinary world. She wrote two little cookbooks (on her own and all her other books are her own, not shared authoring) about bicycling, with food in mind, through France (in general) and the other one through Burgundy. I’ve made several recipes from those books over the years.
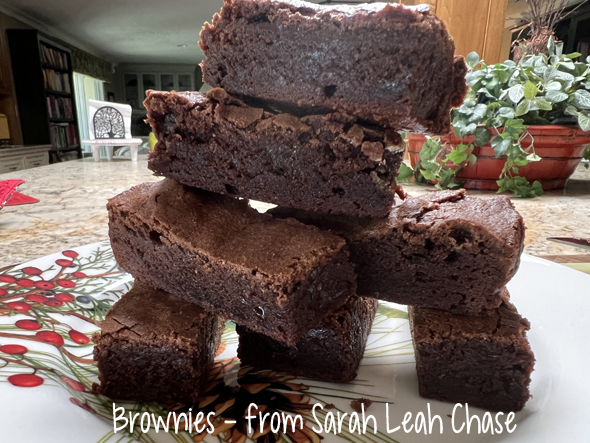
THE BROWNIES: There was one brownie recipe in this cookbook, and it was the headnotes that grabbed me front and center. Chase owns (or owned, I don’t know) a food shop/bakery on Nantucket, and these brownies were a regular on the menu. Everyone wanted the recipe – nobody could figure out what made them different. They were a bit crusty on the top but dense and almost wet inside. Finally, Chase decided to share the recipe in this cookbook. She explains that the recipe origin was Maida Heatter’s Palm Beach Brownies, but Chase made a few changes, mostly in the technique. When I went online, there is a bakery in Indiana with Chase’s original name from her Nantucket store, Que Sera Sarah. So maybe she’s now moved to the Midwest.
And, indeed, these brownies use three very unusual techniques. First, the 10-minute batter (sugar, eggs, extracts, espresso powder) is whipped up at high speed in a stand mixer for 10 minutes (yes, TEN minutes). Set the timer; don’t guess. Secondly, they are baked in pure convection. Apparently that’s what creates the top crust of the brownie – it hardens almost. And lastly, the brownies must be refrigerated a minimum of 6 hours before even removing from the baking pan or cutting.
The batter is easy enough to put together – but as I mentioned just above, the sugar and egg mixture has to be mixed at high speed for 10 minutes. Makes the batter very airy. It’s interesting that you do that because the finished brownies are very dense. Once poured into a foil-lined and butter-greased 11×9 pan, they bake with pure convection for 18-20 minutes at 350°F. And they’re to be removed from the oven immediately. No guesswork – she suggests you stick a toothpick in and there should be WET batter on the toothpick. I used a metal pick and there were some wet crumbs, so I hope I didn’t over bake them.
When they come out, I guess, they’re way too soft to manipulate. They cool in the pan (so that probably took about 2 hours), then need to be refrigerated for 6 hours or overnight. I lasted about 4 hours before I removed the foil sling from the 11×9 pan (and because they were cold, they came out of the pan easily in a nice big slab) and cut off one end and sliced it up for the photo at top. I have to confess – I forgot to add the walnuts. Crazy me! I’d taken the walnuts out of the freezer, put them in a bowl and into the microwave just to take the frozen chill off of them. Then promptly forgot to add them to the batter. Oh well. I’ll probably freeze most of these brownies – there’s no reason they wouldn’t freeze well enough. I’m guessing you’re supposed to keep them in the refrigerator. Not sure, as the recipe doesn’t say. Just that the finished brownies must be refrigerated before removing from the foil sling and sliced up.
What’s GOOD: the brownies are really good. They’re very sweet – I might use a bit less sugar if I made them again. The chocolate flavor certainly comes through, and the texture is almost fudgy, but it’s not fudge by any means. Hard to describe. Definitely these are not light, cake-type brownies; far denser than that. And yes, there definitely is a little crust on the top too. It’s not thick enough to be visible except from a side view, but yes, it has a bit of a bite to it. Guess you’ll have to make them yourself and come up with a better description of the texture. Help me out here if you do.
What’s NOT: only that it has some unusual techniques – the 10 minutes of batter-mixing, and the 6+ hour of refrigeration before cutting and eating. And you need a convection oven to make these exactly as the author does.
printer-friendly PDF and MasterCook file (click link to open recipe)
* Exported from MasterCook *
Brownies – Sarah Leah Chase
Recipe By: Sarah Leah Chase, Open-House Cookbook
Servings: 20-25 (or more if you cut them smaller)
8 ounces unsweetened chocolate
8 ounces unsalted butter
5 eggs
1 tablespoon vanilla extract
2 teaspoons almond extract
1/2 teaspoon salt
2 teaspoons espresso powder, or coffee powder
3 3/4 cups granulated sugar — [next time I would try less]
1 2/3 cups all-purpose flour — not sifted
8 ounces walnuts — chopped
1. Preheat convection oven to 350ºF.
2. Line a 11 x 9 pan with foil. Butter the foil.
3. Place the chocolate and butter in the top of a large double broiler over hot water on moderate heat, or in a medium-sized, but heavy saucepan over low heat. Stir occasionally until the chocolate and butter are melted and smooth. Do not let the chocolate burn on the bottom. Remove from the heat and set aside.
4. In the large bowl of an electric mixer, beat the eggs with the vanilla and almond extracts, salt, espresso powder, sugar and flour at high speed for 10 minutes. On low speed, add the chocolate mixture and beat only until mixed. Remove the bowl from the mixer.
5. Stir in the nuts and pour into the prepared pan. Smooth the top.
6. Bake for 18-20 minutes – the brownie will have a thick, crisp crust on top, but if you insert a toothpick into the middle, it will come out wet and covered with chocolate. Do not over bake.
7. Remove pan from the oven and let stand until cool. Refrigerate the brownies for at least 6 hours or overnight.
8. Remove brownies from the pan with the foil sling. Cut the brownies into 20-25 squares. Serve with a scoop of vanilla ice cream on top.
Per Serving: 345 Calories; 19g Fat (48.0% calories from fat); 5g Protein; 41g Carbohydrate; 2g Dietary Fiber; 57mg Cholesterol; 76mg Sodium; 31g Total Sugars; trace Vitamin D; 25mg Calcium; 2mg Iron; 144mg Potassium; 97mg Phosphorus.


Leave a Comment!