


Well, this one isn’t healthy, what with the cream in the sauce, but if you only have 1-2 tablespoons of it, it can’t be too bad. A tender (and lean) pork tenderloin that’s brined in spiced-up buttermilk is browned in a pan then oven baked. THEN, you make the insanely wonderful sauce with cilantro, jalapeno, lime juice, goat cheese, butter, and more than a tetch of heavy cream.
Oh my goodness, is this recipe wonderful. I almost forgot to post it. It came from that great Diva class I attended in December, with Diane Phillips and and Phillis Carey (this is Phillis’ recipe). The pork is merely a vehicle for the sauce – I’m telling you – you’ll want to lick the plate it’s so good.
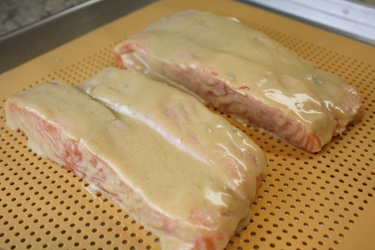
The brine in this is composed of sugar, ancho chili powder, regular chili powder, smoked paprika, cayenne, cinnamon and buttermilk. Easy, providing you have all the ingredients. The thick-sliced bacon is wrapped around the pork once it’s brined for 24 hours and tied onto it. The fat from the bacon bastes the pork while it’s roasting in the oven. The pork is browned and then it’s roasted in the oven for about 20 minutes.
It helps if you’ve made the cilantro pesto ahead of time – it’s not hard to make at all. It’s a typical pesto (oil, pine nuts, garlic), but instead of basil, it uses cilantro. The sauce is a combination of cream and butter, with some crumbled goat cheese (you can see it in the photo at top). The pesto is stirred into the sauce just before you’re ready to serve it – so it doesn’t actually cook – it’s just heated up. It’s SO full of flavor.
The pork needs to rest for about 6-8 minutes after it comes out of the oven (to help pull back the good juices, so you don’t lose them as you slice), then you slice the tenderloins about 1/2 inch thick. The bacon, which has crisped up during the roasting, is chopped up and sprinkled on top once you’ve drizzled the sauce on top. Oh my. Fabulous.
What’s GOOD: there is not anything about this recipe that ISN’T good. I’m telling you, you need to make this. Would make a fantastic company meal, for sure. Not hard to make – don’t be misled by all the ingredients below. It’s not all that hard to do. You’ll be emailing me afterwards, telling me how much you loved this.
What’s NOT: only that it’s not all that healthy, unfortunately. I’d serve it with rice so you can sop up every tiny bit of the sauce. It’s that good.
printer-friendly PDF and MasterCook 14/15 file (click link to open recipe)
* Exported from MasterCook *
Chile Buttermilk Brined Pork Tenderloin in Bacon with Creamy Cilantro Pesto Sauce
Recipe By: Phillis Carey cooking class, 12/2015
Serving Size: 10
PORK TENDERLOIN & BRINE:
1 quart buttermilk
1/4 cup sugar
1 tablespoon salt
2 tablespoons ground ancho chile powder
2 tablespoons chili powder
1 tablespoon dried oregano
1 teaspoon smoked paprika
1/2 teaspoon cayenne
1/2 teaspoon ground cinnamon
4 whole pork tenderloins
8 slices bacon — smoky type, thin sliced
CREAMY CILANTRO PESTO SAUCE:
2 cloves garlic — peeled
2 teaspoons jalapeno chile pepper — (no seeds)
1/2 cup cilantro — chopped (can use some stems)
2 tablespoons pine nuts — or cashews
1 tablespoon fresh lime juice
1 tablespoon grapeseed oil
1 1/2 cups heavy cream
1/4 cup unsalted butter
1/4 cup goat cheese — crumbled (not Silver Goat)
1. BRINE: Whisk together buttermilk, sugar, salt, chile powders, oregano, paprika, cayenne and cinnamon. Pour into a 2-gallon (or two 1-gallon) zip type plastic bags. Remove fat and silverskin from the pork tenderloins and add to the marinade. Refrigerate for 4-24 hours.
2. Preheat oven to 400°. Remove pork from marinade and pat dry. Wrap bacon slices around the pork (lay out the twine before you do this – easier this way) and tie pork with kitchen twine every 1 1/2 inches (4-5 per tenderloin). Fold the tapered end under to make an even thickness.
3. Heat a large, nonstick skillet over medium heat and brown pork tenderloins and bacon 2 minutes per side. Transfer pork to a parchment-lined baking sheet (2 per sheet) and roast in oven for 15-20 minutes or until internal temperature reaches 150°F on an instant read thermometer. Remove pork from oven, tent with foil and allow to sit for 8 minutes or so.
4. SAUCE: Prepare cilantro pesto by combining the garlic, chiles, cilantro, nuts, lime juice and oil in the food processor. Process to make a thick paste that is as smooth as possible – it will still be a bit chunky.
5. To finish sauce, heat cream and butter in a medium saucepan over medium heat until sauce comes to a boil; simmer until sauce thickens slightly, about 5 minutes. Whisk in the goat cheese and just before serving, whisk in the cilantro pesto. Allow to heat just briefly, but do not boil. Season to taste with salt and pepper.
6. Untie the pork tenderloins and remove the bacon (yes, really). Chop the bacon into small bits and slice the pork across each tenderloin diagonally (across the grain) in 1/2 inch thick slices. Serve several slices drizzled with the sauce and sprinkled with the chopped bacon.
Per Serving: 413 Calories; 28g Fat (60.7% calories from fat); 27g Protein; 14g Carbohydrate; 2g Dietary Fiber; 131mg Cholesterol; 926mg Sodium.


Leave a Comment!