Get new posts by email:

Archives

Currently Reading

Here are the tastingspoons players. I’m in the middle (Carolyn). Daughter Sara on the right, and daughter-in-law Karen on the left. I started the blog in 2007, as a way to share recipes with my family. I’m still doing 99% of the blogging and holding out hope that these two lovely and excellent cooks will participate. They both lead very busy lives, so we’ll see.

– – – – – – – – – – – – – – – – – – – – – –

BOOK READING (from Carolyn):

Music of Bees, Eileen Garvin. Absolutely charming book about a woman in midlife, lonely, who raises bees, also makes unlikely friends. Heart-warming and very interesting about beekeeping.

A Postcard from Paris, Alex Brown. Really cute story. Dual time line, 1940s and present day about renovating an old apartment in Paris, things discovered.

Time of the Child, Niall Williams. Oh such a good book. Very small village in Ireland, 1960s. A baby is left on the doorstep. The town all whispers and helps. I listened to an interview of the author, which made me like him and his books even more.

Sipsworth, Simon Van Booy. If you like animals you’ll swoon. An old woman who really wants to die finds a tiny mouse in her house and befriends it and finds a reason to live. Utterly charming book.

The Forger’s Spell, Edward Dolnick. True story. For seven years a no-account painter named Han van Meegeren managed to pass off his paintings as those of Johannes Vermeer.

If You Lived Here, You’d be Home by Now, Christopher Ingraham. Could hardly put it down – about a journalist who takes on a challenge to move to small town in Minnesota and write about it. He expects to hate it and the people and place, but he doesn’t. Absolutely wonderful true story.

The River We Remember, William Kent Kreuger. 1950s, Minnesota. A murder and the aftermath. Could hardly put it down. Kreuger has such a vivid imagination and writing style.

How the Lights Gets In, Joyce Maynard. An older woman returns to New Hampshire to help care for her brain-injured son. Siblings and family, lots of angst and resentments.

The Filling Station, Vanessa Miller. Every American should read this book. A novelized retelling of the Tulsa massacre in 1921. Absolutely riveting.

The Story She Left Behind, Patti Callahan Henry. Love this author. Based on a true story. A famous author simply vanishes, leaving her husband and daughter behind. She had invented a mystical language no one could translate. Present day, someone thinks he’s solved the riddle, contacts the family. Really interesting read.

The Girl from Berlin, Ronald Balson. Love anything about Tuscany. An elderly woman is being evicted from a villa there, with odd deed provenance. Two young folks go there to help unravel the mystery. Loved it.

The Island of the Colorblind, Oliver Sacks, M.D. Nonfiction. The dr is intrigued by a remote Pacific island where most of the inhabitants are colorblind. He also unravels a mystery on Guam of people born with a strange neurological problem. Medical mysteries unveiled. Very interesting.

The Bookbinder, Pip Williams. Post 1914 London. Two sisters work at a bookbindery. They’re told to not read the books. One does and one doesn’t. One has visions beyond her narrow world; the other does not. Eventually the one gets into Oxford. Lovely story.

The Paris Express, Emma Donoghue. 1895 on a train to Paris, a disaster happens. You’ll delve into the lives of many people who survived and died in the crash.

A Race to the Bottom of Crazy, Richard Grant. This is about Arizona. Author, wife and child move back to Arizona where they once lived. Part memoir, research, and reporting in a quest to understand what makes Arizona such a confounding and irresistible place.

The Scarlet Thread, Francine Rivers. A woman’s life turned upside down when she discovers the handcrafted quilt and journal of her ancestor Mary Kathryn McMurray, a young woman who was uprooted from her home only to endure harsh frontier conditions on the Oregon Trail.

A Place to Hide, Ronald Balson. 1939 Amsterdam, an ambassador has the ability to save the lives of many Jewish children. Heartwarming.

Homeseeking, Karissa Chen. Two young Chinese teens are deeply in love, but in China. Then their families are separated. Jump to current day and the two meet again in Los Angeles.

North River, Pete Hammill. He always writes such a good story. A doctor works diligently healing people from all walks of life. His wife and daughter left him years before. One day his 3-yr old grandson arrives on his doorstep.

A Very Typical Family, Sierra Godfrey. A very messed-up family. Three adult children are given a home in Santa Cruz, Calif, but only if the siblings meet up and live in the house together. A very untypical scenario but makes for lots of messes.

Three Days in June, Anne Tyler. The usual Anne Tyler grit. Family angst. This wasn’t one of my favorites, but it was entertaining and very short.

Saved, Benjamin Hall. Author is a veteran war reporter. Ukraine, 2022, he nearly loses his life to a Russian strike. Riveting story – he survives, barely.

Grey Wolf, Louise Penny. Another Inspector Gamache mystery in Quebec. She is such an incredible mystery writer.

All the Colors of the Dark, Chris Whitaker. A missing person mystery, a serial killer thriller, a love story, a unique twist on each. Could hardly put it down.

Orbital, Samantha Harvey. Winner of 2024 Booker Prize. I don’t usually like those, but I heard the author interviewed and she hooked me. This is not a normal book with a beginning, a story and an end. It’s several chapters of the day in the life of various astronauts at the ISS (Int’l Space Station). All fictional. She’s been praised by several real astronauts for “getting it” about space station everyday life.

The Blue Hour, Paula Hawkins. An island off Scotland. Inaccessible except when the tide is out. Weird goings on. An artist. A present day mystery too.

Iron Lake, William Kent Krueger. A judge is murdered and a boy is missing. Riveting mystery.

Tell the Wolves I’m Home, Carol Ricks Brunt. 1980s. A 14-yr old girl loses her beloved uncle. Yet a new friendship arises, someone she never knew about.

Four Treasures of the Sky, Jenny Zhang. 1880s, a young girl is kidnapped in China and brought to the United States. She survives with many hurdles in the path.

The Boy Who Fell out of the Sky, Ken Dornstein. Memoir, 1988. The author’s brother died in the PanAm flight that went down in Lockerbie, Scotland. A decade later he tries to solve “the riddle of his older brother’s life.”

Worse Care Scenario, T.J. Newman. Oh my. Interesting analysis of what could/might happen if a jet crashed into a nuclear plant. Un-put-downable.

Song of the Lark, Willa Cather. Complicated weave of a story about a young woman in about 1900, who has a gifted voice (singing) and about her journey to success, not without its ups and downs.

Crow Talk, Eileen Garvin. Charming story which takes place at a remote lake in Washington State, about a few people who inhabit it, the friendships made, but also revolving around the rescue of a baby crow.

The Story Collector, Evie Woods. Sweet story about some dark secrets from an area in Ireland, a bit magical, faerie life, but solving a mystery too.

A Sea of Unspoken Things, Adrienne Young. A woman investigates her twin brother’s mysterious death. She goes to a small town in California to figure it out, to figure HIM out.

The King’s Messenger, Susanna Kearsley. 1600s England, King James. About one of his trusted “messengers,” and his relationship with a young woman also of “the court.” Lots of intrigue.

In the Shadow of the Greenbrier, Emily Matchar. Interesting mystery in/around the area of the famous resort in White Sulphur Springs, West Virginia.

Isola, Allegra Goodman. Hard to describe, survival story on an island in the 1600s.

Save the Date, Allison Raskin. Rom-com, witty, LOL funny. Clever.

The Sirens, Emilia Hart. Numerous time-lines, Australia. Mysteries abound, nightmares, abandoned baby, weird allergies.

Red Clay, Charles Fancher. LOVED this book. Mostly post-Civil War story about the lives of slaves in Alabama during Reconstruction.

Stars in an Italian Sky, Jill Santopolo. Dual time line, 1946 and recent time. Love stories and a mystery.

Battle Mountain, C.J. Box. Another one of Box’s riveting mysteries. Love his descriptions of the land.

Something Beautiful Happened, Yvette Corporon. A memoir of sorts in Greece, tiny island of Erikousa, where the locals hid Jews during WWII. All elusive stories told by the author’s grandmother.

The Jackal’s Mistress, Chris Bohjalian. 1860s Virginia, about a woman who saves the life of a Union soldier. Really good story.

Song of the Magpie, Louise Mayberry. Really interesting story about Australia back in the days when it was mostly a penal colony. Gritty strength of a woman trying to thrive with her farm.

The Boomerang, Robert Bailey. A thriller that will have you gripping the book. About a lot of secrets surrounding the president (fictional novel, remember) and his chief of staff and about cancer. A cure. Such a good story.

Care and Feeding, Laurie Woolever. Really interesting memoir of a woman driven to succeed in the restaurant business. She worked for Mario Batali and then Anthony Bourdain. Gritty stories.

Everything is Tuberculosis, John Green. Maybe not a book for everyone. A real deep dive into the deadly tuberculosis infection, its history. I heard the author interviewed and found the book very interesting.

The Book Lovers Library, Madeline Martin. Fascinating read about Boots’ drug stores’ lending library. And the people who worked in them.

The Arrivals, Meg Mitchell Moore. LOL funny, about a middle-aged couple whose children (and their various family members) return to the family home and the chaos that ensues.

My Life as a Silent Movie, Jesse Lee Kercheval. About grief. A big move to Paris, finding herself a new life with a new set of real blood family.

Escape, Carolyn Jessop. Another memoir about a woman really in bondage in Utah, Mormon plural marriage.


Tasting Spoons

My blog's namesake - small, old and some very dented engraved silver plated tea spoons that belonged to my mother-in-law, and I use them to taste my food as I'm cooking.

Scroll down to the bottom to view my Blogroll

Posted in Beverages, Brunch, on August 5th, 2013.

kale_mango_peach_smoothie

A month or so ago I know I mentioned that I’d acquired a Vitamix blender. A workhorse of a machine that could mix cement, I think, if the quantities would fit in the container. (I’m joking, you’d never want to do that to a blender.)  A couple of weeks later, with me having not used the blender for anything except salad dressings, I saw a class listed at our favorite cooking school in San Diego (Great News, in Pacific Beach) on the Vitamix. I suggested my DH and I both go – he hardly does any cooking, but he was game. It was very inexpensive – although it didn’t include a meal – just a few samples of what the blender would do and we learned a bunch of techniques too. We had a strawberry agua fresca, a peanut and almond butter (wonderful), an orange vanilla vinaigrette (fabulous), kale and basil pesto (also fabulous) and a hot soup.

The very first thing the instructors did was a green smoothie. I was intrigued about that, because I’ve heard people say they’re really good and good for you. I watched The Chew one day a year or so ago when Daphne Oz  prepared green smoothies for all the other show cast. A few would just barely take a sip or two. Others loved it. Hers contains spinach, celery, kale, cucumbers, mint, parsley, apples, fresh ginger and lime juice.

In our class there was a recipe included in the handout for a “Spring Green Smoothie,” but this one we had in the class (below) was so good, I’ve barely ventured any further.  I’ve made this 3 times, so not every day – I have to have kale on hand, or baby spinach and I don’t always. Kale keeps for at least 10 days or so – spinach only a few days, so kale is my green of choice when I make this.

judy_jerry_green_smoothies
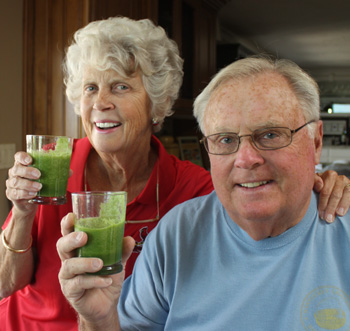
Please don’t make a frownie face about this – you should try it before you decide you really don’t like it. Our friends, Judy & Jerry say they liked it (at right)! Jerry even asked for the recipe, so does that tell you how much? These are our friends from Newtown Square, a village outside of Philadelphia. My DH, Dave, and Jerry have been friends since high school, bonding early-on at sailing. These friends have a home in Florida also and they SAIL their boat from Annapolis to Naples, FL (it takes a month of sailing each way) in the fall and return in the late spring.

The fruit balances out the greens – it really does. The couple-instructors were vegetarians mostly, but they said they start every morning with one of these drinks. There’s all kinds of good nutrients contained in kale and other dark leafy greens that are so very good for us, and particularly if you have them as your first meal, or part of your first meal.

Providing you have a blender that will chop ice (a requirement here), this smoothie is very simple to make. You want to include some very fruit-forward fruit – meaning fruit that has lots of flavor like mango, pineapple or apple. You can use grapes, blueberries, strawberries, peeled oranges, or other stone fruit, but stonefruit, doesn’t have as much flavor as you might hope. It’s good, but not exceptional. I’d use an apple before I’d use peaches, nectarines or apricots.

About the only trick to making these things is to put the heaviest items in first (i.e. the kale goes in last). So ice, fruit, water, greens and sweetener, if using. Start the motor on low, then increase as it continues to blend. Stop and push any greens down into the liquid. Add more water if needed, more fruit, more sweetener . . . whatever suits your taste buds. The greens are the star of the drink, but you actually don’t TASTE the greens.

The next day after making the first version you see below, I made another one (the 2nd recipe below). A bit of a sweeter one, and everyone liked it better. Me too. I added just a little bit of apple juice, an apple and a small knob of fresh ginger. No other fruit, just the kale, parsley. Oh gosh was it GOOD! And we all really liked the little hint of heat from the ginger. Next time I’m going to add fresh mint leaves – just a few.

What’s GOOD: Well, what can I tell you – not only do these taste good, but they’re good for you. I like these a lot – the 2nd one maybe a bit better, but probably because I’m a novice at green smoothies and I prefer a bit more sweeter flavor.
What’s NOT: nothing – it takes a few minutes to make, that’s all. And really not all that many.

Green Morning Smoothie printer-friendly PDF – created with CutePDF Writer
Green Morning Smoothie MasterCook 5 file and MasterCook 14 file

SCROLL DOWN BELOW FOR SECOND RECIPE AND FILES

* Exported from MasterCook *

Green Morning Smoothie

Recipe By: From a Vitamix cooking class, 2013
Serving Size: 4

PLACE IN BLENDER CONTAINER IN ORDER:
2 cups ice
3 cups kale — or spinach or watercress (discard kale ribs)
1 cup parsley
1 cup fruit — your choice: mango, pineapple (or berries)
2 cups water
2 tablespoons honey — or sweetener

Notes: If desired you can add protein powder to this to make a complete breakfast.
1. In blender container add ingredients in order shown. Attach lid and hold it, then gently increase blender speed, stopping at least once to push greens down into the liquid. Continue to puree until the mixture is smooth. Taste for sweetness (add more fruit) or honey. (I prefer to use a little less water as I don’t like it watery – use just enough to get the mixture to blend completely.)
2. Pour into glasses and serve. Will keep for 24 hours in the refrigerator – reblend before serving as it will separate some.
Per Serving: 63 Calories; trace Fat (5.8% calories from fat); 2g Protein; 15g Carbohydrate; 2g Dietary Fiber; 0mg Cholesterol; 37mg Sodium.

Green Smoothie with Green Apple and Ginger printer-friendly PDF – created with CutePDF Writer

Green Smoothie with Green Apple and Ginger MasterCook 5 file and MasterCook 14 file

* Exported from MasterCook *

Green Morning Smoothie with Apple & Ginger

Recipe By: Adapted from a Vitamix cooking class, 2013
Serving Size: 4

ADD TO BLENDER CONTAINER IN ORDER:
1 1/2 cups ice
2 1/2 cups kale — (ribs removed & discarded) coarsely chopped
1 cup fresh parsley
1 small Granny Smith apple
1 1/2 cups water
One small knob of fresh ginger (about a 1″ x 1″ piece)
1 cup apple juice

Notes: If desired you can add protein powder to this to make a complete breakfast.
1. Add ingredients to blender as shown, in order. Turn on blender (low) and gradually increase speed until the mixture is smooth, stopping once or twice to push kale down into the liquid. Continue to blend until it’s very, very smooth.
2. Taste for flavor – more fruit? more kale? more ginger? Pour into glasses and serve. This will keep for 24 hours in the refrigerator – reblend and serve.
Per Serving: 71 Calories; 1g Fat (5.8% calories from fat); 2g Protein; 16g Carbohydrate; 2g Dietary Fiber; 0mg Cholesterol; 34mg Sodium.

Posted in Beverages, Brunch, Desserts, on May 25th, 2013.

horchata_lua_2

Horchata is a refreshing rice-based drink from Latin America. It’s very easy to make, and if you’re so inclined, you can add some Kahlua to it as we did. Not traditional, but oh-so good.

Recently our four-couple gourmet group got together for a brunch. What fun we had, even though it wasn’t a nice day – one of those cloudy, overcast days that we, here in Southern California, don’t understand much, except in June, when we usually  have that kind of weather for the entire month, hence we call it “June Gloom.” But it was on Cinco de Mayo (the 5th). Early May!

One of the gals brought my Tuscan Sangria with Tuaca. We had 4 different salsas with chips (2 of them you’ll see here in a few days), then our main food included a egg/chile/cheese baked dish, caramelized carnitas tacos served with hot flour tortillas, guacamole and slivers of radishes. We also had a no-bake vegetarian enchilada dish that was surprisingly good. I’ll post that too. This, our dessert, was a horchata milk shake. I’d seen the recipe in Food and Wine, and since I like horchata, this one, with ice cream, sounded more like a dessert than a beverage to serve with a meal. So that’s what I did. And most of us ended up adding some Kahlua to the drink – making it a boozy drink, but not much. Just enough to taste it.

Horchata (hor-chaatah) is an agua fresca (meaning fresh water). All agua frescas are non-alcoholic and are common refreshing drinks served all over Latin America. In many Mexican restaurants here in California anyway, they serve some type of agua frescas – either horchata or tamarindo (tamarind) or hibiscus (also a favorite of mine – have never made it, I just buy it when I see it). We visit a Saturday morning farmer’s market some miles from us, and one of the food trucks there almost always has the hibiscus agua fresca, or the tamarind one. They’re all sweet, including horchata.

Anyway, horchata is easy enough to do, but since I’d never made it before, it was all new to me, other than I knew it was rice based. First I measured out rice, added water and whole cinnamon sticks (horchata typically is a cinnamon flavored drink). That sat overnight (out on the kitchen counter, not refrigerated). You remove the cinnamon sticks (see ERRATA below), then pour the entire mixture into the blender. The rice was not cooked at all, but after it sat in liquid all night, it was softened somewhat. Nothing is heated up during the making of horchata. I turned on the blender and let it go a bit, then added in some toasted sliced almonds, sugar and cinnamon. And here’s the most difficult thing you’ll do – pour the mixture through a fine-mesh strainer. Do NOT try to push the mixture through – you want the sieve to catch whatever rice it can, although it is ground up, you understand! I poured in about a cup and just let it sit until it had drained through. I rinsed the sieve and did it again, and again. It will take a few minutes for that, but truly that’s the most time consuming thing you’ll do making horchata.

Kahlua Tip:

If you do add Kahlua to this drink, don’t use much – you still want to taste the cinnamon, banana and almond flavors.

At that point in the making I poured it into a pitcher and refrigerated it (several hours before our get-together). When I was ready to serve it I put it back in the blender, added sweetened condensed milk, the banana, vanilla ice cream and ice. I tasted it and put in a tiny bit more horchata_lua_1of the sweetened condensed milk. Truth to tell, in our drive to the hosts’ home, my pitcher, with lid, slid and some of the horchata ended up on the carpet in my car’s trunk. Ooph! I wasn’t sure how much quantity I really had left, so needed to guesstimate how much to add in. Pour into glasses, add a straw and sprinkle the top with the cinnamon sugar mixture.

OPTIONAL: I served the horchata milk shakes in silver tumblers – they’re actually mint julep cups. Some people were drinking coffee with whipped cream on top and Kahlua was on the table. One person added a little jot of Kahlua to their horchata and he made very noisy mmmmmm’s, so someone else added Kahlua, and in short order nearly everyone had added Kahlua. Knowing that horchata is really a non-alcoholic drink, I wasn’t so sure it would be a good thing! Oh, was I wrong. It was fabulous. My only caveat: don’t add too much Kahlua or it does overpower the delicacy of the cinnamon, almond and banana flavors.

ERRATA: I have to confess, I forgot to take out the cinnamon sticks after the rice had soaked overnight. I glanced at the recipe and didn’t see the instructions. I just missed it. So our horchata was a bit grainy from the ground-up cinnamon – but you know what? Everyone seemed to love it that way. They said they liked it grainy and would definitely do it that way if they made it. Well, okay then!

What’s GOOD: every little sip of it was fantastic. I’d definitely make this again, with or without the Kahlua. I didn’t mind the grainy texture from the cinnamon sticks, but that’s up to you. Traditionally, remove the cinnamon sticks! You could lighten up the recipe some by using sugar-free ice cream, or light ice cream. There’s also low-fat sweetened condensed milk in grocery stores too. This one’s a keeper.
What’s NOT: nothing. Absolutely nothing wrong with this at all!

printer-friendly PDF – created using Cute PDF Writer, not Adobe
MasterCook 5+ import file – right click to save (remember where), run MC, File|Import

* Exported from MasterCook *

Horchata Milk Shake

Recipe By: Food & Wine, May 2013
Serving Size: 4 (maybe 5)

1 cup long-grain white rice — rinsed well
3 cups water
4 medium cinnamon sticks — cracked
1/4 cup sliced almonds
1 tablespoon ground cinnamon — plus 1/4 teaspoon
1 tablespoon sugar
1/4 cup sweetened condensed milk — plus 2 tablespoons
1/2 banana — (2 ounces)
1 pint vanilla ice cream
1/2 cup ice
OPTIONAL: Kahlua to taste, about 2 tsp per serving

1. In a bowl, cover the rice with the water. Add the cinnamon sticks and let stand at room temperature for at least 3 hours or overnight; discard the cinnamon sticks.
2. Meanwhile, in a skillet, toast the almonds over moderate heat, tossing, until fragrant, 3 minutes. In a small bowl, stir 1 tablespoon of the ground cinnamon with the sugar.
3. Transfer the rice and its liquid to a blender. Add the almonds and puree for 2 minutes. Strain the horchata through a fine sieve into a bowl. Rinse out the blender.
4. Return the horchata to the blender and add the condensed milk, banana and the remaining 1/4 teaspoon of ground cinnamon and puree. Add the ice cream and ice and blend. Pour the shake into glasses, sprinkle the cinnamon sugar on top and serve.
5. OPTIONAL: Add Kahlua to each glass (about 2 tsp). Don’t overdo the Kahlua as it will overpower the delicate cinnamony flavor of the horchata.
Per Serving (this is off some because you don’t consume all the rice – some yes, all? no): 482 Calories; 15g Fat (26.0% calories from fat); 10g Protein; 83g Carbohydrate; 10g Dietary Fiber; 36mg Cholesterol; 91mg Sodium.

Posted in Breads, Brunch, on May 13th, 2013.

lavender_white_choc_chip_scones

The scones we made for the tea – apricot orange on the left, and the favorite, lavender white chocolate chip on the right.

Today you’re going to get 2 recipes – for both scones Sara and I made for her tea recently. They were easy and totally different. The lavender ones used heavy cream as the fat (mostly) and the apricot ones used butter and buttermilk. Both were good, but everyone seemed to favor the lavender white chocolate chip ones over the apricot. Maybe because the texture was slightly different – they were a bit more moist – in fact the batter was really wet when Sara scooped them onto the cookie sheet. It’s hard to tell from the photo but the apricot ones were actually cut in rounds, while the lavender ones were drop scones and they spread some as they baked.

If you happen to have lavender in your garden, do harvest and dry some (providing you don’t use any pesticide on it – you’d not want to be eating that!). If not, you can buy Culinary French Lavender (1 oz) online. Lavender buds don’t keep fresh and vibrant tasting for all that long, so I’d recommend you use whatever you buy within 6 months or so. If you buy any online, unless you use it a lot, I’d buy the smallest quantity available. The one linked above offers free shipping – that’s nice since herbs don’t weigh all that much in small quantities!

The lavender scones came from an article in the San Diego Union Tribune. The recipe is from a bakery in San Diego called Cups. The buttermilk scone recipe came from a very old cook book of Sara’s, a Sunset Breakfast & Brunch cookbook (out of print). She mentioned that it’s her favorite go-to scone recipe and has been for years. I should compare it to my favorite go-to Buttermilk Scones recipe that I’ve been making for about 25 years or so.

Lavender Scone printer friendly PDF
Lavender Scone MasterCook 5+ file

* Exported from MasterCook *

Lavender White Chocolate Chip Scones

Recipe By: Adapted very slightly from Cups, a San Diego bakery
Serving Size: 12 (I think it made more than 12)

2 1/2 cups all-purpose flour
2 tablespoons baking powder
2 tablespoons sugar
1 teaspoon sea salt
2 teaspoons culinary lavender buds
1 cup white chocolate chips — or chunks
1 cup unsalted butter — cut into cubes and chilled
1 1/4 cups heavy whipping cream — chilled
TOPPING:
1 egg — beaten
1 cup turbinado sugar — (unprocessed sugar such as Sugar in the Raw)
1 teaspoon culinary lavender buds

1. Preheat oven to 400°.
2. Sift flour, baking powder, sugar and salt into a medium-sized bowl. Work the butter cubes into the dry ingredients with a pastry cutter (or you can use two knives) until it resembles loose crumbs. Add lavender buds and chocolate chips.
3. With a spoon, gently mix in the cream until just incorporated.
4. Pat the dough with your hands, forming a 7-inch circle. Cut into 6 to 8 wedges for traditional, triangular-shaped scones, or cut rounds with a 2-inch cutter for flat, round scones. (You can also scoop dough with an ice cream scoop to get nice, rounded scones; that’s the method used at Cups. This latter is the method we used – the dough was very soft and loose, so the scones were flatter – but they were incredibly moist and soft.)
5. TOPPING: Mix sugar and lavender buds together, and place in airtight jar for one week before using.
6. Place the scones on a parchment or Silpat-lined cookie sheet, glaze with egg mixture and top with lavender sugar for a crunchy top.
7. Bake scones for 12 to 15 minutes; take them out of oven just as the tops begin to turn golden.
Per Serving: 498 Calories; 30g Fat (54.9% calories from fat); 5g Protein; 51g Carbohydrate; 1g Dietary Fiber; 93mg Cholesterol; 445mg Sodium.

. . .

Apricot Scone printer friendly PDF
Apricot Scone MasterCook 5+ file

* Exported from MasterCook *

Buttermilk Scones with Apricots and Orange Zest

Recipe By: Adapted slightly from Sunset, Breakfast & Brunch
Serving Size: 18

3 cups all-purpose flour
3/4 cup cold butter — cut in small bits [1 1/2 cubes]
1/3 cup sugar
3/4 cup dried apricots — finely chopped, or dates or currants [in original recipe]
1/2 teaspoon baking soda
2 teaspoons grated orange peel — [original recipe used 1 teaspoon]
2 1/2 teaspoons baking powder
1 cup buttermilk
3/4 teaspoon salt
TOPPING:
1 tablespoon half and half
1/4 teaspoon ground cinnamon
2 tablespoons sugar

1. Preheat oven to 425°. In a large bowl, stir together flour, sugar, baking powder, soda and salt.
2. Using a pastry blender, cut butter into flour mixture until it resembles coarse cornmeal; stir in dried fruit and orange peel.
3. Make a well in the center of the mixture; add buttermilk all at once.
4. Stir with fork until dough cleans the sides of the bowl. Gather dough into a ball, and turn out onto a floured surface. Roll or pat into a 1/2 inch-thick circle. Cut out shapes using a 2 ½ inch cookie cutter.
5. Using a pastry brush, brush tops with cream and sprinkle with cinnamon sugar.
6. Bake for 12 minutes or until lightly browned.
Per Serving: 183 Calories; 8g Fat (39.3% calories from fat); 3g Protein; 25g Carbohydrate; 1g Dietary Fiber; 21mg Cholesterol; 285mg Sodium.

Posted in Brunch, Desserts, Miscellaneous, on March 12th, 2013.

mango_coulis

The easiest of sauces – you can make it as sweet as you prefer – I made it on the tart side. It would be great on top of French toast, breakfast yogurt (I can attest to that one since the left overs have garnished several morning bowls), or as a fruit puree with a creamy dessert like cheesecake. Yum.

If you read my blog regularly, you already know that I made Lindy’s Cheesecake and wrote up a post with a very brief history of Lindy’s deli in New York City. It closed in 1957, but the famous cheesecake lives on in home kitchens, and perhaps a lot of restaurants too, since the recipe became public. It was recently listed in Saveur magazine as one of the top 100 recipes ever.

lindys_cheesecake_slice2When I made it, I decided it needed something along side – something with some color. It’s too early in the season for reliably sweet strawberries, so I decided to use mangoes. It was perfect. The recipe came straight out of the Joy of Cooking: 75th Anniversary Edition – 2006. Maybe it was in Rombauer’s earlier editions, but this is the book I own because my old one from the 1950’s was falling apart. I looked up many other recipes, and they were all the same – mangoes, sugar of some form and either lime or lemon juice. Plus just a bit of water to make the sauce almost pourable. That’s it. See? I said it was easy!

I whizzed it up in the food processor, although the blender would likely work just as well. I used the frozen mango chunks from Trader Joe’s. You could use fresh mangoes too. Do defrost the frozen ones some so they will puree. Add some citrus (the lemon juice or lime juice) and add as much sugar as you want – I used about a rounded 1/4 cup of powdered sugar. You can use regular sugar too. Either one. And then some water – the texture of the mangoes will determine how much water you’ll need – you want it thick, but not so you can’t pour it. In the photo at top you can see it’s almost the consistency of pudding, but it spread out flat once I put it on the plate with the cheesecake.

What’s GOOD: the delicious FRESH taste of mango. Citrus does that in all of its guises. I made mine on the tart side since the cheesecake was already plenty sweet, but use your own judgment based on what you’re serving it with. It keeps for several days. I think the recipe said 3, but I don’t know why it wouldn’t keep a week. It is also fantastic drizzled over Greek yogurt for our breakfast. And I just know it would taste wonderful on French toast.
What’s NOT: it was perfect for how I needed to use it, as a sauce for cheesecake.

printer-friendly PDF (created using Cute PDF Writer, not Adobe)
MasterCook 5+ import file – right click to save file (and remember where you put it), run MC, then File|Import

* Exported from MasterCook *

Mango Coulis

Recipe By: Joy of Cooking, 75th anniversary edition, 2006
Serving Size: 5

2 whole mangoes — (or use frozen chunks, about 1 1/2 cups)
1/4 cup to 1/2 cup confectioner’s sugar — or more to taste
1 tablespoon fresh lime juice — or lemon juice
About 2-3 T water

1. If using frozen mango, defrost. If using fresh, peel and core mangoes and cut into 1″ pieces.
2. In a food processor or blender combine the mangoes, lime juice and water. Blend until completely smooth, then add the sugar and blend. Add more water if it’s too thick. Taste for sweetness and add more citrus or sugar. If you’re serving this with a very sweet dessert, you can make the coulis less sweet. Refrigerate. Ideally, use up within 3 days. Add leftovers to a morning fruit smoothie or pour over fresh fruit and yogurt. Would also be delicious on top of French toast.
Per Serving (based on 1/4 cup sugar): 78 Calories; trace Fat (2.4% calories from fat); trace Protein; 20g Carbohydrate; 2g Dietary Fiber; 0mg Cholesterol; 2mg Sodium.

Posted in Brunch, Miscellaneous sides, on December 26th, 2012.

winter_fruit_salad

You know what those little bug-like things are? Star anise. Not commonly in every kitchen, I suppose. I don’t use them very often, but when you need them in cooking, they’re essential. They wouldn’t normally go on top of the salad, but I wanted to get your attention.

For a brunch a couple of weeks ago I needed some kind of fruit. I have a wonderful Spiced Fruit dish I’ve made for years – it’s great for a morning kind of thing. Spiced Peaches also go well with a vanilla_star_anise_syrupbrunch, but this time I thought I’d try something new. I’d just read the recipe in The Essential New York Times Cookbook: Classic Recipes for a New Century. My go-to cookbook these days. This is actually in the dessert section of the cookbook, but it says it’s great with breakfast or brunch. It’s flavored with whole vanilla, some lemon zest and the star anise, all soaking in a simple syrup kind of sugar and water concoction. The other good thing about this is you have to make it the night before – so the fruit has time to marinate in the tasty syrup. There above is the mixture before I brought it to a boil.

vanilla_star_anise_syrup2Here at left is the mixture after I brought it up to a boil – the sugar is dissolved and hopefully the heat will have opened up the flavors of the vanilla, lemon and star anise. The recipe calls for Bosc pears, fresh apple, dried figs and dried apricots. I added some dried Braeburn sliced apples I had in my box of dried fruits in my pantry. The syrup is mixed up with the vanilla bean (sliced in half to release all those lovely little tiny beads of flavor), a few strips of fresh lemon peel and the star anise. It’s brought to a boil, the sugar gets dissolved, then you pour that hot-hot syrup over the fresh fruit. You let it cool to room temp that way, then cover with plastic wrap, poke a couple of holes in it to ventilate it, store in the refrigerator. By pouring the hot liquid over the fruit, it almost “cooks” the fruit, but not really, and not quite. The fresh fruit still has texture, and the dried fruits and pleasantly toothsome. I liked the combination a lot.

When you serve it, you’ll want to remove the star anise, the vanilla bean halves and the lemon peel. So you’re left with the nice bowl of mixed fruit. I had ample left over and it’s still tasty some days later. The pears probably won’t last – as I write this (about 5 days after I served it) I still have left overs and the pears are not so nice in texture anymore, but all the remaining fruit is fine. So probably you could make this a couple of days ahead if you needed to.

What’s good: it’s make-ahead easy. Nice flavors, considering it’s all winter-type fruit. Went well with a brunch (an egg dish) and left overs were very nice for several days. Try not to make more than you’ll eat at the one meal. I made the recipe below and could have served about 10 people, I think. Keep that in mind, unless you’re feeding fruit fanatics! Save the syrup – you could use it to flavor and sweeten iced tea (or hot tea) or pour over other fruit. Strain out all the fruit dredges first, though.
What’s not: only that you must plan ahead – it’s got to be made the night before (or maybe 2 days before) you want to serve it.

printer-friendly recipe (CutePDF)
MasterCook 5+ import file – right click to save file, run MC, then File|Import

* Exported from MasterCook *

Winter Fruit Salad

Recipe By: Adapted slightly from New York Times, 2001 (Amanda Hesser)
Serving Size: 8
NOTES: The recipe assumes you will eat/drink all of the sugary syrup. You don’t, so it is not as caloric as the recipe indicates.

1  1/4 cup sugar
3 star anise — (I would add 4 of them next time)
1 vanilla bean — plump, split in half lengthwise
2 long pieces lemon zest — (2 inch) preferably Meyer lemons, (peeled with a vegetable peeler)
3 Bosc pears — firm
1 apple — tart type, firm
8 whole dried apricots — Turkish, if possible, cut in half
4 whole dried figs — quartered
2 ounces dried apples — (optional – not in original recipe)

1. Fill a medium saucepan with 5 cups water. Add the sugar, star anise, vanilla bean and lemon zest. Bring to a boil, and cook until all the sugar is dissolved. Then shut off the heat. Meanwhile, peel and core pears and apple. Slice thinly lengthwise and place in a large heatproof bowl. Add apricots, dried apples and figs. Pour hot sugar syrup on top, making sure all the fruit is covered. Allow to cool to room temperature. Cover bowl with plastic wrap; poke a few holes in plastic. Chill overnight in refrigerator.
2. The next morning, remove the star anise, lemon zest pieces and vanilla beans, then use a slotted spoon to ladle fruit into a serving bowl and serve. Store left overs in a sealed container.
Per Serving (inaccurate – assumes you drink all the marinating syrup): 528 Calories; 1g Fat (2.2% calories from fat); 6g Protein; 136g Carbohydrate; 16g Dietary Fiber; 0mg Cholesterol; 21mg Sodium.

Posted in Breads, Brunch, on December 20th, 2012.

choc_orange_muffins

Here’s another of those – TRUST ME –  recipes. When I tell you these are worth making, please just do it, right? Do you like vivid orange flavors? And chocolate? This positively is a match made in heaven. And they’re super easy too.

Muffin Tips:

(1) don’t over-mix the batter; and (2) bake to 205° internal temp (use a thermometer for that part)

A group of women was coming to my home to attend a cooking class, and each time we meet, the hostess (me this time) provides beverages (hot and cold) and some breakfast sorts of things (croissants maybe, fresh fruit, occasionally champagne) and a bread – perhaps banana bread or muffins. Even cookies. I had nothing particular in mind, but turned to one of my favorite little tiny cookbooks. What I’ve learned over the years is that every recipe in this book, Muffins: Sixty Sweet and Savory Recipes… From Old Favorites to New is reliable. Written by Elizabeth Alston,

Our daughter Sara, and her 15 & 7/8 year old daughter Sabrina

Our daughter Sara, and her 15 & 7/8 year old daughter Sabrina

it’s out of print, but you can still find it in a used book store. And if you click on the link there, you’ll find some used copies for a penny (plus shipping, of course). I bought it for myself in 2003, when it was new (along with the companion book about Scones – Biscuits and Scones: 62 Recipes from Breakfast Biscuits to Homey Desserts). I also gave these to my daughter Sara, because she and her daughter love to bake. She was telling me a few weeks ago that it’s her go-to cookbook for anything close to a muffin (there are all kinds from savory to sweet, and biscuits too). What’s good about this one is that every single recipe I’ve ever tried (and Sara says the same thing) has been exceptionally good.

choc_orange_muffins_batterLooking online to see what other people thought, I found several versions of this recipe, all with a few little changes. Never did find the exact recipe, so I stuck with Alston’s original, using yogurt as the dairy (you can use buttermilk too).

You might be skeptical at the amount of orange zest in the recipe – 12 muffins require the zest from 2 oranges. My oranges were very large, so I probably had more than usual – about nearly 3 tablespoons that I got using the microplane. And it uses 3 ounces of bittersweet chocolate. I rarely use anything but the best chocolate (SharffenBerger in this case), and the bittersweet is worth seeking out. I did NOT use chocolate chips, and I’m glad I didn’t because they’re too sweet and too uniform – it’s nice to have dots of larger pieces of chocolate. You know you’re eating a really good chocolate that way.

choc_orange_muffins_coolingThe muffins are standard as far as mixing – cream the butter and sugar, add eggs and beat until light and fluffy. Add the yogurt,  orange juice and zest, then the dry ingredients are gently stirred in with the chocolate at the last. There are two secrets to making muffins: (1) don’t over mix the batter – just stir until you don’t see any errant streaks of flour; and (2) bake them to EXACTLY 205°. In my oven that took 18 minutes. I used my fantastic Thermapen thermometer to test them and they were 204.9° exactly. Perfection. I cooled them in the muffin tin for about 10 minutes, then carefully used a plastic knife to release them and let them cool to room temp. And I’m absolutely guilty as heck – I ate one while they were still barely warm. Oh – my – gosh.  Was it ever good. Ideally bake them within an hour of serving, when the chocolate is still almost molten, but not quite. As it was, I made them the day before and kept them in a ziploc bag overnight. Reheat them if you’re going to make them ahead – but not for long as they would dry out, I’m sure.

What’s good: oh, the orange flavor and the chocolate. As they say, those are two flavors that are marriage material. Loved the intense orange flavor – much more orange-y than usual in a baked good – but it wasn’t over the top (as in bitter). And the irregular pieces of chocolate were such a sweet surprise as you eat it. Definitely a make-again muffin.

What’s not: absolutely nothing at all.

printer-friendly (Cute PDFWriter) PDF

MasterCook 5+ import file – right click to save file, run MC, then File|Import

* Exported from MasterCook *

Chocolate Orange Muffins

Recipe By: From “Muffins” by Elizabeth Alston (2003)
Serving Size: 12
NOTES: If you use a mini-muffin tin, you’ll get 36.

1 cup sugar — (I used about 7/8 cup)
6 tablespoons unsalted butter — softened
2 large eggs
1/2 cup buttermilk — or plain, unsweetened yogurt
1/4 cup orange juice — freshly squeezed
2 cups all-purpose flour
1 teaspoon baking powder
1/2 teaspoon baking soda
1 tablespoon orange zest — (I used about 2+ T because the oranges were large)
3 ounces semisweet chocolate — chopped in irregular small pieces

1. Preheat oven to 400° (200° C). Lightly grease a 12 cup muffin pan, or line with paper liners. May also use mini-muffin tin (if so, use shorter baking time)
2. In a medium bowl, mix flour, baking powder, and baking soda.
3. In a separate mixing bowl, with an electric mixer, cream together butter and sugar until smooth. Beat in the eggs one at a time and continue mixing until the mixture is light and ribbony. Add orange zest, orange juice, and buttermilk (or yogurt). Use a spoon to add the flour mixture and stir it in just until mixed and there are no streaks of flour. Add the chocolate pieces and stir just until combined. Divide batter into muffin cups.
4. Bake for 15 to 25 minutes in the preheated oven (to an internal temperature of 205°) or until a toothpick inserted into the center of a muffin comes out clean. Let muffins cool in the pan on a wire rack for at least 10 minutes before removing from the pan. (My batch of these took 18 minutes. Do NOT over bake them or they’ll be dry. If making ahead, reheat them gently and for a short time.)
Per Serving: 244 Calories; 9g Fat (32.3% calories from fat); 4g Protein; 38g Carbohydrate; 1g Dietary Fiber; 51mg Cholesterol; 118mg Sodium.

Posted in Brunch, on August 21st, 2012.

huevos_in_a_hole

So what is it, you want to know? Tortillas in a stack of 3 with a hole cut out of the middle, like doughnuts, I suppose, crisped up with a little butter, then an egg dropped into the hole and fried both sides. Garnished with your choice of toppings: salsa, sour cream, cilantro, avocado. Yum.

Huevos in a Hole-001

Here’s how it went together. First I stacked up 3 of the smaller 5” diameter corn tortillas.

Then I cut a hole in the center with a 3” cutter. You need to use 3 tortillas because anything smaller – well, once you add the egg in the middle, it will overflow the hole! That doesn’t work!

Next I heated up a nonstick frying pan and melted about oil and butter, and set the tortillas in there to sizzle a bit. After about 2-3 minutes sizzling, I used a wide spatula to turn the group over on the other side – but first I melted more butter on the side of the pan (I pushed the tortilla stack over a bit first), then I held the tortillas up on the spatula while I tilted the pan so the melted butter would go into the center.

Once turned over (no picture of that part) I let that sizzle a bit. THEN I added the egg in the center and let it cook for about 45 seconds. Gently. Next I turned it over again, putting a last little pat of butter to melt underneath. If you don’t do that part the egg may stick – even though this was a nonstick pan, I’m recommending the additional butter anyway. I put a lid on it for about 20 seconds, then out onto a plate it went and everybody could add whatever condiments they wanted. I didn’t have avocado; if I had, I would have added that to the garnishes. The trick to this dish is getting the pan hot enough that the tortillas cook and get a little crispy, but not have it so hot that the egg over cooks or cooks too fast. Which would be easy to do. That’s why I cooked the tortilla stack some at the beginning. Adding a little oil to the pan will crisp it up, and I definitely think you should do it on both sides before you add in the egg. The recipe came from Pioneer Woman‘s blog.

Our grandson suggested that next time I fry up a few slices of bacon and put them in between at least one layer. That was a good idea. To be more authentic, a little spread of chorizo on one of the doughnut type tortillas would be good too. It might fall out when you turned it over – that’s the only possible down side. Maybe you could mix the chorizo with a little egg white so it would stick. Hmmm.

What I liked: the “huevos rancheros” taste combo. It was EASY to make. Really it was, as long as you have fresh salsa at hand and a little light sour cream. Do cook the tortillas long enough that they crisp up a bit, though. You want the egg to be a little runny, so it soaks in. This is not low calorie or low fat cooking; sorry!

What I didn’t like: nothing at all!

printer-friendly PDF

MasterCook 5+ import file – right click to save file, run MC, then File|Import

Huevos in the Hole

Recipe By: From Pioneer Woman’s blog
Serving Size: 1
Serving Ideas : If you don’t mind the extra calories, I think adding a little mound of Monterey Jack cheese on top of the egg (after you’ve turned over the stack) would be especially delicious.
NOTES: The calorie count is higher than it should be – because you cut out the center of each tortilla, you’re only eating about 2/3 of a tortilla with each one.

3 whole corn tortillas — 5″ diameter
1 tablespoon butter — divided in 3 pieces
1 tablespoon vegetable oil
1 whole egg
salt and pepper to taste — to taste
fresh salsa, light sour cream, chopped cilantro and avocado slices for garnish
grated Monterey Jack Cheese (my suggestion)

1. Stack the three tortillas on top of one another and use a circular cutter to cut a 3-inch circle out of the middle. It needs to be 3″ otherwise a large egg will overflow the hole. Save center circles for another use (nachos or mini tacos, anyone?)
2. Heat a griddle or skillet over medium heat and add oil and melt one chunk of butter. Place the tortillas, still stacked, in the skillet so that the tortilla on the bottom soaks up some of the butter. Allow to sizzle some over medium-high heat for about a minute. With a wide spatula, lift tortilla stack and turn it over. Allow it to cook for about 2 minutes until the tortilla has gotten just a little crispy.
3. Put a little butter in the center hole, then carefully crack in the egg. Sprinkle with salt and pepper and let it cook for 1 1/2 to 2 minutes.
4. Move the tortilla/egg away from the cooking area for a second, then melt on the rest of the butter. Carefully flip the tortilla/egg to the other side so that the tortilla on that side will soak up some of the butter. Sprinkle the top with Jack cheese in a thin layer (not thick), if desired. Continue cooking until egg is cooked to your liking and the cheese is melted. Put a lid on it to help melt the cheese.
5. Serve with salsa, sour cream, and other garnishes.
Per Serving (not accurate as it assumes you’re eating 3 whole tortillas, and probably larger ones than I used): 463 Calories; 32g Fat (61.0% calories from fat); 11g Protein; 35g Carbohydrate; 4g Dietary Fiber; 243mg Cholesterol; 308mg Sodium.

Posted in Breads, Brunch, on March 10th, 2012.

blackberry_lemon_thyme_muffins

The minute I spotted this recipe I knew I wanted to try it. Fresh thyme in a sweet muffin? It sounded so interesting. Plus some fresh blackberries, which are available in our markets almost year ‘round now. And lemon – we have an abundance of them on our trees, although in this case it was only the zest that was needed. The recipe is in the most recent issue (March, 2012) of Bon Appetit.

blackberry_muffins_collageSince I love to bake, it was a no-brainer to try this – read the recipe through first (something I often forget to do) – and begin. The crumble topping (cake flour, butter, fresh thyme baking powder, sugar and an egg yolk) is made first and chilled (even a day ahead is okay). The muffin batter has several steps – and in fact this particular batter requires lots of stand-mixer time – 2 minutes of just butter, 2-3 minutes once you add sugar, another 3-4 minutes once you add the eggs and vanilla. Then everything slows down – you add the buttermilk, then the dry ingredients. What it made was a really, really light batter

Meanwhile, the blackberries are halved – that’s not something I’ve ever done before I must admit – and you actually want some of the berries to macerate a bit in the batter to give it some dark berry color. The berries are just folded in, then plopped into lined muffin cups. The recipe indicated using those fancy paper liners – the tall, waxed paper type that makes a very large muffin. I just used regular muffin liners and my regular muffin tin. The chilled crumble is sprinkled on top (about a tablespoon per muffin) and into a 325° oven they went for 40 minutes. I ended up with quite a bit of topping leftover – I suppose I should have made 18 muffins, or even 20 of them so I used up all of the crumble. Don’t know exactly what I’m going to do with the rest of it. It’s too nice to throw out . . . any ideas for me, kind readers?

Since I now have a Thermapen Instant Read Thermometer (wow, is that thing a real beauty – expensive – but it does register temp within about 3 seconds) I use it at any and all occasions. I quickly looked up online what temp the interior is supposed to be of a baked sweet muffin – it said 210°, and at 40 minutes that’s exactly what they were. They cooled in the tin for about 10 minutes, then I took them out and onto a rack while I baked the remaining 4 muffins (the recipe makes 16).

My DH has just planted a new herb garden for me – in two deep and long raised flowerboxes that sit outside on a short wall in our patio, and we have new, tender thyme in one. I chopped up two teaspoons of it (one went in the crumble topping, the other in the muffin batter itself – next time I’d add more).

What I liked: well, I liked the thyme. A lot and I’ve upped the amount in the batter by half (from 1 tsp to 1 1/2 tsp). Loved the blackberries. I’d also add just a bit more sugar. Maybe because an insufficient amount of the topping ended up on top (where there was some sugar) the muffins were just a bit too savory. I’d have to try them again to know for sure. I’ve increased the sugar in the recipe below or serve with a sweetened butter. I liked the silky cake-like texture (from the cake flour and all the long mixing). I also liked that each muffin had just 11 grams of fat! Surprising, when there was a cube of butter in the batter and 3/4 of one in the crumble.

What I didn’t like: really nothing – all the flavors were delish, and the cake so very tender. I might add some toasted walnuts? More vanilla?

printer-friendly PDF
MasterCook 5+ import file – right click to save file, run MC, then File|Import

Blackberry, Lemon and Thyme Muffins

Recipe By: Adapted from Bon Appetit, March 2012
Serving Size: 16
NOTES: Can be made 1 day ahead. Store cooled muffins airtight at room temperature for up to 2 days. If storing longer, freeze, individually wrapped in foil and in a sealed plastic bag.

CRUMBLE:
1 cup cake flour
1/4 cup sugar
1 1/2 teaspoons chopped fresh thyme
1/2 teaspoon baking powder
1/2 teaspoon kosher salt
6 tablespoons unsalted butter — (3/4 stick) chilled, cut into 1/4″ cubes
1 large egg yolk
MUFFINS:
1 cup all-purpose flour — plus 2 tablespoons (for blackberries)
1 cup cake flour
1 teaspoon baking powder
3/4 teaspoon baking soda
1 teaspoon kosher salt
1/2 cup unsalted butter — 1 stick, room temperature
1 1/4 cups sugar
2 large eggs
1 teaspoon vanilla extract
1 cup buttermilk
2 tablespoons lemon zest — finely grated
1 1/2 cups blackberries — fresh, about 6 ounces, or frozen, thawed, drained, halved lengthwise
1 1/2 teaspoons chopped fresh thyme

1. CRUMBLE: Whisk first 5 ingredients in a medium bowl. Add butter. Using your fingertips, rub in butter until pea-size lumps form. Add egg yolk; stir to evenly distribute and form moist clumps. (Crumble should resemble a mixture of pebbles and sand.) Chill for at least 1 hour. DO AHEAD: Can be made 3 days ahead. Cover and keep chilled.
2. MUFFINS: Preheat oven to 325°F. If making standard-size muffins, line 16 1/3-cup molds with paper liners.
3. Whisk 1 cup all-purpose flour and next 4 ingredients in a medium bowl.
4. Using an electric mixer, beat butter until pale and creamy, about 2 minutes. Add sugar and continue to beat until well incorporated, 2-3 minutes longer.
5. Whisk eggs and vanilla in a small bowl to blend; gradually beat into butter mixture. Continue beating until light and fluffy, 3-4 minutes. Combine buttermilk and lemon zest in a small bowl; gradually beat into butter mixture. Add dry ingredients; beat just to blend (do not overmix).
6. Toss blackberries and thyme with 2 tablespoons flour in another small bowl; fold into batter, gently crushing berries slightly to release some juices.
7. Spoon about 2/3 cup batter into large paper muffin molds, or divide between prepared muffin pans. Top each large muffin with 2 tablespoons crumble or each small muffin with 1 rounded tablespoon crumble.
8. Bake until tops are golden brown and a tester comes out clean when inserted into center (or to an internal temperature of 210°), about 50 minutes for large muffins and 40 minutes for standard-size muffins. Let cool in pan at least 20 minutes, then transfer muffins to a wire rack to cool. Serve warm or at room temperature.
Per Serving: 267 Calories; 11g Fat (38.0% calories from fat); 4g Protein; 38g Carbohydrate; 1g Dietary Fiber; 67mg Cholesterol; 308mg Sodium.

Posted in Breads, Brunch, on March 2nd, 2012.

harvest_pumpkin_scones

Are all scones beautiful? Certainly not if you look at mine! But, these have a nice rich, tender scone texture with all those lovely spices (similar to pumpkin pie), some crystallized ginger, and pumpkin puree.

Can you just tell these scones are craggy? I love that word – craggy. Means rugged and uneven: a craggy face, for instance. These are not your more common –  pretty, perfectly formed triangular scones with smooth tops and edges. The dough is raggedy and slightly bumpy. Even a tad on the difficult to form. But I didn’t over-handle it just so it wouldn’t get tough. I needed a breakfast bread for my DH’s men’s Bible Study group, and went to my internet file, and there was this one. It came from King Arthur Flour about 2 years ago, and if you want to see their version, click here.

My pantry shelf still had two large cans of pumpkin puree from 2010. Long past its use by date, but I know those dates are just suggestions. Canned goods usually don’t have a problem for several years. But I only used 2/3 of a cup of the pumpkin, so I’ll have to find something else to use some of the remainder. I could freeze it, but that’s taking up valuable real estate in my freezer. Not what I want to do with it for sure! If I had 3 freezers, they’d all be full. I just know it. But those kinds of confessions are for another post . . .

The scones were cinchy easy to make – flour, baking powder, sugar, some spices (cinnamon, allspice, ginger and nutmeg), a cube of butter, a couple of eggs and the pumpkin puree. That’s all there is in it. As I mentioned the dough was a little on the dry side – I ended up adding a couple of tablespoons more pumpkin to help bring it together. I could have added some milk instead, but with so little pumpkin in it, I knew a little more wouldn’t hurt. You could easily makes these in rounds, or the triangles – whatever you prefer. I molded the dough into a kind of rectangle and cut the wedges easily enough.

One unusual step was putting the baking sheet (with raw scones on it) in the freezer for 30 minutes. I’d guess that’s to freeze the butter – or at least chill it a lot – helps to make tender pastry products. Into an oven it went. I looked up what the finished temp is supposed to be (the internal temp) for scones, and found out it was 200°, so that’s exactly how long I baked them. Actually it went a couple degrees over that.

Right out of the oven one of those scones yelled out to me – I had to taste one, right – this is quality control! They’re delicious. I made half a recipe (6) so those were mostly eaten by the guys. I knew if I wanted to know how they tasted I needed to eat one. Actually I cut them slightly smaller and had 7, so eating one was just right!

What I liked: the very tender crumb. The pumpkin flavors – the pumpkin itself, but also the spices. AND the crystallized ginger. Love that stuff!  I’m a fan of crystallized ginger, so I loved the little bit of sweet-tart crunch from the little nuggets. Worth making.

What I didn’t like: the dough was a bit hard to shape – not un-do-able, just craggy, as I mentioned. Didn’t make a whit of difference to the taste, which was really good!

printer-friendly PDF

MasterCook 5+ import file – right click to save file, run MC, then File|Import

Harvest Pumpkin Scones

Recipe By: King Arthur Flour blog
Serving Size: 12
NOTES: If the mixture is dry, add a tablespoon more canned pumpkin puree. If too wet, add just a bit of flour until it’s malleable.

2 3/4 cups all-purpose flour
1/3 cup sugar [I used Splenda]
1 tablespoon baking powder
3/4 teaspoon salt
3/4 teaspoon ground cinnamon
1/4 teaspoon ground ginger
1/4 teaspoon ground nutmeg
1/4 teaspoon ground allspice
1/2 cup cold butter
1 cup crystallized ginger — minced, or cinnamon chips, or chocolate chips, or up to 2 cups
2/3 cup canned pumpkin
2 large eggs
coarse white sparkling sugar — for topping, optional

1. In a large mixing bowl, whisk together the flour, sugar, baking powder, salt, and spices.
2. Work in the butter just until the mixture is unevenly crumbly; it’s OK for some larger chunks of butter to remain unincorporated.
3. Stir in the ginger and/or chips, if you’re using them.
4. In a separate mixing bowl, whisk together the pumpkin and eggs till smooth.
5. Add the pumpkin/egg to the dry ingredients and stir until all is moistened and holds together.
6. Line a baking sheet with parchment; if you don’t have parchment, just use it without greasing it. Sprinkle a bit of flour atop the parchment or pan.
7. Scrape the dough onto the floured parchment or pan, and divide it in half. Round each half into a 5″ circle (if you haven’t incorporated any add-ins); or a 6″ circle (if you’ve added 2 cups of fruit, nuts, etc.). The circles should be about 3/4″ thick.
8. Brush each circle with milk, and sprinkle with coarse white sparkling sugar or cinnamon sugar, if desired.
9. Using a knife or bench knife that you’ve run under cold water, slice each circle into 6 wedges.
10. Carefully pull the wedges away from the center to separate them just a bit; there should be about 1/2″ space between them, at their outer edges.
11. For best texture and highest rise, place the pan of scones in the freezer for 30 minutes, uncovered. While the scones are chilling, preheat the oven to 425°F.
12. Bake the scones for 22 to 25 minutes, or until they’re golden brown (to an internal temp of 200° or a toothpick inserted into the center of one comes out clean, with no wet crumbs). If you pull one of the scones away from the others, the edges should look baked through, not wet or doughy.
13. Remove the scones from the oven, and serve warm. Wrap any leftovers airtight, and store at room temperature. Reheat very briefly in the microwave, if desired.
Per Serving: 260 Calories; 9g Fat (30.4% calories from fat); 4g Protein; 41g Carbohydrate; 1g Dietary Fiber; 56mg Cholesterol; 355mg Sodium.

Posted in Brunch, Vegetarian, on September 16th, 2011.

tomato_corn_cheese_pie

Will you just trust me on this one? Make it, please. Providing you like tomatoes. And cheese. And fresh corn. And pie crust. Oh, it’s so utterly delicious.

If you’ve been reading my blog for a long time, you may remember that I posted a similar pie two years ago. It was called a Savory Tomato & Gruyere Pie. And, in fact, this one is also savory, also full of tomatoes, and gruyere cheese. But after I made that pie in 2009 I also made another one – a Tomato & Corn Pie in a Biscuit Crust. I particularly liked the corn in the 2nd rendition. But I thought the first one had better taste. So this time I had both recipes handy and decided to make some changes. All for the better, I assure you! I think this recipe has all the best of both recipes in it. If you’d prefer to use the biscuit crust, by all means do so.

I made a short crust tart shell (you can either roll it out and place in the pie plate, or press it in if you’re piecrust-challenged) and put it into my 9-inch pie dish. I sautéed some onion, added the fresh corn cut off the cob, and a little bit of Sriracha sauce. After the pie shell baked for awhile, I spread the bottom of the crust with about 3 ounces of garlic-and-herb Boursin cheese. It’s a protective layer to keep the moist veggies from soaking into the tender, flaky piecrust. And I used Boursin because I didn’t have any cream cheese in the refrigerator. This worked just fine. The pie shell was still fairly warm, so the cheese really softened a lot. Then I poured in the onion-corn mixture and spread it around. Meanwhile, I’d cut up about 2 1/2 cups of fresh heirloom tomatoes. I cored the tomatoes, cut them in wedges, then squeezed the dickens out of them and put them on some paper towels. Then I squeezed them again to get almost all the juice out of them but still keep the pieces intact. Then I cut the tomatoes into pieces and placed them in the pie and sprinkled the top with a small handful of sliced basil. Then I mixed up the Gruyere cheese, mozzarella cheese and mayonnaise (sinful, I know) and dabbed little pieces all over the top of the tart. There isn’t enough to really spread; besides, the mixture is very sticky, so I used my hands and dropped little bits of it all over the top, then used a spatula to sort-of spread it more evenly. There will be a few holes here and there.

tomato_corn_pie

That’s it – bake for about 30 minutes – until the cheese is bubbling away. I let it sit for a few minutes (letting it rest for about 10 minutes would be best – it will cut better), slice and serve with a few more bits of fresh basil on top. I made a green salad with some soft butter lettuce and my latest Lemon Sherry Vinegar Salad Dressing. Perfection. My DH raved.  And raved. I cut us each one slice for dinner and it was all we could do to keep our forks out of the pie plate to have more. We were good. But I had it for lunch the next day, heated in the microwave for about 45 seconds. More perfection!

printer-friendly PDF – doesn’t include the pie crust
MasterCook 5+ import file (click to run MC or right click to save file)

Tomato Corn Pie

Recipe By: Adapted significantly from Simply Recipes blog
Serving Size: 7-8
NOTES: If using Gruyere, it’s a very salty cheese, so don’t salt

1 whole pie shell — 9 inch unbaked
2 teaspoons canola oil
1/2 whole yellow or red onion — chopped finely
2 cups fresh corn — cut off the cobs (2-3 ears)
1 teaspoon Sriracha sauce — (or more to taste)
2 1/2 cups tomatoes — cut in half horizontally
3 ounces Boursin cheese — at room temperature, garlic flavored
1/4 cup basil — sliced in thin strips
2 1/2 cups grated cheese — a combination of Gruyere and Mozzarella
2/3 cup mayonnaise
Freshly ground black pepper
Basil leaves for garnish

1. Preheat oven to 400°F. Line the unbaked pie shell with waxed paper and add pie weights, pushing them up the sides if possible. Bake for 10 minutes or longer until lightly golden. Reduce oven temp to 350° and bake for another 5-10 minutes. Remove pie shell from oven. Allow to cool just a couple of minutes and gently remove waxed paper (and pie weights), using the waxed paper as a sling. Set pie shell on a rack while you complete the rest of the pie. You can make the pie shell earlier in the day and let it sit at room temp until you’re ready to continue.
2. Squeeze as much moisture as you can out of the chopped tomatoes, then drain on paper towels. Again squeeze gently in your hands, too, to get the last bit of juice out, without pulverizing the tomato flesh in the process. Chop the tomatoes into small bite-sized pieces.
3. In a medium saute pan heat canola oil and cook over medium heat until the onion is limp. Turn up the heat and add the corn and continue cooking until the corn has browned just a little bit, at the most 2 minutes. Remove from heat and add the hot sauce and stir to mix it well. Set aside.
4. Spread the softened Boursin cheese all over the bottom of the baked pie shell, then gently pour in the onion-corn mixture and spread it around, out to the edges too. Spread the chopped tomatoes over the onions. Sprinkle the sliced basil over the tomatoes.
5. In a medium bowl, mix together the grated cheeses, mayonnaise and freshly ground black pepper. Using your hands (it’s gooey) drop small little clumps of the cheese mixture all over the top of the pie, spreading it out to the edges as much as possible. There will still be a few holes here and there.
6. Bake until browned and bubbly, anywhere from 25 to 45 minutes. Cool for 10-15 minutes, sprinkle top with more chopped basil and serve in wedges.
Per Serving (includes the pie shell): 546 Calories; 46g Fat (71.8% calories from fat); 15g Protein; 25g Carbohydrate; 4g Dietary Fiber; 64mg Cholesterol; 631mg Sodium.

If you’d like to try my short crust shell, this is the recipe I use most often (and that isn’t often because I rarely bake pies, but when I do, this is my go-to recipe). It’s one I got from a Joanne Weir cooking class eons ago (probably 10-15 years) and once I saw how easy this was (even for me who is sometimes piecrust-challenged) I’ve made it many, many times. Sometimes I roll it out, other times I use the press-in technique in the recipe.

printer-friendly PDF (short crust only)
MasterCook 5+ import file – click to run MC or right click to save file

Short Crust (Press-In) Tart Shell

Recipe By: Joanne Weir, from one of her cookbooks
Serving Size: 8
NOTES: This is oh-so-good, and easy. This is a very rich, tender and crumbly pastry. It doesn’t act like a traditional piecrust. If using this for a savory filling (like quiche), add only about 1 tsp. of sugar, and eliminate the lemon zest. I have also successfully rolled this out with a rolling pin (for a piecrust, not a tart). Just don’t get the dough too thin or it will fall apart once you try to transfer it to a pie plate.

1 1/4 cups all-purpose flour
1 tablespoon sugar — (if making a dessert)
1 pinch salt
1 teaspoon grated lemon zest — (if making a dessert)
10 tablespoons unsalted butter
2 teaspoons ice water — or more as needed

1. Warm butter at room temperature for a maximum of 15 minutes before proceeding.
2. In a food processor fit with a metal blade, mix the flour, sugar and salt with a few pulses. Add lemon zest and butter and pulse until mixture resembles cornmeal. Add about 2 tsp. of water, or up to a maximum of 1 T., just until the dough holds together into a ball. Remove from the processor, flatten into a 6-inch disc and wrap in plastic. Refrigerate 30 minutes or up to 24 hours.
3. Remove pastry from refrigerator and allow to sit out (covered) for about 15-20 minutes before proceeding. Have ready a 9-inch tart shell with removable bottom. Or you may use a traditional pie plate. Take a small piece of pastry, about 1 inch by 3 inches and press it into the side evenly. Continue adding more pieces until you have a solid edge. If the dough is too stiff, press it between your palms to warm it slightly, then make into a kind of rope and press into side of tart shell. Take remaining pastry and press in pieces into bottom of pan and pat out so the pastry is mostly even. Do your best to press the corners so that right angle doesn’t become too deep with dough. Set the shell in the freezer for 30 minutes before baking. Use this time to preheat the oven to 400°.
4. Line the pastry with parchment or waxed paper and scatter dry beans or pie weights into the parchment. Make sure the beans reach up close to the edges. Bake until the top edges are very lightly golden, about 10-15 minutes. Remove the parchment and weights, reduce oven temperature to 375° and continue to bake until the shell is golden brown, another 15-20 minutes.
Per Serving): 204 Calories; 15g Fat (63.7% calories from fat); 2g Protein; 16g Carbohydrate; 1g Dietary Fiber; 39mg Cholesterol; 19mg Sodium.

Related Posts Plugin for WordPress, Blogger...