


There’s a rather long and complicated story about how the recipe for these bars came to be. First, some weeks ago my friend Cherrie and Jackie came to my house and we baked cookies. We made 4 kinds, two from years past, and 2 new ones. My new one was something called Ginger Crunch Bars. If you do a search for it online you’ll find several versions. We made them, and they were less than successful as far as the texture was concerned. Once cooled, for me the cookie base stuck to the pan, and the icing/topping shattered into funny, jagged pieces when cut. A dismal failure all around. But, all 3 of us agreed, the flavors were great.
The next day I really thought about it and decided to try something altogether different. But with similar flavors – particularly the ground ginger in the cookies and crystallized ginger in it as well. Because my cousin Gary is visiting from Northern California, as he does nearly every year at Christmastime, I knew I needed to think about some GF (gluten-free) treats. Some years he tells me not to make anything special for him (sweets) because he’d rather not have them to tempt him. This year he said yes, he’d like to help me make/bake some GF things.
I decided I wanted to make a ginger riff on my old recipe for New York Special Slices. These are bars that resemble Nanaimo Bars (which contain mint). They’re a 3-layered cookie/bar and ginger generally plays no part in it. And the base contains graham crackers, which my cousin can’t have.To make those for him would be useless – as the recipe reads.
So, I’d read about a GF ginger cookie over at Christie’s Corner some weeks ago. I emailed Gary and asked him if he had some of the unusual flours required (sweet white sorghum, bean flour and brown rice flour). He said he did and brought them with him. Christie wrote in her blog post that she was following the new GF flour combination from a cookbook she’d discovered and she dubbed it GEMS Flour (from the cookbook Gems of Gluten-Free Baking: Breads and Irresistible Treats Everyone Can Enjoy). All the other ingredients were normal pantry items, so the other day Gary and I made the cookies. They were definitely a find. Delicious. Even for me who doesn’t need to eat GF. Gary thought they were wonderful. Not exactly crispy crunchy like a flour-based ginger snap, but the cookie definitely met all requirements in the taste department. They are crispy on the outside, but soft on the inside – just so you know.

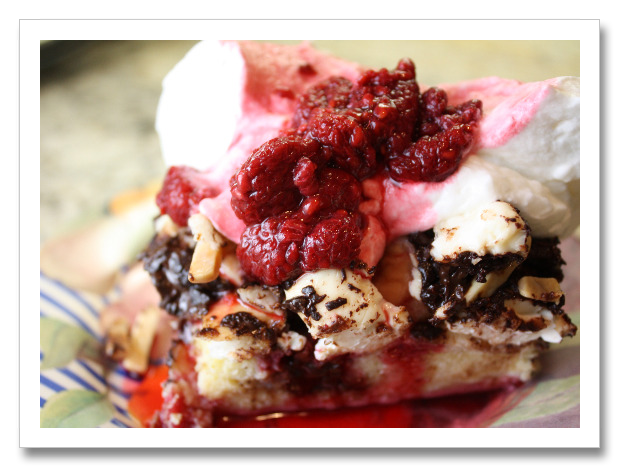
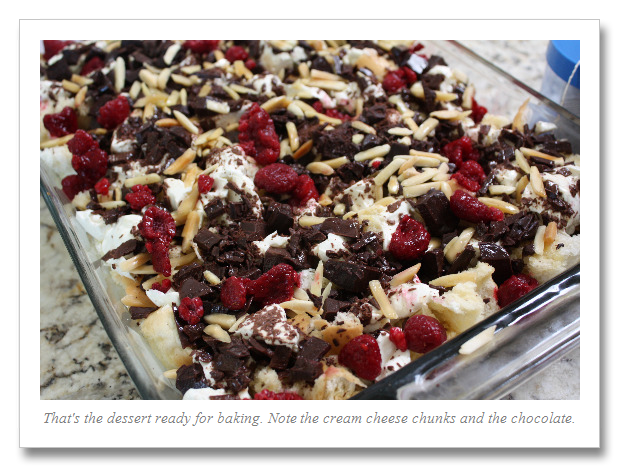
Now, back to the dessert bars. Can you see where this is going? I replaced the graham crackers with crumbs from these GF ginger cookies and made the base (the cookie crumbs, ground ginger, an egg, butter, chopped walnuts and some melted semisweet chocolate). I also didn’t include coconut, because it didn’t sound like a right combination. I did add in about 1/2 cup of finely chopped crystallized ginger, though. Next, I made the custard layer (using Bird’s custard powder dry mix for the custard layer) which is mixed with powdered sugar (and here’s where I added ground ginger and some finely minced crystallized ginger for that over-the-top ginger flavor) and a bit of milk to thin it to spreading consistency. These layers are refrigerated until they set, then you melt some unsweetened chocolate and butter to spread thinly on top.
My cousin was wow-ed by these. Both the cookies and the ginger bars. As a celiac, he doesn’t very often get to have dessert because so often desserts are flour-laden. The bars became the GF dessert taken to our family Christmas Eve and Christmas Day celebrations. So Gary was able to partake of some delicious desserts too. He made the cookies himself – he bakes some when he’s at home – but I gave him plenty of good instruction along the way. The GF ginger bars I made for him – he was out with my DH on an errand. My DH’s 15-year old BMW convertible appears to be in its death throes, and the repair shop was performing CPR on the car. I think he’ll be doing some car shopping in the next week or so.
What I liked: the ginger flavor, and the chocolate didn’t overwhelm. It could have, but didn’t seem to. Do understand there’s raw egg in these. The cookie base is not baked or cooked, yet it contains an egg. Use pasteurized or just egg whites, if you have any concerns. The GF ginger cookies are delicious. Worth making even if you’re not wheat intolerant.
What I didn’t like: well, it was a fairly laborious process to first bake GF cookies and then use part of them to whiz up into crumbs to make this dessert. But if you’d seen the smile on my cousin Gary’s face, you’d have done it too.
printer-friendly PDF for GF ginger cookies
printer-friendly PDF for GF ginger bars
MasterCook 5+ import file for GF ginger cookies – right click to save file, run MC and File|Import
MasterCook 5+ import file for GF ginger bars – right click to save file, run MC and File|Import

GF Ginger Bars
Recipe By: My own concoction based on an old recipe I have called New York Special Slices
Serving Size: 24
BASE:
2 ounces semisweet chocolate
1/4 pound unsalted butter
1 large egg — beaten
2 cups GF ginger cookie crumbs — (if you don’t need to eat GF, substitute graham cracker crumbs for these cookie crumbs)
1/2 cup walnuts — chopped
1 teaspoon ground ginger
1/3 cup crystallized ginger — minced
CUSTARD LAYER:
4 tablespoons unsalted butter
2 cups confectioner’s sugar
2 tablespoons Bird’s Dessert Mix — also called custard powder
4 tablespoons milk
2 teaspoons ground ginger
1/2 cup crystallized ginger — minced
CHOCOLATE TOPPING:
1 tablespoon unsalted butter
3 ounces unsweetened chocolate
1. BASE: Melt semisweet chocolate and butter, stirring often. Do not cook this mixture. In a medium bowl combine egg vanilla, ground ginger, crystallized ginger and cookie crumbs. Pour melted chocolate mixture on top and stir to combine. Press into an 8×8 greased pan. Refrigerate while preparing next layer. The mixture will be very “wet,” but you serve it from a refrigerated state so it will be fine.
2. CUSTARD LAYER: Melt butter and add it to a bowl with the confectioner’s sugar, Bird’s powder, milk, ground ginger and crystallized ginger. If mixture is too thick add a teaspoon more milk. If too thin add more sugar. It should be a thick spreading consistency. Remove 8×8 pan from refrigerator and carefully pour this mixture over the base. Use an offset spatula and spread it all the way to the edges. Refrigerate this for at least an hour.
3. CHOCOLATE TOPPING: In a small saucepan melt the unsweetened chocolate and butter. Watch it carefully – do not cook it or burn it. Carefully pour this over the top of the chilled custard layer and using an offset spatula spread the chocolate all the way to the edges. Do it gently so you don’t pick up any of the custard layer with the spatula.
4. Chill thoroughly (several hours or overnight). Use a knife heated in hot water (dry it off) to cut the bars into individual servings. Keep refrigerated until ready to serve. Will keep for several weeks.
Per Serving: 166 Calories; 11g Fat (54.7% calories from fat); 2g Protein; 18g Carbohydrate; 1g Dietary Fiber; 26mg Cholesterol; 9mg Sodium.
&
GF Ginger Cookies
Recipe By: Christie’s Corner blog
Serving Size: 52
“GEMS” FLOUR MIXTURE (this make just a bit more than is needed for the cookies):
2 3/4 cups brown rice flour
2/3 cup sweet white sorghum flour
1/3 cup gluten-free oat flour
3 tablespoons bean flour — [we used garbanzo bean flour]
COOKIES:
1 1/2 tsp ground ginger
1 1/2 tsp baking soda
2 teaspoons ground cinnamon
1 teaspoon xanthan gum — or guar gum
1/2 teaspoon salt
1 cup unsalted butter — softened
1 cup brown sugar — plus 2 tablespoons (original recipe called for 1 1/3 cups)
2 large eggs
1/2 cup molasses
1 tablespoon fresh ginger — finely grated
1 teaspoon vanilla extract
2/3 cup crystallized ginger — minced granulated sugar for rolling dough balls
1. Preheat over to 325°. Lightly grease two baking sheets or line with silpats.
2. Combine ingredients for GEMS flour, stir well and set aside. In a small bowl combine the ground ginger, baking soda, cinnamon, xanthan gum and salt and stir to blend. Set aside.
3. In mixing bowl, cream butter and sugar until smooth. Add egg, molasses, fresh ginger and vanilla and beat until blended.
4. Add 4 cups of the GEMS flour mixture (there will be a little bit left over) and mix well. Stir in crystallized ginger.
5. Use some of the GEMS flour on your hands, and shape dough into 1-inch balls, roll in granulated sugar and place 2 inches apart on baking sheet.
6. Bake 12 to 15 minutes until cookies are golden brown. Cool in pans for about 10 minutes, then remove cookies to a rack.
Per Serving: 91 Calories; 4g Fat (38.7% calories from fat); 1g Protein; 13g Carbohydrate; trace Dietary Fiber; 18mg Cholesterol; 28mg Sodium.


Leave a Comment!