Cobblers don’t always look sensational, but don’t let the appearance fool you. This is one fabulous, must-make-this kind of homey, comforting dessert. Get ye to the store for some pears and do it!
So, even though I promised myself I wouldn’t buy any more cookbooks, last year I succumbed to a fruit dessert one called Rustic Fruit Desserts: Crumbles, Buckles, Cobblers, Pandowdies, and More by Cory Schreiber. I think cobblers are just about my favorite dessert, so to have a cookbook that’s all about such desserts, well, I just couldn’t NOT buy it. I’ve posted two other recipes from this book already, a Peach, Blackberry & Almond Crisp, and a Stone Fruit Tea Cake made with peaches. The crisp was my favorite of the two, but now with this one, I’m not so sure.
My mother used to make a pear pie, a creamy filling (sour cream, I think) with fresh pears. I loved that pie. I should make it – I just don’t make many pies. Any day I’d prefer a cobbler or a crisp. I’m a sucker for ordering one at restaurants if they have it on a menu. But to tell you the truth, I think I’ve been disappointed with every one I’ve ever ordered out. They never use enough fruit. And, without fail, they make them too sweet for me. Anybody else noticed that? Some had good-enough toppings, but restaurants are in the business of making money, so they may cut corners (using a pre-made streusel, for instance, or just plopping a piece of flaky dough on top). But when you make it yourself, you know what goes into it and it’s made with love! Of course.
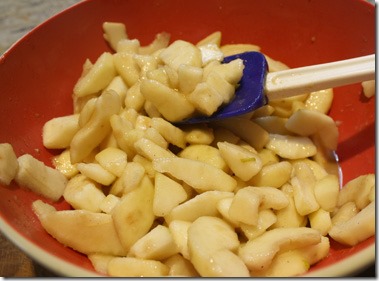 I’d purchased a bag of 12 pears at Costco. What was I thinking? Oh my goodness. And yet, I needed to make a dessert for a gathering at my house, and it called for 10 large pears. Bingo! They’d ripened on my kitchen counter for a few days (and I lost one that had gotten bruised, I think). The day I needed this dessert the pears were to perfect ripeness. Yippee. That’s one of the problems with cooking/baking with pears – you can’t predict when they’ll be at their peak, because they’re almost never ripe in the bins at the grocery store. I used 11 pears – but I don’t think you’d want to use any less than 10 – pears wilt/sink/flatten when baked since they’re filled with some water/juice.
So, first you cut up the pears and combine them quickly in a bowl with brown sugar, cornstarch and spices. Don’t go off to talk on the phone – you don’t want the pears to turn brown . . . then they were turned into a large greased baking dish (9×13). Do use ceramic or glass, not metal. Then you mix up the biscuits.
What can I tell you – oh gosh, these biscuits are divine. First you whiz up some toasted and skinned hazelnuts (along with sugar, flour, baking powder and salt) in the food processor until it’s a fairly fine meal. I used the processor to add the butter (the recipe says to use your fingertips or a pastry blender) but I took the lazy way out. Just don’t over-process it once you add the butter. The dough was crumbly and even though the recipe indicates such, I added another tablespoon of cream so it would barely come together. It’s really a very dry looking biscuit. Then you roll it out to a rectangle, cut it into 10 square shapes. Those are slightly overlapped (that’s what the “shingled” means in the recipe title) in the baking dish. The biscuits do completely fill the baking dish with only a tiny bit of fruit peeking out around the edges. See photo. 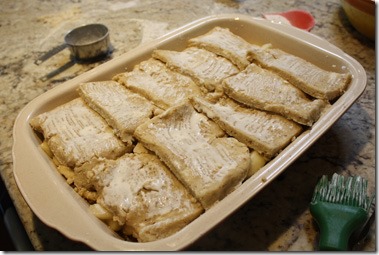
So there, at left is the photo of the cobbler before it was baked. The biscuits are brushed on the tops with a tablespoon of heavy cream. You could add a sprinkling of crystallized sugar on top if you’d like that look. It’s baked (partly with foil on top) and is done in about 55 minutes at which time the biscuits are gloriously golden brown and the filling is bubbling around all the edges. You remove the baking dish to cool, but serving this warm is just about heaven-sent.
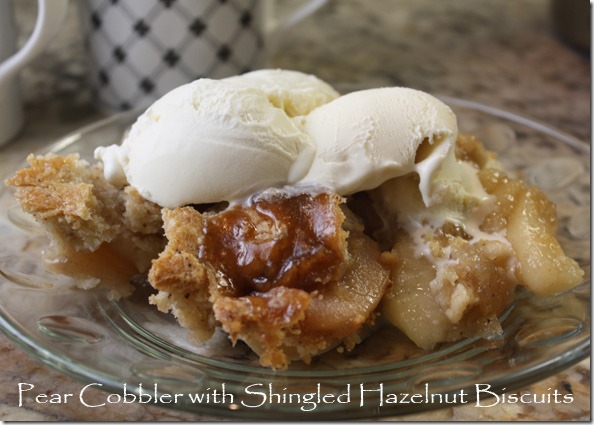
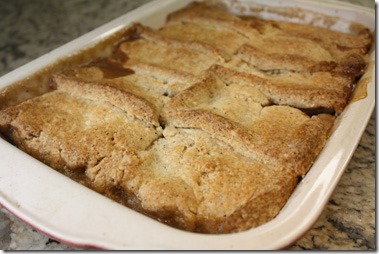 The book’s author says this is best eaten the day it’s made – but if you absolutely must have some left overs, have it for breakfast, she says. Okay, I did that. It’s not overly sweet, so with a bit of half and half poured over it, oh gosh, it was delicious for my breakfast. If you do have any of it left over, leave it out at room temp (in other words, do NOT refrigerate it) and just cover it with a tea towel. You can also bake this some hours ahead, reheat it in a 300°F oven for about 15-20 minutes. There at right is a photo of the baked cobbler, all golden brown. My mouth is watering since I made this a couple of weeks ago and it was completely gone the next day – I gave some to friends and kept ONE serving which is now in my freezer. Although you have biscuits for 10, when I put it out for people to serve themselves, nobody took a whole biscuit – so you could make the biscuits smaller, or just know that it will likely serve more than 10 people.
What’s GOOD: everything about this cobbler is good. Absolutely everything – the pears, the bubbling sauce, the hazelnuts in the biscuits, the texture of the biscuits. Oh my. It’s a keeper. Do save this recipe, my friends, and make it soon. If you use Bartlett pears, you don’t have to peel them, by the way.
What’s NOT: only that she says it’s not good to keep it past the day it’s made. I thought it was pretty darned good the next day, but that’s what’s in the recipe. Just so you know. Make a half a recipe in an 8×8 pan if you don’t want enough to serve 10-12.
printer-friendly PDF and MasterCook 15/16 file (click link to open recipe)
* Exported from MasterCook *
Pear Cobbler with Shingled Hazelnut Biscuits
Recipe By: Rustic Fruit Desserts by Cory Schreiber and Julie Richardson
Serving Size: 10-12
1 tablespoon unsalted butter — to grease the baking dish
PEAR FILLING:
2/3 cup light brown sugar — packed
3 tablespoons cornstarch
1/2 teaspoon sea salt
1/2 teaspoon ground cardamom
10 large pears — ripe, but firm (see notes)
HAZELNUT BISCUITS:
2 cups all-purpose flour
1 cup hazelnuts — toasted and skinned
3 tablespoons sugar
1 1/2 teaspoons baking powder
1 teaspoon sea salt
6 ounces unsalted butter — cold, cut into small cubes
1/2 cup heavy cream
1 tablespoon heavy cream — to glaze the top of the biscuits
NOTES: All pears require peeling, unless they’re Barlett. If your pears are small, use more. The pears reduce at least a third during baking.
1. Preheat oven to 375°F and position a rack in the lower third of the oven. Grease a 9×13 baking dish (not metal pan) with the butter and set aside.
2. FILLING: Rub brown sugar, cornstarch, salt and cardamom together in a large bowl (pressing any lumps).
3. Peel, core and slice the pears (or you may cut the pears into small chunks) into the sugar bowl and add the lemon juice. Stir periodically as you prepare the pears so the flesh doesn’t turn brown. Pour the fruit into the prepared baking dish, scraping out all the juices.
4. BISCUITS: Combine flour, hazelnuts, sugar, baking powder and salt in the bowl of a food processor and pulse until the nuts are finely chopped. Then add the butter and pulse until the butter is the size of peas, then transfer to a bowl. (Alternately, you can chop the hazelnuts by hand and combine with the dry ingredients, then use your fingertips or a pastry blender to cut in the butter until the size of peas.) Pour in the cream and stir just until the dry ingredients are moistened. (I had to add another tablespoon of cream to the dry mixture in order to get it to come together.) The dough may be crumbly and appear very dry, but it will come together.
5. Turn the dough out onto a lightly floured work surface and gently press the dough together to form a rectangle, then roll out in a rectangle measuring 8 x 15″, adding more flour to the board as necessary to keep the dough from sticking. Cut the rectangle in half lengthwise, each measuring 4″ x 15″, then cut each long piece into 5 rectangles (to equal 10 altogether). Just slightly overlap the biscuits on top of the pear mixture in a shingled pattern. The biscuits should completely fill the 9×13 pan. Brush the tops with the 1 T. of heavy cream.
6. Cover the dish with foil and bake in the lower third of the oven for 20 minutes. Remove foil and bake an additional 35 minutes, or until the biscuits are golden and the filling is bubbling all around the edges. Serve warm with vanilla ice cream, whipped cream, or just unadorned.
7. STORAGE: This cobbler is best eaten the day it’s made, but leftovers can be covered with a tea towel to be eaten the next day. Reheat in a 300°F oven until warmed through.
Per Serving: 430 Calories; 25g Fat (49.6% calories from fat); 5g Protein; 52g Carbohydrate; 5g Dietary Fiber; 49mg Cholesterol; 306mg Sodium.



Marlene
said on June 26th, 2016:
This sounds yummy, Carolyn. I also like to make crisps and such, especially in the summer and fall, and the hazelnut biscuits make a different topping. I love hazelnuts, and this would be good with other stone fruits as well.
I’m sure you’re right about being good with other fruit. Crisps and cobblers are very versatile! . . . carolyn t
Hayley Elseth
said on October 16th, 2021:
I have this cookbook! I cooked my way through Julie Richardson’s entire Vintage Cakes cookbook (I love that book!!), and thought I’d try this next. I made this with Anjou pears from my MIL’s abundant tree and it is as lovely as you describe! I thought the shingles look was boring in the way it’s (not really) described, so I tried to google shingles and decided a totally different look would’ve been better. Shingles maybe, but overlapping more and in a different shape. Maybe diamonds or skinny rectangles arranged more like bricks instead. I want to experiment with it some more for a better appearance. Round shingles would be very pretty but would require more dough surface area and more handling of the biscuit batter.
The directions say the crumbly dough will come together but I felt a step where you form the crumbles into a dough was the missing step. I didn’t add any additional cream to the biscuits and mine came together with some extra handling and shaping. I was able to roll it out no problem once I did that, but it would’ve been impossible without that step without adding more liquid as you did.
How clever of you to think of making different biscuit shapes. And thanks for the extra tip about handling the crumbly dough. Thanks for commenting, Hayley. . . carolyn t