Certainly I’ve admitted here before that pie crusts (at one time) were not my favorite thing. Well, to eat them was fine. To make, well, sometimes was iffy. Not anymore. But therein lies a story:
My mother, a real pie crust expert, only made the old-fashioned kind of Crisco (shortening) type. Even as a child I marveled at her ability to whip up a pie in nothing flat. She would combine the crust ingredients in a bowl, cut in the shortening, then sprinkle in the ice water. She’d mix and form it into a mound, flatten it a bit then start rolling. In about 8 rolls she’d have a perfectly round piecrust which she’d very easily pick up and lay into a pie plate. There were NO cracks. No dry edges. No thin parts either. If there were scraps, she’d put those on a separate baking sheet and spread with a little margarine, sugar and cinnamon and bake those for us to nibble on.
Therefore, I grew up thinking making and rolling pie crusts was easy. So one time, probably when I was about 12-14 I’d guess, I asked my mom if I could make the crust this time. She said “sure.” With her next to me, I did everything she told me to do (use ice water, handle it as little as possible, roll gently, don’t roll all the way to the edges, turn, sprinkle the surface with a bit of flour, but not too much, turn and roll some more). With the kind of impatience I likely had, I did manage to get it into a ball, flatten it some and started rolling it out. I’m sure I was more interested in the rolling of it than the making of it. But anyway, you can guess from the tenor of this post that all did NOT go well. It stuck to the board, big time. It was lopsided. It was thin in places. It cracked right through the middle. When I tried to transfer it (after my mother had helped me patch it in several places) it completely fell apart. I was nearly in tears.
It’s likely I’d already manhandled it too much. My mother wrapped the dough in a ball and refrigerated it for 15 minutes and I tried again. Same thing happened. I think I walked away from piecrusts at that point, rarely to return. I watched my mother make them after that, but was never willing (or interested) to try it again.
When I first became a bride in 1962, I was a real novice cook. Living in a small cottage in Florida at one point, I decided to tackle another pie crust. You’ll laugh at this scene: I didn’t own a pie plate. With all the lovely wedding gifts I received, nary a pie plate. But I had a thin aluminum cake pan (nonstick didn’t exist back then), so I figured, oh well, I could make the pie in a cake pan. Sure thing. I thought. (Note to any new cooks here: don’t do it.) I managed to make the shortening pie crust somehow, patching it in a dozen places. Had a very hard time getting the crust to hold on the cake pan edge, of course. Pie crusts aren’t meant to hold onto a vertical surface. Anyway, I think it was a cherry pie made from the Joy of Cooking (a wedding gift). The dark and gloomy kitchen had a 2-burner stove and a small oven in it. It was difficult to see anything, but within about 20 minutes I knew something was wrong because I could hear some hissing coming from the oven. I could hardly see into the dark oven interior, but as soon as I opened the oven door smoke was pouring out. The pie had overflowed and was dripping all over the oven floor. Not knowing what to do, I just let it do its thing. The crust obviously wasn’t done. Well, the pie tasted okay, I guess, but it was hardly a pie. It was nary impossible to get the crust out of the pan because some of the filling had leaked through the crust and caramelized on the aluminum surface. Plus all the globs of sugary filling had dripped all over the oven. What a mess to clean. I’d never had to use oven cleaner (this was long before self-cleaning ovens). So can you see why I walked away from pie crusts? Yup. I did. For years and years and years.
My epiphany came probably 20 years later (can you imagine, I didn’t make a pie in all those years unless I could buy the ready-made shell!) I attended a cooking class where the instructor made quiche Lorraine. And she used a pie crust recipe from ‘>’>The Silver Palate Cookbook. As she whizzed up the crust ingredients in the food processor (BUTTER – oh my goodness BUTTER) it came together in a flash. She chilled it briefly and literally rolled it to soft perfection. Into the pie plate it went and any cracks were easily fixed. The butter gave the dough a softness that not only allows easy handling, but simple repairs as well.
My first butter pie crust was a resounding success. It was tender and flaky. It stood up around the edges (in a pie plate, of course!). Nothing leaked through the crust. It looked pretty. It tasted great. My guests thought I knew how to make a pie crust. Since then, I’ve never wavered from making a butter crust. A few have worked better than others, and I’m always open to some new combination, as long as butter is in the mix.
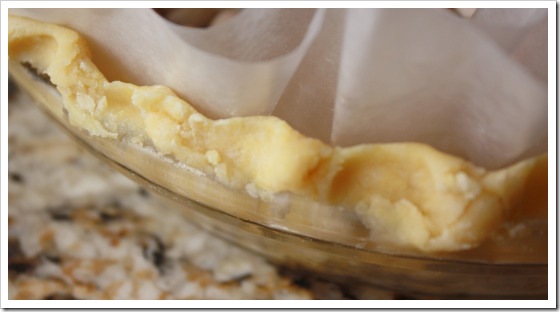
With a new cookbook at hand (a gift from my friend Cherrie, for my birthday), ‘>’>The Art and Soul of Baking (Mushet, 2009), I decided to try their version of a rich pastry crust. It’s very similar to many others (one cube of butter to 1 1/4 cups of flour). This one also had egg yolks (2) in it, which made it even more rich. But it worked like a charm. Probably the flakiest pastry I’ve ever made. It was mixed in the food processor. It was still cool enough from the cold butter and ice water, that I was able to roll it out immediately. I think I needed just a tiny half teaspoon more water in the mix (in the photo above you can see the raw pastry has a few dry edges). But, it went into the pan just fine.
The joy of this kind of pie crust is that it can be pressed, by hand, into the pie plate too, rather than using a rolling pin. So if you are pie crust challenged, or don’t own a rolling pin, by all means, just use your hands and press it in, starting in the middle. Put clumps of dough in the bottom of the pie plate and then start pressing toward the outside edges and up the sides. The recipe had ample quantity, so I didn’t lack for enough dough to put on a nice crimped edge.
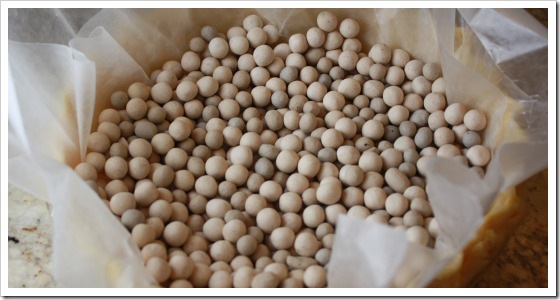
When I made the Tomato Pie, it required a partially baked crust. So, I put long strips of waxed paper in the middle of the raw shell and added pie weights. And pushed them as much as possible UP the sides so the top edges would stay in place. I use two sheets of waxed paper in the raw shell. I do trim down the corners that stick up (so they don’t come in contact with the heating elements), but not too much. I also discovered early on, that when you try to remove the pie weights by grabbing the waxed paper, you’ve got to have enough edges to pick up the whole thing.
 There’s the raw shell with the pie weights. Carefully move them around so more of the weights are up the sides, as I said. Once the shell is partially baked, you let it cool for a couple of minutes. Have a heatproof bowl nearby, then very gently and very carefully pick up opposite sides of both sheets of waxed paper, lift and pour the pie weights into the bowl. (You may need to wash the pie weights – for sure you will if you only use one thickness of waxed paper – with two thickness, probably not.) Allow the pie weights to completely cool before returning them to a storage container (I use a quart sized freezer bag).
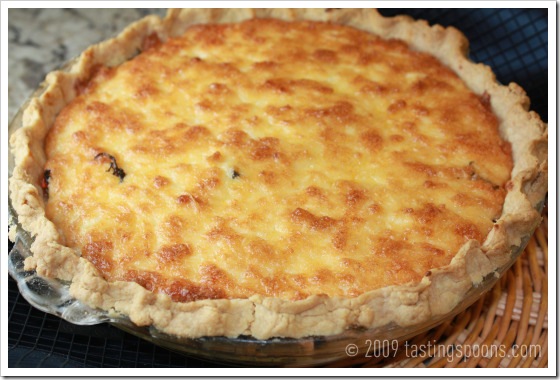
So there’s my pie crust story, and I’m sticking to it – the butter pastry, that is. Below is the finished pie. Isn’t this pretty? If you didn’t already print out the tomato pie recipe, be sure to try it. With the buttery flaky pie shell, it’s sublime. For a PDF of the shell, see bottom of recipe.
Shortcrust Pastry (Shell)
Recipe: The Art & Soul of Baking by Cindy Mushet
Servings: 8
NOTES: To blind bake, fill raw shell with waxed paper and pie weights and bake in a 375 oven for 10-20 minutes just until it turns the lightest of golden color.
FOR SAVORY CRUST:
1 1/4 cups all-purpose flour
1/4 teaspoon salt
4 ounces unsalted butter — very cold, cut in 1/2 inch cubes
2 large egg yolks
1 teaspoon ice water — or up to 3 teaspoons if needed
ADDITIONS FOR SWEET CRUST:
1/4 cup sugar
2 teaspoons vanilla extract
1. CRUST: Place the flour, sugar (only if you’re making a sweet crust) and salt in the bowl of the food processor. Pulse 5 times to blend. Add the ice cold butter pieces and pulse 6-8 times, just until the butter is the size of large peas.
2. In a small bowl whisk together the egg yolks, water (and vanilla if this is for dessert). Add it to the butter mixture, then process just until the dough begins to form small clumps, 5-10 seconds. Do not let the dough form a ball. Test the dough by squeezing a handful of clumps – when you open your hand, they should hold together. If they are crumbly and fall apart, sprinkle another teaspoon of water over the dough and pulse a few times then test it again. Repeat, if necessary.
3. Turn the dough out on a lightly floured work surface and knead gently 2-3 times, just to finish bringing it together. (If it still crumbles a bit too much, put it back in the processor and add another teaspoon of water and process again.)
4. Shape it into a disk about 6 inches in diameter. If the dough is still cool to the touch, continue on to the next step. If not, wrap in plastic wrap and chill for 30 minutes before continuing.
5. ROLLING PIN METHOD: Make sure the dough is cool, but if it’s too cold, it won’t be malleable, so allow it to sit out for 5 -10 minutes or so. If you try to roll it, it will crack and be totally unmanageable.Place the dough between 2 pieces of plastic wrap, wax paper or parchment paper. Gently roll it, turn and roll, always from the center out. Lift as you reach the outer edges so you don’t mash the tender dough into the paper. If the paper wrinkles, gently lift it up and replace it on top. Turn the dough over if needed.Roll is out until it’s about 11 inches in diameter. If the dough gets too warm place it on a baking sheet and chill for 30 minutes.
6. Peel off the top piece of paper and gently turn it over onto a pie pan/dish. Peel off the other piece of paper and gently move the dough into place. Trim larger edges (if you have any) and fold the outer edges under the top rim. If there are thin spots use a small piece of dough and gently press it into place.
7. PRESS-IN type: Chill dough for 30 minutes. Allow to sit out just a few minutes, then break the dough into smaller pieces (about 10-12) and place them around the pie pan. Using your fingers, press each piece – starting from the center of the pan – toward the outer edges. The warmth of your fingers will allow you to manipulate the dough fairly easily. Press the excess up the sides to form walls, making sure they are the same thickness as the bottom. Push the dough up to the top and fold over to crimp. If using a tart pan, just push the dough at the top to remove excess. Save excess dough in case you need to patch somewhere.
8. Chill dough, preferably, for about 30 minutes.
9. BLIND BAKE: Place two layers of waxed paper in the pie dish. Pour in pie weights (or dried beans) to mostly fill the pan. Trim paper edges just a bit (you need enough length, though, to lift the hot pie weights after it’s baked so don’t cut them too short) so it doesn’t touch any of the heating elements in the oven. Bake at 375 for about 8-15 minutes, or until just beginning to turn golden brown. Remove from oven and allow to sit on a rack for about 10 minutes. Gently remove paper with pie weights and allow to cool completely.
Per Serving: 215 Calories; 13g Fat (54.5% calories from fat); 3g Protein; 22g Carbohydrate; 1g Dietary Fiber; 84mg Cholesterol; 70mg Sodium.
A year ago: White Sangria
Two years ago: Italian Bragiole (a stuffed steak)


Kathleen Heckathorn
said on August 26th, 2009:
Love your pie crust story!