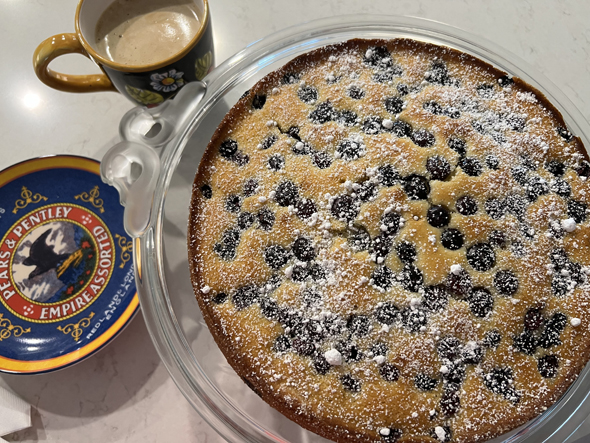
Archive for the ‘Breads’ Category

Wednesday Breakfast Scones

wednesday breakfast scones from Anne Hughes Cafe
I’m not sure I ever thought I’d find a scone recipe that I liked as much as my own Buttermilk Scones with Golden Raisins. I’ve made them for years, and have been so happy with the recipe, I’ve never wanted to change. Then we stayed in Portland, Oregon for a couple of nights, at the Rose Cottage B&B just outside the city. The owner, Sally, served us just the lightest, most flavorful scones. The proportions of things are very similar to my tried-and-true recipe, but these have more flour in them – mine are more like very rich, flaky round biscuits. Sally’s were light, perfectly crumbly, huge and served in wedges. And, incidentally, if you’re ever up Portland way, I highly recommend Sally’s Rose Cottage as an ideal close-by location. She’s not in downtown, but it’s easy driving distance. She’ll serve you a breakfast that is enough to feed a small infantry, but it’s worth every single delicious-laden calorie.
Sally was kind enough to share the recipe for the scones with me. She said it was printed in the Portland Oregonian newspaper in 2004, and she raved about the chef, Anne Hughes, who created them. I believe she said the café that Hughes used to own is no longer in business. But Sally was happy she had THIS recipe from her café. Sally follows the recipe to the letter with the following exceptions: she mixes it by hand with a pastry blender AND she freezes the butter – she cuts the butter up in small chunks and puts that in the freezer so they’re all ready to go when she decides to make a batch (as a B&B owner, obviously she makes the scones quite frequently), then uses the pastry blender to cut it up a bit more (from a frozen state). She said you definitely don’t want to mix it so much that you can’t see the butter flakes. If the chunks are a bit larger (like little flat pieces the size of your little finger) they’ll be perfect for the flakiest results. These have a hint of lemon peel in them, and you briefly knead the dough just to pull it together, roll it out, sprinkle some of the zest on top, fold it over, then slice the pastry into wedges before baking on a parchment-lined baking sheet. Sally also adds fruit (like fresh Oregon blueberries) to the dough sometimes. I made my batch in the food processor (per the Oregonian recipe) and they seemed wonderful to me, but perhaps doing them by hand would produce even more flaky and flavorful scones. I also didn’t have frozen butter either, but I do like these enough that I might try those techniques next time I make them. I made them for my hubby’s Bible Study group the other day. They were gobbled up in short order.


Wednesday Breakfast Scones

Recipe: Anne Hughes, of Anne Hughes Kitchen Table Cafe, Portland, OR
Servings: 8-10
3 cups all-purpose flour
1 tablespoon baking powder
1/2 teaspoon baking soda
1/3 cup granulated sugar
1 tablespoon sugar — to sprinkle on top
3/4 teaspoon salt
3/4 cup unsalted butter — cold, cut into small cubes
1 cup buttermilk
3 teaspoons lemon zest — from about 2 lemons
1 tablespoon heavy cream
1. Preheat oven to 400. Set aside an ungreased baking sheet (lined with parchment).
2. In a food processor fitted with the metal blade, add the flour, baking powder, soda, 1/3 cup sugar and salt. Process with 6-8 one second pulses.. Remove the cover and evenly distribute the butter over the dry ingredients. Cover and pulse until the mixture resembles coarse meal with a few slightly larger butter lumps (about 16-20 one second pulses).
3. Transfer the mixture to a large bowl. Add the buttermilk and half the lemon zest; use a wooden spoon to stir until mixture begins to form a dough, about 30 seconds.
4..Transfer the dough to a floured surface and divide into two equal balls. Use a rolling pin to lightly roll each half into a circle about 7 inches in diameter. Sprinkle the remaining lemon zest over both circles and use the rolling pin to lightly press the zest into the dough, then fold each circle in half (making a half circle), then cut each into 4 wedges.
5. Place the wedges on the prepared baking sheet.
6. If desired, glaze the scones by brushing tops with the heavy cream and sprinkling with the remaining one T. of sugar.
7. Bake until the scone tops are golden brown, about 18-23 minutes. Cool on a wire rack for 10 minutes to firm up. Serve warm if possible.
Per Serving (assuming you make 8 very large scones): 382 Calories; 19g Fat (43.8% calories from fat); 6g Protein; 48g Carbohydrate; 1g Dietary Fiber; 50mg Cholesterol; 498mg Sodium.
printer-friendly pdf


Strawberry Coffeecake

fresh strawberry coffee cake
The blog called What Did You Eat was not one that I happened to follow. Apparently I’d never come across it. But Sher died suddenly, last month, from a heart attack. I read about her death on several other websites . . . from other bloggers who had an online/email friendship with her. Sher’s husband posted a last note, informing everyone about his wife’s death, and thanking people for the friendship shown to her. She was young – well, certainly not of an age when she should have died. Lots of bloggers around the world have done their own tribute to Sher by preparing some of her recipes. They did it on a specific day a few weeks ago. On one of those blogs I read about this coffeecake that she had posted – actually it was another blogger’s recipe, Butta Buns.
 

The coffeecake sounded perfect for summer. And, the Bible Study guys were coming to our house and I needed a treat for them. This recipe was sitting, front and center, on my cookbook/recipe stand. My DH kindly offered to go buy fresh strawberries for me, and I whipped it up the night before. The coffeecake is delicately flavored. Even though it has cinnamon in it, it’s subdued and I couldn’t even tell it was there. The fellows enjoyed it very much. I halved the recipe, made it in a 9×9 pan and baked it for 30 minutes. Came out perfectly. My question always: would I make it again? Yes, I might. Particularly during the height of strawberry season. I might add just a tiny bit more cinnamon, and I’d add some to the topping (or maybe a touch of nutmeg) as well. The recipe said it served 12. I got 9 portions from the 9×9 pan, so it likely could serve 18.
 
Strawberry Coffeecake
Recipe: From Sher at “What Did You Eat” blog (now deceased)
Servings: 12
TOPPING:
1 cup flour
1/2 cup sugar
½ cup butter
COFFEECAKE:
2 cups flour
1 cup sugar
2 tablespoons baking powder
1 teaspoon salt
2 teaspoons cinnamon
2 teaspoons vanilla
1 cup milk
2 whole eggs
1/4 cup butter — melted
3 cups strawberries — sliced
1.  TOPPING: Sift the sugar and flour together in a large bowl.  Place the butter in the center of the bowl and sprinkle a little of the sugar and flour mixture over it.  Place all 10 fingers on the stick and start crumbling it by making cat-kneading gestures with your fingers so the butter turns into little pea sized bits.  Keep crumbling until the stick is completely whittled down.
2.  Keep the bowl of crumbles in the frig until you’re ready for it.
3.  COFFEECAKE: Sift the first four ingredients together in a bowl and set aside
4.  Whisk the milk, eggs, vanilla, and melted butter together in a bowl.  Add the mix of wet ingredients to the bowl of dry ingredients.  Beat together with a handheld mixer until well incorporated.
5.  Pour into a pre-greased 9×13 pan.  Arrange the sliced strawberries on top of the batter.  Sprinkle with the crumble topping.
6.  Bake at 350F for 35-45 minutes.
Per Serving (I think this will serve more like 18, but this is the analysis based on 12 servings): 352 Calories; 13g Fat (34.0% calories from fat); 5g Protein; 53g Carbohydrate; 2g Dietary Fiber; 69mg Cholesterol; 561mg Sodium.
Printer-friendly pdf
© 2008 tastingspoons.com

Apple Buttermilk Scone Round

apple buttermilk scone round
It was time, again, for me to bake something for my DH(dear husband)’s Bible study group. I flipped through the options and came upon this one, which was very simple. That’s what I needed, as I was short on time. And I had one big Braeburn apple waiting to be utilized in something. I was supposed to use a Granny Smith, but I didn’t have one. Braeburn would have to do! There was only one problem. The recipe was mostly in metric (milliliters and grams). I managed, primarily because I have a kitchen scale that will convert the two. Good thing since I was rushing.
 
But for you, my friends, I’ve made it easy. I went to a website and did all the conversions for you, so you needn’t worry about having a special scale to compute the measurements.
 
As for the scone, it was very nice. A drier kind of scone, but since this is from a European blogger, she likely likes a drier type recipe. I tend to prefer a more tender crumb but that’s just my personal preference. Don’t misunderstand – it was delicious. I liked it. And I liked that I just plopped it onto a large baking tray (Silpat lined) and scored the top. Didn’t have to pat it out and cut rounds. The apple contained within the dough (which is mushed into it after it’s mixed up in the food processor – see, I told you it was easy) gave it a nice moistness. The fellows nearly ate the whole thing, but we had enough for breakfast instead of toast. I’d make this again just because it’s so very easy.
 
The recipe came from a blog I read regularly – Buerre et pain – and she got it from Morning Bakes, a breakfast baking cookbook by Linda Collister. I did have to make another adjustment – I didn’t have any whole wheat flour, so substituted additional all-purpose. I’ve altered the recipe for that, but you can substitute about ½ cup of the whole wheat if you’d like. And I’ve included just a tad more butter in the mixture than was called for in the original. Once the round is patted out, you sprinkle the top with some demerara sugar – I used turbinado. That gave each wedge a nice little crunch. I liked that part. I’ll make this again! You can also split a wedge and toast it, although the scone is very crumbly - even more so the second day.
 
Apple buttermilk scone round
Recipe By: Linda Collister’s Morning Bakes, via Buerre et pain blog
Serving Size: 8
1 large apple — Granny Smith preferably
2 1/4 cups all-purpose flour — plus extra for dusting
1 teaspoon soda
1/3 cup sugar — plus extra for sprinkling
6 tablespoons unsalted butter — chilled and diced [I increased this amount slightly]
1/2 cup buttermilk — plus 4 teaspoons, and extra for brushing [converting this quantity from ml to cups doesn’t come out as an easy fluid measure]
1.  Peel, core and coarsely chop the apple into 1/3 inch chunks.  Mix the flours, soda and sugar in a food processor.  Add the chilled cubes of butter and process until the mixture looks like fine crumbs.  With the machine running, add the buttermilk through the feed tube to make a soft but not sticky dough. [My dough mound was rather sticky.]
2.  Turn out onto a floured surface and knead in the apple chunks to form coarse and bumpy dough.  Shape into a ball and put in the middle of the prepared baking sheet.  With floured fingers, pat into a 9-inch round.  Brush lightly with buttermilk or milk to glaze, then sprinkle with a little demerara sugar to give a crunchy surface.  Using a sharp knife, score the round into 8 wedges.  Bake in a preheated oven at 400° F. for about 20-25 minutes until lightly golden and firm to the touch.
3.  Cool on a wire rack.  Eat warm, immediately or within 24 hours.  The scones are also good split and toasted.  When thoroughly cooled, they can be wrapped then frozen for up to one month.
Per Serving: 227 Calories; 6g Fat (24.9% calories from fat); 4g Protein; 39g Carbohydrate; 1g Dietary Fiber; 16mg Cholesterol; 18mg Sodium.  Exchanges: 2 Grain (Starch); 0 Fruit; 0 Non-Fat Milk; 1 Fat; 1/2 Other Carbohydrates.
COOK’S NOTES: Don’t overcook this as it will get too dry.  Original recipe called for some whole wheat flour - if you choose to use it, substitute about 1/2 cup whole wheat for 1/2 cup all-purpose white. You can chop the apples into smaller dice if you’d like. The dough is kind of lumpy, bumpy. And fyi, here is the original metric ingredient list: 1 large apple, 200 g all-purpose flour, 80 g whole wheat flour, 1 t soda, 75 g sugar, 75 g unsalted butter, 140 ml buttermilk, with extra sugar and buttermilk for the top.
printer-friendly pdf recipe

Vermont Cheddar Cheese Bread

vermont cheddar cheese bread

It’s been about 6-12 months ago that I first read about the No-Knead Bread. It’s made the rounds of bloggers around the world. Not too long after I read about it I tried it. And was positively amazed how good it was. And how easy it was. It’s just that it requires about 18-24 hours of time (very little of it with any work, though) to make. The dough develops a sourdough kind of flavor, and is baked in a heavy Le Crueset-type pan, with a lid. The pan creates its own hotter-than-heck oven, within the oven. Gives the bread a great crispy crust like the artisan loaves you may buy at your local bakery.

Some other blogger mentioned a book out there – Artisan Bread in Five Minutes a Day, by Jeff Hertzberg and Zoe Francois. I ordered the book, have read parts of it, and decided I’d have to try this recipe last weekend. The prep and baking method is very similar to the no-knead bread, although maybe easier since this one requires only a two-hour rise to start the batter.

The bread is a cinch to make, i.e., don’t be intimidated by the long list of instructions . . . they’re just wordy and very thorough. You can do everything by hand if you choose, but I utilized my stand mixer (with dough hook) to perform the harder work for me. This dough does not require kneading at all. In fact the recipe indicates you do not knead it. The less you mix it, the more of those wonderfully big holey holes you’ll get in the loaf.

The steps include:
(1) mixing up the dry stuff, the wet stuff and combining the two
(2) letting the dough rest for 2 hours
(3) refrigerating the dough to bake at a later time (up to 7 days later)
(4) shaping the loaves (takes about 3-4 minutes) and allowing them to rise
(5) baking in a 450 oven, on a pizza stone

I’ve only made one recipe so far, from this new book. But if this bread is any indication of the others, I’ll be making more of them in the future. Next time I am going to try using hard wheat flour too, and do my best to do less kneading. This version doesn’t have quite the sourdough flavor the no-knead (18-24 hour) bread does, but it’s certainly a worthy competitor. 

Cook’s Notes: be sure to use ample cornmeal under the formed loaves so they don’t stick to the pizza peel. A pizza peel is ideal. Most peels are made of wood, but mine is a lightweight metal with a plastic edge (the peel is a big, wide, flat kind of spatula the pizza makers use to slide pizza off of onto the hot oven floor), but you could also use a cookie sheet that has no lip.

Vermont Cheddar Cheese Bread
Recipe By: Artisan Bread in Five Minutes a Day — Hertzberg & Francois
Serving Size: 24
3 cups lukewarm water
1 1/2 tablespoons yeast — granulated type
1 1/2 tablespoons salt
1 1/2 tablespoons sugar
6 1/2 cups all-purpose flour
1 cup grated cheddar cheese — sharp, or New York
1. Mixing and storing the dough: Mix the yeast, salt and sugar with the water in a 5-quart bowl, or a lidded (not airtight) food container.
2. Mix the dry ingredients and the cheese, without kneading, using a spoon, a 14-cup capacity food processor (with dough attachment) or a heavy-duty stand mixer (with dough hook). If you’re using a machine, you may need to use wet hands to incorporate the last bit of flour.
3. Cover (not airtight), and allow to rest at room temperature until the dough rises and collapses (or flattens on top), approximately two hours.
4. The dough can be used immediately after the initial rise, though it is easier to handle when cold. Refrigerate in a lidded (not airtight) container and use over the next seven days.
5. On baking day, dust the surface of the refrigerated dough with flour and cut off a grapefruit-sized piece (if baking one loaf). Alternately, weigh the entire amount and divide into 4 equal portions, about 1 3/4 pounds each. Dust the pieces with more flour and quickly shape it into a ball by stretching the surface of the dough around to the bottom on all four sides, rotating the ball a quarter-turn as you go. Allow to rest and rise uncovered on a cornmeal-covered pizza peel for one hour (or just 40 minutes if you’re using fresh, unrefrigerated dough).
6. Twenty minutes before baking time, preheat the oven to 450 degrees, with a baking stone placed on the lowest rack. Place an empty broiler tray on any other shelf that won’t interfere with the rising bread.
7. Sprinkle the loaf liberally with flour and slash a cross, a scallop, or tic-tac-toe pattern into the top, using a serrated bread knife. Leave the flour in place for baking; tap some of it off before eating.
8. Slide the loaf directly onto the hot stone. If it sticks, gently coax it off the pizza peel. Pour one cup of hot tap water into the broiler tray, and quickly close the oven door. Bake for about 25 minutes, or until deeply browned and firm. Smaller or larger loaves will require adjustments to baking time.
9. Allow to cool on a rack before slicing or eating. Makes 4 approximately one pound loaves.
Per Serving: 147 Calories; 2g Fat (12.0% calories from fat); 5g Protein; 27g Carbohydrate; 1g Dietary Fiber; 5mg Cholesterol; 430mg Sodium. Exchanges: 1 1/2 Grain (Starch); 0 Lean Meat; 0 Fat; 0 Other Carbohydrates
Printer-friendly PDF recipe.

Sour Cream Coffeecake with Chocolate Streusel, oh yeah!

chocolate sour cream coffeecake

The stories that go along with recipes, those hand-me-down treasures from family members especially, lend a rich character to them. Their origin gives them special merit. Added credibility. A known quantity of deliciousness.

I don’t talk about my first marriage much (thank goodness, you really should be spared the details), but in the course of the years that she was alive, I got to know and love my former husband’s step-grandmother, Ethel. She was a dear little lady, and I have 3 or 4 recipes of hers acquired over the years. This is one (I also have one for avocado ice cream, and another for icebox almond cookies that I remember right off the top, neither of which I’ve posted yet) that must have been served to me one of the multitude of times I visited her home. She was a very good cook, and managed to prepare some amazing meals in her very small kitchen. She enjoyed entertaining, even though it was hard work for her as she aged. She lived to be in her 90’s, bless her. I hope she’s waving at me from heaven since I’m sharing her recipe for coffeecake.

For many years, even up until recently, I have made this on holiday mornings, like Christmas, or Easter, or the day after Thanksgiving. With a bowl of fresh fruit, and maybe some bacon or sausage, it would make a lovely breakfast or brunch.

Chocolate as an ingredient in coffeecake isn’t very common. At least I don’t think so. And this really isn’t chocolate-chocolate coffeecake. For this occasion I’m going to rename it - originally it was Chocolate Sour Cream Coffeecake, but that’s misleading. You might think the chocolate is in the entire coffeecake, and it’s not. It’s not overwhelming with chocolate, but is laced through in a kind of dry mix that is layered, then sprinkled on top. The coffeecake itself is just a rich sour cream based cake. The only unusual ingredient there is cream of tartar. Not many recipes include it anymore. It used to be quite common, before double acting baking powder. So, that probably gives you an idea how old this recipe really is. Old.

So I did a bit of research about it cream of tartar. I’d forgotten what it is, exactly. Now I know:

Cream of tartar is a by-product of the wine industry. A crystalline acid forms on the inside of wine barrels. The barrels are scraped and the sediment is purified and ground to form cream of tartar. Cream of tartar is used to stabilize egg whites when making meringue or as an addition to certain frostings to produce a creamy product.

Why it’s in this recipe, I don’t know, but I’ve never wanted to bake the coffeecake without it merely to test it. There’s so much chemistry involved with baking that I don’t want to tamper with success. But be my guest, then let me know!

  • Normally, when cream of tartar is used in a cookie, it is used together with baking soda. The two of them combined work like double-acting baking powder. When substituting for cream of tartar, you must also substitute for the baking soda. If your recipe calls for baking soda and cream of tarter, I would just use baking powder.

  • One teaspoon baking powder is equivalent to 1/4 teaspoon baking soda plus 5/8 teaspoon cream of tartar. If there is additional baking soda that does not fit into the equation, simply add it to the batter.

Looks like you could substitute additional baking powder for the cream of tartar and baking soda called for, but since I had the cream of tartar, I stuck with the tried-and-true recipe when I made it this time.

Cook’s Notes: The recipe can be halved and baked in a 9×9 pan. That pan will easily serve 9 people, so the double recipe probably would serve 18-20, no problem. The original recipe indicated it served 12. Although the recipe indicates two layers, I made 3 layers - more areas for the chocolate. The middle layer didn’t completely cover the bottom layer. You don’t have to be exact. The crumb on this cake is so tender, likely from the sour cream addition. The amount of chocolate/cinnamon mixture is probably a bit too much. I always have leftover that I toss out, so you could likely reduce the dry mix by about 1/3 and have just enough.

Grandma’s Chocolate Sour Cream Coffeecake
Serving Size : 18
CAKE BATTER:
1/2 pound margarine — softened
2 cups sugar
4 whole eggs
2 cups sour cream
2 teaspoons vanilla
4 cups flour
4 teaspoons baking powder
1/2 teaspoon cream of tartar
2 teaspoons baking soda
TOPPING:
4 teaspoons unsweetened cocoa powder [I increase to 2 T.]
1 cup sugar
4 teaspoons ground cinnamon
1. Preheat oven to 350. In separate bowl combine topping: cocoa, sugar and cinnamon and set aside.
2. Combine margarine, sugar, eggs, vanilla and sour cream in mixer and mix well. Then add flour, baking powder, cream of tartar and soda.
3. Pour half of the batter into an oiled 9×13 pan, then sprinkle half of the topping over it (covering every inch of batter), then pour in remaining batter. Use a knife to swirl the batter a little, then sprinkle remaining topping on top. Bake for 45 minutes.
Per Serving: 396 Calories; 17g Fat (38.2% calories from fat); 5g Protein; 57g Carbohydrate; 1g Dietary Fiber; 86mg Cholesterol; 383mg Sodium. Exchanges: 1 1/2 Grain(Starch); 0 Lean Meat; 0 Fruit; 0 Non-Fat Milk; 3 Fat; 2 1/2 Other Carbohydrates.

Printer-friendly recipe.


Irish Soda Bread

The recipe came from Gourmet, a reader’s recipe, Stephanie Foley of Massapequa, Long Island, from March, 2002. It’s a bit different than many Irish Soda Bread recipes, which is why I decided to try it, back then. With the exception of the butter brushed on the loaves prior to baking, the only fat in it comes from the buttermilk, which isn’t much. I’ve made it several times since then, always getting rave reviews for it. Truly it comes together in about 7 minutes, including time to gather the ingredients. Then it bakes about 35-40 minutes. Ideally you’ll want to let it rest a bit before cutting it, but sometimes I’ve not had that luxury. But you must let it rest about 5 minutes, otherwise it’s too hot to handle. It’s heaven-on-a-bun [pun intended] with some unsalted butter spread on it, accompanying a soup.

Ready for the oven: here are the dough loaves, cut with 1/2 inch deep furrows, spread with butter.

Cook’s Notes: my flour must be drier here in Southern California, than some, because I always have to add a drizzle more buttermilk to the bowl to give the dough enough liquid to pull it together. I added walnuts to this one, but that’s optional. I’m sure it’s not traditional. Some people don’t like caraway, so eliminate it. I didn’t melt the butter to spread on top of the loaves - I just used a spreader knife and brushed it with very soft butter instead. I’ve never tried substituting some whole wheat flour, but am sure you could. Would be better for us, obviously. This recipe says it serves up to 12 people. Maybe so, if you ate only one small slice. Not in our house. Each loaf probably serves 4, but that’s max unless you have very small eaters. And, I think this bread is best eaten when it’s warm and fresh. It gets dried out if frozen.

Irish Soda Bread

Recipe: Gourmet, March, 2002

Servings: 12 [more like 8]

4 cups all-purpose flour

1 1/2 teaspoons baking soda

1 teaspoon salt

1 tablespoon sugar

1 1/2 tablespoons caraway seeds [optional]

1 cup raisins, golden raisins or currants [also optional]

1/2 cup walnuts, chopped [my addition]

1 3/4 cups well-shaken buttermilk

2 tablespoons unsalted butter, melted.

1. Preheat oven to 375°F.

2. Butter and flour a large baking sheet, knocking off excess flour.
3. Sift together 4 cups flour, baking soda, and salt into a large bowl and stir in sugar, caraway, and raisins. Add buttermilk and stir just until dough is evenly moistened but still lumpy.

4. Transfer dough to a well-floured surface and gently knead with floured hands about 8 times to form a soft but slightly less sticky dough.

5. Halve dough and form into 2 balls. Pat out each ball into a domed 6-inch round on baking sheet. Cut a 1/2-inch-deep X on top of each loaf with a sharp knife, then brush loaves with butter.
6. Bake in middle of oven until golden brown and bottoms sound hollow when tapped, 35 to 40 minutes. Transfer loaves to racks to cool completely.

Per Serving: 226 Calories; 3g Fat (11.1% calories from fat); 6g Protein; 45g Carbohydrate; 2g Dietary Fiber; 6mg Cholesterol; 394mg Sodium. Exchanges: 2 Grain(Starch); 0 Vegetable; 1/2 Fruit; 0 Non-Fat Milk; 1/2 Fat; 0 Other Carbohydrates.

Printer-friendly recipe, click HERE.


Coconut Banana Bread with Lime Glaze


This is another of the recipes that worked its way up to the top of the pile, as I was sorting and filing clippings the other day. And since I had some bananas that were way beyond eating out of hand, they seemed perfect for this recipe. I did find the recipe on myrecipes.com, (myrecipes is a compendium of the recipes offered in Southern Living, Cooking Light, Sunset, Coastal & Cottage Living) and it said that when it was published last year it was a repeat - this bread became a real favorite at Cooking Light and won for Best Quick Bread in their 2007 issue all about their best tried and true recipes. It originally appeared on the cover of the September 2003 issue and remains one of their best banana breads. With that kind of praise, how could I not try it?

I’m not always thrilled with Cooking Light’s recipes - better for me, I know, but sometimes there’s too light on flavor. But their baked goods, whether it be breads, or cakes particularly, they’ve worked on extensively, have usually been adapted so they’re pretty darned good. This one was no exception. And, since this is a better-for-you recipe, I’d be inclined to try it again.

Cook’s Notes: The batter went together easily, and the dark rum called for certainly added a depth of flavor that was barely discernable in the finished bread if I really thought about it. I used lemon instead of lime in the glaze. And you’ll note below, I used half sugar and half Splenda in the batter.

Coconut Banana Bread with Lime Glaze
Recipe: Jean Patterson, Cooking Light, September, 2007
Servings: 16
2 cups all-purpose flour — (about 9 ounces)
3/4 teaspoon baking soda
1/2 teaspoon salt
1 cup granulated sugar [I used half sugar, half Splenda]
1/4 cup butter — softened
2 large eggs
1 1/2 cups banana — ripe mashed (about 3 bananas)
1/4 cup plain low-fat yogurt
3 tablespoons dark rum
1/2 teaspoon vanilla extract
1/2 cup sweetened coconut flakes

Cooking spray
1 tablespoon sweetened coconut flakes
1/2 cup powdered sugar
1 1/2 tablespoons fresh lime juice — or lemon juice

1. Preheat oven to 350°.
2. Lightly spoon flour into dry measuring cups; level with a knife. Combine flour, baking soda, and salt, stirring with a whisk.
3. Place granulated sugar and butter in a large bowl; beat with a mixer at medium speed until well blended. Add eggs, 1 at a time, beating well after each addition. Add banana, yogurt, rum, and vanilla; beat until blended. Add flour mixture; beat at low speed just until moist. Stir in 1/2 cup coconut.
4. Spoon batter into a 9 x 5-inch loaf pan coated with cooking spray; sprinkle with 1 tablespoon coconut.
5. Bake at 350° for 1 hour or until a wooden pick inserted in center comes out clean. Cool in pan 10 minutes on a wire rack; remove from pan.
6. Combine powdered sugar and juice, stirring with a whisk; drizzle over warm bread. Cool completely on wire rack.

Per Serving: 196 Calories; 5g Fat (21.6% calories from fat); 3g Protein; 35g Carbohydrate; 1g Dietary Fiber; 34mg Cholesterol; 174mg Sodium. Exchanges: 1 Grain(Starch); 0 Lean Meat; 1/2 Fruit; 0 Non-Fat Milk; 1 Fat; 1 Other Carbohydrates.
Printer-friendly recipe, click HERE.


Chocolate Scones - is this decadent, or what?


As a card-carrying chocoholic, I will attest, these little numbers are too darned good. I ate a whole one plus a little piece of another just after baking. And it took all my will power to stay out of them. My advice: either don’t make them at all, or put the leftovers - immediately - into the freezer.

I was putting away recipe clippings the other day, and needed something to fix for DH’s Bible study group, and this recipe went into the “try immediately” stack. They came together easily, although I did dirty-up many a bowl getting them ready. I mixed up the dry ingredients the night before. I watched a demo on TV just the other day of a chef mixing in cold butter to flour. You do it by hand, just smashing the little pieces of butter and making those pieces smaller and smaller by sifting the mixture through your hands and pressing. It was fun, actually. Made a bit of a mess of my hands, but so what? Then you add the liquid ingredients (heavy cream and egg yolk), before kneading slightly into a big blob and pressing it out for cutting. I brushed the tops with heavy cream instead of milk, and I sprinkled the tops with just a tad of white sugar too. Were these good? Oh my yes. The recipe is from an issue of Bon Appetit in 2006, I believe, and is credited to The Balmoral Hotel near Edinburgh, Scotland, The Bollinger Bar at Palm Court.

Here are the scones before baking, brushed with cream and sprinkled with granulated sugar.

Chocolate Scones
Recipe: The Bollinger Bar at Palm Court, Balmoral Hotel, Scotland
Servings: 18
2 1/2 cups all-purpose flour
1/2 cup unsweetened cocoa powder
1/2 cup sugar
2 teaspoons baking powder
1/2 teaspoon salt
1/2 cup unsalted butter — chilled, cut up into 1/2 inch cubes
1 1/4 cups heavy cream — chilled [I had to add about 1 T. more]
1 egg yolk
Milk — to brush tops, as needed
1. Preheat oven to 425°F.
2. Combine flour, baking powder, salt, sugar, cocoa powder in a large mixing bowl. Using a pastry blender, cut in butter until a coarse meal is formed. Or, use your hands to press the butter pieces smaller and smaller until it’s a coarse meal.
3. Whisk together the egg yolk and cream in a small bowl, then stir into the flour mixture just enough to blend (do not overmix). Dump dough onto a lightly floured surface, dust your hands lightly with flour and knead dough gently 5 times, just to bring the dough together. Gently press dough into a thick round, then use a 2 1/2″ round biscuit cutter to cut out scones. Gather scraps, reform your dough circle and cut remaining scones out.
4. Bake on large baking sheet lined with parchment and brush lightly with a bit of milk. Bake until puffy and dry around the edges, about 18 minutes.
5. Cool on racks slightly.

Serving Ideas: Serve with raspberry jam and clotted cream.
Per Serving: 196 Calories; 12g Fat (53.5% calories from fat); 3g Protein; 21g Carbohydrate; 1g Dietary Fiber; 48mg Cholesterol; 122mg Sodium. Exchanges: 1 Grain(Starch); 0 Lean Meat; 0 Non-Fat Milk; 2 1/2 Fat; 1/2 Other Carbohydrates.
Printer-friendly recipe, click HERE.


Eat Your Fiber (Refrigerator Bran Muffins)

Think back to the 1960’s. We were just starting to eat more cereal, rather than bacon and eggs every morning. Grape Nuts. Corn Flakes. Oatmeal hadn’t hit the big time yet as a cholesterol fighter. We didn’t even know about cholesterol back then. We hardly knew about yogurt - it was a kind of “health food” as I recall. But the cereal manufacturers had produced both All-Bran and Raisin Bran, so sure enough, somebody came up with a variation other than consuming it in your cereal bowl. I’m sure this recipe made the rounds of most home cooks of the era. It may be a recipe devised by Kellogg’s for all I know, although I got it from a friend of my mother’s. It originally called for All Bran, but it was too, too much fiber and not all that tasty, so I substituted the bran flakes instead. Much improved and have made them that way ever since. You mix it up in a big bowl, refrigerate it and plop batter into a muffin tin in the morning. Voila. Fifteen minutes later you have freshly baked muffins. The batter keeps for weeks in the refrigerator. The marketing of the day convinced us this kind of muffin was healthy for us because it contained bran. And raisins. Never mind the sugar - it was considered an energy source. That mentality hasn’t changed - just look in the case at any Starbuck’s and you’ll see these humongous bran muffins - probably 500 or more calories and loads of fat. Hmmm.

Cook’s Notes: Doctor these up with some additional dried fruits (dried cranberries, for instance, or chopped up apricots or some crystallized ginger) if you’d like some variety. I added some more golden raisins because the brand of Raisin Bran flakes was a little light on the fruit, in my opinion. It’s wasn’t Kellogg’s, but somebody else’s label. You can also add some cinnamon and ginger to the batter too, if you’d like a spicy variation. I substituted 1/3 Splenda for the sugar, and these are not overly sweet even so. If you like a sweeter muffin, add another 2 to 3 tablespoons of sugar. After making one batch of these the other day, I decided they were not quite sweet enough (I’d put in less sugar than called for). So, I added about 2 T. sugar to the wet batter, stirred it around a bit, then once plopped into the muffin tin, I sprinkled just a tad of sugar on top of each muffin. Oh. Very good. I’ll do that again because the ouside of the muffin had just a bit of caramelization from the late-added sugar. I liked the texture.

These aren’t going to wow your next breakfast. But, they’re just plain and good. DH decided that our plain (unflavored, but sweetened) yogurt was just wonderful with these, and indeed they are. Something about the creaminess of the yogurt - like eating cream cheese with them, or something.

Refrigerator Bran Muffins
Recipe: Mary Wilfert, a San Diego friend from the 1960’s
Serving Size : 30 (small)
3 cups Raisin bran — cereal
1 cup boiling water
2 whole eggs — lightly beaten
2 cups buttermilk
1/2 cup vegetable oil
2 1/2 teaspoons baking soda
1/2 teaspoon salt
1 cup sugar
2 1/2 cups flour
1. Preheat oven to 425°.
2. In a large bowl mix bran cereal with boiling water, stirring to moisten evenly. Allow to cool, then mix in eggs, buttermilk, oil and stir well. Stir together (separately) the soda, salt, sugar and flour, then stir into the bran mixture.

3. Scoop batter into muffin tins and sprinkle tops with just a little bit of sugar. Bake for 20 minutes (small muffins). If using larger muffin tins, bake about 25 minutes.
NOTES : This whole mixture will keep in the refrigerator for several weeks if you want to bake them fresh in the morning.
Per Serving: 123 Calories; 4g Fat (30.9% calories from fat); 3g Protein; 19g Carbohydrate; 1g Dietary Fiber; 15mg Cholesterol; 199mg Sodium. Exchanges: 1/2 Grain(Starch); 0 Lean Meat; 0 Fruit; 0 Non-Fat Milk; 1 Fat; 1/2 Other Carbohydrates.
Printer-friendly recipe, click HERE.


Bishop’s Bread - a Christmas keeper - and this is NOT fruitcake!

I’ve been waiting for months and months to give you this recipe. Since I only make this at Christmas-time, I didn’t think it appropriate to share it when the temps outside were in the 90’s. Although this is not my original recipe, I will tell you I’ve been making this for about 40 years, and this is one of those recipes - if you’re a regular reader of my blog - that I say - “now, listen up! I’m about to share something important.” Hence it is. Important.

My mother’s friend Mary gave me this recipe, back in about 1969 or 1970. We had a group of us - 4 women: my mother, Fay, and two of her friends, Esther and Mary, both near her age. And me. We played the Japanese version of Mah Jong about every 2 weeks or so, and one of us provided lunch. It had to coincide with when my daughter, Dana, went down for her nap, so more often than not, it was at my house. After eating the repast we’d then play the game for a couple of hours.

So, Mary brought this, one Mah Jong day, when it was close to Christmas. My mother (and dad both) liked fruitcake. But I never did. Still don’t. I’ve been known to try a nibble, with somebody’s prized recipe, thinking that maybe my taste buds have changed, that I’ve matured somehow. Or that somebody has found some unique new way to make fruitcake palatable. Sorry. No. I still don’t like fruitcake. I detest citron, and anything close to it. So, when Mary brought this over, explaining that it was something like fruitcake, I was suspicious. However, she quickly said she didn’t like fruitcake, either. Oh good. I became a bishop’s bread convert from the first bite. SO:

  • I do like maraschino cherries. Certainly I don’t eat them 11 months of the year. I mean, where do we ever even SEE maraschino cherries anymore except on some caterer’s platter or in a Shirley Temple. I went through a stage in the 1970’s when red dye was an anathema, but that didn’t keep me from making bishop’s bread, I’m sorry to say. So much for my dedication to the shrine of a healthy body! But now they don’t use the bad red dye (supposedly), so I hope that since this is only consumed by me for these few, short weeks, maybe I’ll live another day.
    And, I like chocolate too. You all already know that. You can use Nestle’s chips, or cut up your own, or use some other brand. The better the brand the better the bread. You could use milk chocolate too, I suppose.
  • And, I like walnuts.
  • But, I don’t like fruitcake.
  • Enter, ta da: Bishop’s Bread!

So, on to this recipe. If you’re going to be a stickler for detail, I suppose this does bear some resemblance to fruitcake - it has a similar consistency - chunks of goodies glued together with a basic cake recipe. Kind of like pound cake. But, instead of citron and dried fruit (lemon, lime, orange, red candied cherries, dates, figs, etc) this has nothing but chocolate chips, walnuts and maraschino cherries. The cherries maintain their moistness, and you combine them with walnuts and chocolate, and it’s a marriage made in heaven, I say. Yes, it’s a bread-like shape, and you slice it like fruitcake, but it isn’t. I promise. On my honor.

(left to right: cutting up the maraschino cherries with scissors, and clad in plastic gloves [or buy them already halved at Smart & Final], 4 cups of cherries, the goodies mixed with the dry ingredients, the finished batter mixed up and ready to pour)

You can bake it in bread pans, so you’ll have just one loaf using the recipe below. Or, if you’re a Bishop’s Bread lover, then you bake in large quantity. Today I made a quadruple batch. It would make 4 bread pans full, but I had some smaller, cute little cardboard ones that are perfect for giving away (picture above). I made seven of them and one loaf pan. I’ll keep the loaf sized one and very judiciously give away the others. Only to very special friends. You can interchange nuts if you’d prefer something different. And if you don’t like maraschino, then substitute apricots, perhaps, or dried cranberries maybe. But it won’t be the same.

Over the years I’ve tried to find out the history of this bread/cake. The internet hasn’t been of much help other than to give me several similar recipes (purportedly dating to the 1950’s) with candied cherries, sometimes almonds or pecans, chocolate, and dates. I did see a couple with maraschino cherries, so this must have been somebody’s interpretation. Obviously, the way-back origin must be religious in some way with the word “bishop” in the title. I did find this, though:

  • Any purchased or homemade cake decorated with the bishop’s name and a tiny mitre can be used on the feast of a bishop-saint, the traditional cake is Bischofsbrot or “Bishop’s Bread.” (this was from a Catholic Church website)

It probably did have candied cherries in it at one time. Whatever it is, I adore this bread. And if you’re a regular reader of my blog, and you like my recipes, then I sincerely request that you make this bread. Post Haste.

Bishop’s Bread
Recipe: Mary Wilfert
Servings: 20 (slices)
1 1/2 cups flour
1 1/2 teaspoons baking powder
1/4 teaspoon salt
1 1/2 cups chocolate chips
1 cup sugar
2 cups walnuts — chopped
1 cup maraschino cherries — drained, halved [or buy them in a great big jar at Smart & Final where they’re already halved for you]
3 whole eggs
1. Preheat oven to 325°. Grease a bread pan and line the bottom with waxed paper (yes, it’s important). Sift dry ingredients into a large bowl. Add chocolate chips, walnuts and cherries and stir to coat the cherries.
2. With mixer, combine eggs and sugar, add to flour mixture and stir gently, but well, until combined. You don’t want to see any pockets of dry flour. Pour into prepared pan and bake for 90 minutes. Test to make sure it’s done. If baking in smaller pans, start checking for doneness at 60 minutes. Continue baking as needed and test at 5-minute intervals. Remove pan to a rack and allow to cool in the pan. When cool, remove and wrap well, or place in plastic bags and refrigerate.
Per Serving: 255 Calories; 13g Fat (42.8% calories from fat); 6g Protein; 33g Carbohydrate; 2g Dietary Fiber; 32mg Cholesterol; 82mg Sodium. Exchanges: 1/2 Grain(Starch); 1/2 Lean Meat; 2 1/2 Fat; 1 1/2 Other Carbohydrates.
To print a PDF recipe, click HERE.


Cardamom Crumb Cake


Sometimes my DH doesn’t give me much notice that the guys are coming to our home the next morning for Bible Study. He knew two weeks ago but neglected to tell me. So, yesterday afternoon about 3:00 he just happened to mention it in passing. I said, when were you going to tell me about this, dearest? He said, well, I just did [big, apologetic grin].

So, wanting to do something new (the guys have had all of my regular repertoire of morning coffee cakes more than once) I swiftly turned to my latest favorite baking book, Dorie Greenspan’s Baking: From My House to Yours. I do love that book. Not wanting to make a trip to the grocery store, I actually found several “Morning Cakes” I could make, but settled on this one.

Out came all the ingredients and this pulled together fairly quickly. I liked the crumb topping - it’s a bit different - well, similar to others - but different because of the orange zest - and the espresso powder in it. Oops, I opened my jar of espresso powder that’s been languishing in the pantry for at least a year without any use, and uh, it’s a solid mass. Oh, da–! Usually I’ll just make some very strong espresso instead to substitute in a recipe, but this was in a dry topping, so I couldn’t do that. What to do? I had no instant coffee (we don’t drink the stuff). So, out came the Dutch-process cocoa. It worked just fine, although I suppose Dorie might not like my substitution. She obviously was going for a cardamom and coffee pairing here. The batter is hand mixed, which gives the finished cake a little bit of irregular texture - not a bad thing. It’s not like a dessert cake that’s beat with a mixer until totally smooth.

The coffeecake/crumb cake was very nice. This isn’t a wow kind of cake - just good home made flavors, perfect with a hot cup of coffee. Luckily there were leftovers, so when the boys come next week I’ll pop it in the oven for a little re-heat.

Cardamom Crumb Cake
Recipe By Dorie Greenspan - Baking: From My House to Yours
Servings: 9

CRUMB TOPPING:
1/2 cup all-purpose flour
1/2 cup walnuts — coarsely chopped
1/3 cup sugar
1 tablespoon orange zest — finely grated
1/2 teaspoon instant coffee granules — preferably espresso [or cocoa]
1/2 teaspoon ground cardamom
4 tablespoons unsalted butter — at room temperature
CAKE BATTER DRY INGREDIENTS:
2 cups all-purpose flour
2 teaspoons baking powder
1/4 teaspoon salt
1 1/4 teaspoons ground cardamom
1 teaspoon instant coffee granules — preferably espresso [or cocoa]
2/3 cup sugar
CAKE BATTER WET INGREDIENTS
2 tablespoons orange zest — finely grated
8 tablespoons unsalted butter — melted and cooled
2 large eggs
1/2 cup whole milk
1/2 cup espresso coffee — cooled
1 1/2 teaspoons vanilla extract
1. Preheat oven to 400 and arrange rack in center of oven. Butter an 8-inch square baking pan, dust the inside with flour and tap out the excess. Put the pan on a baking sheet.
2. CRUMBS: Put all the ingredients except butter in a bowl and toss them together with a spatula just to blend. Add the butter, in small little pieces, and using your fingers or spatula, mix everything together until you’ve got crumbs of different sizes. It’s nice to have a few big pieces, so don’t overdo it. Set the crumbs aside (up to 3 days ahead).
3. CAKE: Whisk together the flour, baking powder, salt, cardamom and espresso powder in a large bowl. Turn the dry ingredients out onto a sheet of waxed paper, and put the sugar and zest in the bowl. Rub them together with your fingers until the sugar is moist and the fragrance of orange strong, then return the dry ingredients to the bowl and whisk to blend.
4. Put the remaining ingredients in another bowl and whisk them to blend. Pour the wet ingredients over the dry and stir - DON’T BEAT - to mix. Stir ONLY until you’ve got an evenly moistened batter. Scrape the batter into the prepared pan and top with a thick, even layer of the crumbs. Pat the crumbs ever so gently into the top of the batter.
5. Bake for 30-35 minutes, or until the cake has risen (it will crown the pan), the crumbs are golden brown and a thin knife inserted into the center comes out clean.
6. Transfer to a rack to cool in the pan, before serving warm or at room temperature.
7. You can unmold the cake if you want to, but you’ll lose some of the crumbs when you turn it over. I prefer to cut the cake in the pan, taking care not to nick the surface of the pan with my knife. Use a silicone spatula if possible.
NOTES : This cake is best served warm the day it’s baked. If you must make it ahead, freeze it. Defrost and reheat in a 350 degree oven for a few minutes to warm it.
Per Serving: 422 Calories; 21g Fat (44.6% calories from fat); 7g Protein; 52g Carbohydrate; 1g Dietary Fiber; 90mg Cholesterol; 195mg Sodium. Exchanges: 2 Grain(Starch); 1/2 Lean Meat; 0 Fruit; 0 Non-Fat Milk; 4 Fat; 1 1/2 Other Carbohydrates.
To print a PDF recipe, click HERE.


Cranberry Orange Scones


While our whole family was here over last week, there were a lot of meals and snacks being prepared at all hours. Our grandchildren spent many, many hours in and out of our large, heated jacuzzi, and would beg for snacks like apples and cheese, soft drinks, juice (and towels, oh my, the towels). The refrigerator was bursting at the seams with leftovers and other stuff for a variety of meal types. And early on Saturday morning, our daughter Sara was already baking. She loves to bake. I mean it. SHE. LOVES. TO. BAKE. Sara usually prefers to bring desserts or baked items when we have a potluck meal. She’s a very good cook in general, and her daughter Sabrina, aged 11, is already a very good baker too. She’s been helping her mom since she stood next to her mom’s elbow on a stool at the kitchen counter.

My standby Buttermilk Scones are more like a very rich biscuit. The ingredients, however, are very, very similar. Mine have less sugar, less butter (which surprised me), but more buttermilk. Amazing what a little addition of buttermilk can make to a baked good. Sara’s have a little drier crumb (guess that’s the buttermilk at work there), but they were absolutely delicious. I may try her recipe next time I bake scones. There are a precious few of these in the freezer, which we’ll dole out for special occasions in the next couple of weeks. Thank you, Sara.

Sara’s Cranberry Orange Scones
3 c flour
1/3 c sugar
2 t baking powder
3/4 t baking soda
½ t salt
3/4 c cold butter
½ c dried cranberries
zest from 1 orange
1 c buttermilk
milk
a little cinnamon and sugar
Preheat oven to 425. Mix together the flour, sugar, baking powder and salt, then add the cold butter. Blend with knives or a pastry blender. Then add in the cranberries and orange zest. Pour in the cold buttermilk and gently stir dough until it holds together. Pour out onto a floured surface and press dough to about a 12 inch round and cut into shapes and place on a large baking sheet. Brush tops with milk and sprinkle lightly with cinnamon and sugar. Bake for 10-12 minutes until golden brown. Remove to cool for about one minutes. Serve immediately.

Per Serving: 247 Calories; 12g Fat (43.8% calories from fat); 4g Protein; 31g Carbohydrate; 1g Dietary Fiber; 32mg Cholesterol; 389mg Sodium. Exchanges: 1 1/2 Grain(Starch); 0 Fruit; 0 Non-Fat Milk; 2 1/2 Fat; 1/2 Other Carbohydrates. The nutrition count depends on how large you make the scones. This recipe makes about 14 or 15 large scones.
To print a PDF recipe, click HERE.