
Here are the tastingspoons players. I’m in the middle (Carolyn). Daughter Sara on the right, and daughter-in-law Karen on the left. I started the blog in 2007, as a way to share recipes with my family. Now in 2023, I’m still doing 99% of the blogging and holding out hope that these two lovely and excellent cooks will participate. They both lead very busy lives, so we’ll see.
– – – – – – – – – – – – – – – – – – – – – –
BOOK READING (from Carolyn):
Under the Java Moon, by Heather Moore. Sometimes these WWII books are tough to read. This is a true story (written as fiction, though) about a few Dutch families who are taken prisoner on Java Island, by the Japanese. Certainly it’s a story about unbelievable deprivation and sadness, but also about resilience too. Not everyone survives, as you could guess, but you’ll be rooting for young Rita who takes on so many responsibilities far beyond her 6-year old’s abilities. I read this because a dear friend of mine’s husband (now deceased) was in the Army during WWII and spent a lot of his duty in Indonesia and had horrific stories to tell about the weather and environment (awful!). A period of his life he liked to forget. The book certainly brings that period and place to the forefront. I’m glad I read it.
Never in a million years would I have picked up Blind Your Ponies, by Stanley Gordon West. If I’d read the cover or flap that the bulk of the story is about basketball, I’d have put it back on the shelf. But oh, this book is – yes, about basketball, but it’s about a place in time in Montana, a few decades ago, when a tiny town supported their high school team. It’s about a dream. About the town who believed in them. About a tall young man who comes to lives in the town, and his deliverance, really, from a pretty awful background as he plays basketball, when he’d never played before. It’s about relationships, marriages, families and about how this little team makes it. Such a great story and SO glad I read it.
A Girl Called Samson, by Amy Harmon. I’m a fan of anything written by Harmon, and this one delivered as all her books do. 1760, Massachusetts. Deborah Samson is an indentured servant but yearns for independence. From being a rather tall, skinny kid (a girl) to faking it as a young soldier (a young man) in the Continental army. You’ll marvel at her ability to hide her true self. It’s quite a story. She’s thrown into the worst of situations in the war and comes through with flying colors. You’ll find yourself rooting for her and also fearing mightily that she’s going to either get killed, or be “found out,” by some of the men. Riveting story beginning to end. There’s a love interest here too which is very sweet.
On Mystic Lake, by Kristin Hannah. This is a book Hannah wrote some years ago, and tells the story of a woman, Annie, who finds out (on the day their daughter goes off to a foreign land for an exchange quarter) that her husband is in love with another woman and leaves her. Annie, who has been the quintessential perfect corporate wife, is devastated. She felt blind-sided. She cries and wallows, but eventually she returns home to her small town, where her widowed dad lives, in Washington. There she runs into many people she knew and at first feels very out of place. Slowly, she finds the town more welcoming and she helps a previous boyfriend, now widowed with his young daughter. A connection is there. Annie has to find herself, and she definitely does that. Her husband rears his head (of course he does!) after several months, and Annie has to figure out what to do. I don’t want to give away the story. Lots of twists and turns.
The Vineyard, by Barbara Delinsky. A novel with many current day issues. Husband and wife own a vineyard in Rhode Island. Husband dies. Widow soon (too soon) marries the manager, a hired employee, much to the consternation of her two grown children. Widow hires woman as personal assistant (much of the book comes from her voice) and she gets entangled into the many webs, clinging from the many decades the winery has tried to be successful. Really interesting. Lots of plot twists, but all revolving around work of the vineyard. Cute love story too. It wouldn’t be a Delinsky book without that aspect.
Consequences, Penelope Lively. I’ve always loved this author’s writing style. Have read many of her books. This one follows a rather dotted line family, the women, as they grow through worn-torn London and England. There’s poverty and both major events and minor ones that send the story’s trajectory in new directions. Riveting for me. Lively won the Booker Prize for Moon Tiger, her most famous book.
Below Zero, C.J. Box. Mystery of the first order. A Joe Pickett novel (he’s a game warden in Wyoming) with a family member thought dead is suddenly alive. Or is she? Joe’s on the hunt to find out. I don’t read these books at night – too scary. I love his books, though.
Consolations of the Forest: Alone in a Cabin on the Siberian Taiga, by Sylvain Tesson. I’m not sure what possessed me to read this book. About a late 30s guy who seems to crave solitude; he’s offered a 11×11 cabin in the cold/frozen Siberian outback, on a huge lake that freezes over in winter. Here’s a quote from the book: “A visit to my wooden crates. My supplies are dwindling. I have enough pasta left for a month and Tabasco to drench it in. I have flour, tea and oil. I’m low on coffee. As for vodka, I should make it to the end of April.” Vodka plays large in this book. Tesson (who is French, with Russian heritage) is a gifted writer, about the wilderness, the flora and fauna, about the alone-ness, the introspection. Mostly he ate pasta with Tabasco. No other sauce. Many shots of vodka every day. Drunkenness plays a serious role too – what else is there to do, you might ask? He lived there for about a year. I’d have lasted a week, no more.
The Auburn Conference by Tom Piazza. Another one, given my druthers I’m not sure I’d have picked up. For one of my book clubs. Excellent writing. 1883, upstate NY. A young professor decides to make a name for himself and puts on an event, inviting many literary luminaries of the day (Mark Twain, Frederick Douglass, Herman Melville, Forrest Taylor and a romance novelist [the outlier] Lucy Comstock). Part panel discussion, part private conversations, the author weaves a tale of discord, some moderate yelling, some rascism and much ridicule of the romance novelist. Also some words of wisdom, maybe not from the authors you’d have expected. Unusual book.
As Bright as Heaven, by Susan Meissner. 1918. Philadelphia. About a young family arriving with the highest of hopes. Then the Spanish Flu hits and dashes everything. You’ll learn a whole lot about that particular virulent flu and the tragic aftermath. Really good read.
Hour of the Witch, by Chris Bohjalian. Boston, 1662. A young woman becomes the 2nd wife of a powerful man, a cruel man. She determines to leave him, something just “not done” back then. Twists and turns, she’s accused of being a witch. Story of survival, and a redeeming love too.
My Oxford Year, by Julia Whelan. At 24, a young woman is honored with a Rhodes Scholarship to Oxford. She’s older than most of her fellow classmates, and as an American, doesn’t fit in very well. She’s left a good job back home, but determines to try to work some for the political campaign job she’s left, and also do the work for her Oxford scholarship. She meets a professor. Oh my. Such an interesting book. I loved learning about the culture of Oxford, and there’s a fascinating romance too, somewhat a forbidden one with said professor.
Madame Pommery, by Rebecca Rosenberg. I love champagne. Have read a number of books over the years (novels) about the region (and I’ve visited there once). This is real history, though in a novelized form. Madame Pommery was widowed, and determined she would blaze a trail that was not well received (no women in the champagne business for starters). And she decides to make a different, less sweet version. She’s hated and reviled, but sticks to her guns, veering away from the then very sweet version all the winemakers were producing. Fascinating story.
The Wager, by David Grann. A true tale of shipwreck, mutiny and murder back in the 1740s. Not exactly my usual genre of reading, but once I heard about the book, I decided I needed to read it. This is a novelized version of the story, based on the facts of an English shipwreck, first off Brazil, then later off Chile. Of the men, their struggle to survive (and many didn’t). Yes, there’s murder involved, and yes, there’s mutiny as well. Those who survived stood trial back in England many years later. Riveting read.
Before We Were Yours, by Lisa Wingate. 1939. A shantyboat in the backwaters of the Mississippi River. A 12-year old girl is left to care for her younger siblings when her mother is taken ill. A mystery ensues, and soon officials chase these youngsters to take them into an orphanage, one that became infamous for “selling” the children, weaving wild tales of their provenance. Dual timeline, you read about a successful young attorney who returns home to help her father, and questions come up about the family history. Fascinating read. You’ll learn about this real abominable woman, Georgia Tann, who profited by her “sales.”
The Vaster Wilds, by Lauren Goff. This tells the story of a young servant girl, in the aftermath of the starvation in Jamestown, the beleaguered town that virtually disappeared because the people weren’t prepared for the harshness of survival in those days. She escapes before the demise of the town and heads west, with nothing but the clothes she’s wearing. She survives longer than you might think, and encounters a lot of interesting experiences and people. Very interesting historical read.
Lady Tan’s Circle of Woman, Lisa See. Historical fiction, from 1469, Ming Dynasty, China. Based on the true story, however, about a young woman mostly raised by her grandmother who is a well known physician. Her grandfather is a scholarly physician, her grandmother, more an herbalist, or like a pharmacist of the day. Tan eventually marries into a family and is immediately subjugated by the matriarch, who won’t allow her to practice any of her healing arts. Quite a story, and also about how she eventually does treat women (women “doctors” were only allowed to treat women) as a midwife and herbalist. You’ll learn a whole lot about the use of flowers and herbs for healing and about the four humors.
Winter Garden, by Kristen Hannah. Quite a story, taking place in Washington State with apple orchards forming a backdrop and family business. Two sisters, never much friends even when they were young, return home to help care for their ailing father. Their mother? What an enigma. She took no part in raising them, yet she lived in the home. She cooked for the family, but rarely interacted. Yet her father adored his wife, their mother. How do they bridge the gulf between each other and also with their mother. Another page turner from Kristen Hannah.
Trail of the Lost, by Andrea Lankford. Not my usual genre. This is nonfiction, about Lankford who has plenty of credentials for rescue services, and is an avid hiker herself, determines to try to find some missing people who have disappeared off the face of the earth on the Pacific Crest Trail. It’s about how rescues work, everything from the disconnect between active citizens who want to help, and seemingly the unwillingness of authorities to share information. Not exactly a positive for law enforcement in this book. Really fascinating. There are hundreds of people who have disappeared off various long hike trails in the U.S. This is about four who were hiking (separately and at different times) on the PCT.
Tomorrow, Tomorrow and Tomorrow, by Gabrielle Zevin. I’ve never been a “gamer.” Not by any standard definition, anyway. Not like people who really get into games, adventure, killers, etc. And this book isn’t a game .. . but it’s a novel (and a great story, I might add) about how these games come into being. How they’re invented, how they morph. First there were two college students, then a third person is added, and they end up creating a wildly popular game. A company is born. And it goes from there. Mostly it’s about the people, their relationships, but set amidst the work of creating and running a gaming company. Not all fun and games, pun intended.
Remarkably Bright Creatures, by Shelby Van Pelt. Oh gosh, what a fabulous book. It’s a novel; however, much of the story is about the intelligence of octopus. In particular this one, Marcellus, who lives in an aquarium in a fictitious town in western Washington State. More than anything the book is about relationships, not only Marcellus with a woman (of a certain age) who cleans the aquarium at night, but the various people in this small town.
Trust, by Herman Diaz. This novel is an enigma in so many ways. It’s a book, within a book, within a book. About the stock market crash back in 1929, but it’s about a man. Oh my. It’s really interesting. This book won the Pulitzer. That’s why I bought it.
Cassidy Hutchinson is a young woman (a real one) who works in politics or “government.” She’s worked for some prestigious Washington politicians, and ended up working for Trump. The book is a memoir of her short spin working at the highest levels, and obviously at the White House. She worked under Mark Meadows and suffered a lot of ridicule when she quit. Truth and lies . . . when she couldn’t live with herself and subvert the truth. Enough, gives you plenty of detail leading up to and after the January 6th uprising. She testified to Congress about what she knew. Really interesting. I almost never read books about politics because I think many (most?) of our elected politicians succumb to the lure of power and forget who they work for, us, the public.
Becoming Dr. Q, by Alfredo Quiñones-Hinojosa, MD, is an Associate Professor of Neurosurgery and Oncology at Johns Hopkins University. This is his memoir about how he went from being a penniless migrant from Mexico to one of the world’s most renowned experts in brain tumors.
The Invincible Miss Cust, by Penny Haw. In 1868 Ireland, a woman wasn’t allowed to attend veterinary school, much less become a veterinarian. It took years of trying (to the horror of her aristocratic family) and finally someone took her under their wing, she enrolled using a pseudonym (a name not revealing her gender). This is a true story of Aleen Isabel Cust, who did just that.
Her Heart for a Compass, by Sarah Ferguson (yes), the Duchess of York. I was pleasantly surprised as I read this book that it wasn’t the usual romantic romp – there’s more to this story than you might think. Ferguson utilizes some of her family ancestors as real characters in the book. Sweet story but with lots of twists and turns.
Someone Else’s Shoes, by Jojo Moyes.Nisha, our heroine, is a wealthy socialite. She thinks her life is perfect. At the gym someone else grabs her gym bag, so she grabs the similar one. Then she finds out her husband is leaving her and he’s locked her out of their high-rise apartment. She’s penniless. No attorney will take her on. She has nothing but this gym bag belonging to someone else (who?).
The Eleventh Man, Ivan Doig. What a story. Ben, part of a Montana college football team in the 1940s, joins the service during WWII. So do all of his eleven teammates. After suffering some injuries in pilot training he is recruited by a stealthy military propaganda machine. His job is to write articles about his teammates as they are picked off at various battle theaters around the Pacific and Europe. Ben goes there, in person, to fuel the stories. Ivan Doig is a crafty writer; I’ve read several of his books, my favorite being The Whistling Season.
Wavewalker, by Suzanne Heywood. Oh my goodness. A memoir about a very young English girl who goes off with her besotted and narcissistic parents and her brother on a years-long sailing journey supposedly following the route of James Cook. A very old, decrepit 70-foot schooner. Four people, 2 sort-of adults and 2 children. Sometimes a helper or two. A seasick mother. A dad who is driven to the extreme, whatever the damage he creates. She spent 10 years aboard.
Claire Keegan wrote Small Things Like These. It’s won a lot of awards, and shortlisted for the Booker Prize. Takes place in Ireland. Some profound questions come up in this novella, about complicity, about restitution. There’s a convent nearby, and attached one of those places young girls were sent if they found themselves “in the family way,” and about how the church helped, supposedly, by taking the children and placing them in homes, without consent. It’s ugly, the truth of the matter. Really good read.
Nicholas Sparks isn’t an author I read very often because his books are pretty sappy, but daughter Sara recommended this one, The Longest Ride. It begins with Ira (age 93), stuck in his car as it plunges off the edge of a road, and it’s snowing. As the hours tick by, he reminisces about his life.
The Neuroscientist Who Lost Her Mind, by Barbara Lipska. Interesting that I’ve read two books recently about the brain (see Doctor Q above). This is a true story about a woman, a neuroscientist, who developed a metastatic melanoma in the brain.
The Price of Inheritance, by Karin Tanabe. This is a mystery, of sorts. Our heroine is an up and coming employee at Christie’s (auction house). In bringing a large collection of expensive art to auction, she makes a misstep about the provenance of a desk. She’s fired. She goes back to her roots, takes a job at a small antique store where she used to work.
The Covenant of Water, by Abraham Verghese. Did you read Cutting for Stone, years ago, by this author? Such a good book, so I knew I’d enjoy this one, and oh, did I!. The book takes place in a little known area of southern India, and chronicles a variety of people over a few generations, who inhabit the place.
Finding Dorothy, by Elizabeth Letts. My friend Dianne recommended this book to me, and it was so special. Loved it beginning to end. It’s based on the story of 77-year old Maud Gage Baum (her husband Frank Baum wrote The Wizard of Oz).
The Bandit Queens, by Parini Shroff. It’s about a young Indian woman, Geeta, as she tries her best to make a living after her husband leaves her. Yet the community she lives in, thinks Geeta murdered him.
Attribution, by Linda Moore. We follow art historian Cate, as she struggles to succeed in her chosen field against sexist advisors. She finds what she thinks is a hidden painting.
The Measure, Nikki Erlick. Oh my goodness. This story grabbed me from about the third sentence. Everyone in the world finds a wooden box on their doorstep, or in front of their camper or tent, that contains a string. Nothing but a string. The author has a vivid imagination (I admire that) and you just will not believe the various reactions (frenzy?) from people who are short-stringers, or long-stringers.
The Book Spy by Alan Hlad. True stories, but in novel form, of a special Axis group of men and women librarians and microfilm specialists, sent to strategic locations in Europe to acquire and scour newspapers, books, technical manuals and periodicals, for information about German troop locations, weaponry and military plans of WWII. I was glued to the book beginning to end. Fascinating accounts.
A Dangerous Business, Jane Smiley. What a story. 1850s gold rush, story of two young prostitutes, finding their way in a lawless town in the Wild West. There’s a murder, or two, or three, or some of the town’s prostitutes, and the two women set out to solve the crime.
Storm Watch, by C. J. Box. I’m such a fan of his tales of Wyoming Game Warden Joe Pickett’s adventures catching criminals. Loved it, just like I’ve loved every one of his books.
Defiant Dreams, by Sola Mahfouz. True story about the author, born in Afghanistan in 1996. This is about her journey to acquire an education. It’s unbelievable what the Taliban does to deter and forbid women from bettering themselves.
Language of Flowers by Vanessa Diffenbaugh. This is fairly light read, a novel – but interesting, about the meaning behind many flowers.
The Rome Apartment, by Kerry Fisher. Such a cute story. Maybe not an interesting read for a man. It’s about Beth, whose husband has just left her, and her daughter has just gone off to college. Beth needs a new lease on life, so she rents a room from a woman who lives in Rome.
All the Beauty in the World, a memoir by Patrick Bringley. Absolutely LOVED this book. Bringley was at loose ends and accepted a job as a guard at the Metropolitan Museum of Art in NYC. He’d been a journalist at The New Yorker magazine, but after his brother was ill and died, he needed refreshing. After his training at the museum, he moves from room to room, guarding the precious art, and learning all about the pieces and the painters or sculptors.
The Queen’s Lady, by Joanna Hickson. I love stories about Tudor England, and this one didn’t disappoint. Joan Guildford is a lady in waiting to Queen Elizabeth. Oh my goodness are there twists and turns.
Once in awhile I’m ready to read another Louise Penny mystery. This time it was World of Curiosities. Usually I’d write something wonderful regarding “another tome about Three Pines.” Not going to say it this time. Three Pines becomes a sinister place. Murders (many).
Over the years I’ve read many of Jodi Picoult’s books. This, her newest, or very new, is called Mad Honey. Oh, my. This book is beyond Picoult’s usual borders, but then she always writes edgy books. That’s her genre. This one is written with a co-author, a woman who is gay (I think) and also a trans-gender.
Philippa Gregory is one of my fav authors. Just finished her 3rd (and last, I think) in the Fairmile series called Dawnlands. If you scroll down below you’ll find the 2nd book in the series, Tidelands. Very interesting about English history, but about the same families from the first book in the group. Loved it, as I loved all of them.
Am currently reading Rutherfurd’s long, long book, Paris. I love these involved historical novels about a place (he’s written many about specific places in the world). It’s a saga that goes back and forth in time, following the travails of various people and families, through thick and thin. Some of it during the era of the King Louis’ (plural, should I say Louies?). Very interesting about some of the city’s history and royalty.
Although this book says A Christmas Memory, by Richard Paul Evans, it’s not just about Christmas. A young boy is the hero here, but really an older widower man who lives next door plays a pivotal part of this book.
Wish You Were Here, by Jodi Picoult. Another page-turner. I loved this book. A thirty-something woman, about to take a trip with her boyfriend, when Covid breaks out. Covid plays a major role in this book, beginning to end. She decides to go anyway as her boyfriend is a doctor and cannot leave. She ends up on a remote Galapagos island, and you go along with her – with people she meets, the life she leads, the isolation she experiences, the loneliness she feels, but the joy of nature is a sustaining aspect.
Not everyone wants to read food memoirs. When I saw Sally Schmitt had written a memoir, titled Six California Kitchens, I knew I wanted to read it. I met Sally a few times over the years when I visited Napa Valley, and bought some of her famous pickled items, chutneys, jams, etc. She was the original chef at The French Laundry, before it became truly famous by Thomas Keller.
Being a fan of Vivian Howard (from her TV show), when I saw she’d written another book, I knew I should buy it. This Will Make It Taste Good is such an unusual name for a cookbook, but once you get into the groove of the book, you’ll understand. What’s here are recipes for some “kitchen heroes” she calls them. They’re condiments. They’re food additions, they’re flavor enhancers.
As soon as it came out, I ordered Spare, by Prince Harry. I’ve always been interested in the Royal Family.
Unaccustomed Earth by Jhumpa Lahiri. Usually I don’t seek out short stories. I might have purchased this book without realizing it was. There aren’t that many stories – each one gets you very ingrained in the characters. I love her writing, and would think each story in this book could be made into a full-fledged novel.
A Lantern in Her Hand, by Beth Streeter Aldrich. A very interesting and harrowing story of early pioneer days in the Midwest (Nebraska I think); covered wagon time up to about 80 years later as the heroine, Abbie Deal, and her husband start a family in a small town.
The Messy Lives of Book People, by Phaedra Patrick. From amazon’s page: Mother of two Liv Green barely scrapes by as a maid to make ends meet, often finding escape in a good book while daydreaming of becoming a writer herself. So she can’t believe her luck when she lands a job housekeeping for her personal hero, mega-bestselling author Essie Starling, a mysterious and intimidating recluse.
Four Seasons in Rome by Anthony Doerr. I’m a fan of this author and relished reading his book about a year in his personal life, with his wife and very new, newborn twins. Doerr was given an auspicious award – a year of study in Rome, with apartment and a stipend. There are four chapters, by season.
Kristin Hannah’s Distant Shores is quite a read. Some described it as like a soap opera. Not me. Interesting character development of a couple who married young. She put her own career/wants/desires aside to raise their children. He forged ahead with his life dreams. The children grow up and move on. Then he’s offered a huge promotion across the country. She’s torn – she doesn’t want to be in New York, but nothing would get in the way of his career.
Oh, William! by Elizabeth Strout. Lucy Barton is divorced. But she’s still sort of friendly with her ex. It’s complicated. Out of the blue he asks her to go on a trip with him to discover something about his roots.
Tidelands, by Philippa Gregory. It tells the tale of a peasant woman, Alinor (an herbalist and midwife), who lives barely above the poverty level, trying to raise two children, during the time of great turmoil in England, the rancorous civil war about Charles 1.
Read Reminders of Him, by Colleen Hoover. A page turner of a story. A young woman is convicted of a crime (young and foolish type). Once released her sole purpose is to be a part of her daughter’s life.
The Last Anniversary by Liane Moriarty. Oh my goodness. The wicked webs we weave. How in the world did the author even come UP with this wild story, but she did, and it kept me glued. Sophie walked away from her wedding day, and always wondered if she made the wrong decision.
Very funny and poignant story, Mrs. Palfrey at the Claremont, by Elizabeth Taylor (no, not that one). Mrs. Palfrey, a woman of a certain age, moves into an old folks’ home in London. It’s a sort of hotel, but has full time elderly quirky residents.
For one of my book clubs we read Lessons in Chemistry, by Bonnie Garmus. This book is so hard to describe. Elizabeth is a wizard at chemistry and struggles to be recognized for her intelligence and research. She meets a man at her company who is brilliant too. They make quite a pair. They have a child, then he suddenly dies. Her work isn’t taken seriously, so she leaves her employment and becomes an overnight phenom on a cooking show where she uses the chemical names for things like sodium chloride, etc. You go alongside her struggles, and her raising of her daughter. LOTS of humor, lots to discuss for a book club.
Horse. Oh my, is it a page turner. Loved it from the first page to the last. Sad when it ended. It’s a fictional creation but based on a real racehorse owned by a black man, back in the 1850s. Technically, the story is about a painting of the horse but there are many twists and turns. If you’ve ever enjoyed Brooks’ books in the past, this one won’t disappoint.
The Book of Lost Names, by Kristin Harmel (no, not Hannah). Certainly a little-known chunk of history about a woman who becomes a master forger during WWII to help get Jewish children out of France. Not easy to read, meaning the difficulty of anyone finding the means and place to DO the forgery and right under the noses of the Nazis. Really good read.
Liane Moriarty’s first novel, Three Wishes, follows the travails of adult triplets, so different, yet similar in many ways. Two are identical, the third is not. So alike, and so not. It takes you through a series of heart-wrenching events, seemingly unrelated, but ones that could bring a family to its breaking point and test the bonds of love and strength.
Recently I’ve read both of Erin French’s books, her cookbook, The Lost Kitchen, and since then her memoir, Finding Freedom. About her life growing up (difficult) about her coming of age mostly working in the family diner, flipper burgers and fries (and learning how much she liked to cook). Now she’s a very successful restaurant entrepreneur (The Lost Kitchen is also the name of her restaurant) in the minuscule town of Freedom, Maine. She’s not a classically trained chef, but she’s terrifically creative. See her TV series on Discover+ if you subscribe.
Jo Jo Moyes has a bunch of books to her credit. And she writes well, with riveting stories. Everything I’ve read of hers has been good. This book, The Girl You Left Behind, is so different, so intriguing, so controversial and a fascinating historical story. There are two timelines here, one during WWI, in France, when a relatively unknown painter (in the style of Matisse) paints a picture of his wife. The war intervenes for both the husband and the wife.
Eli Shafak’s Island of Missing Trees. This book was just a page turner. If you’ve never read anything about the conflict in Cyprus (the island) between the Turks and the Greeks, you’re in for a big history lesson here. But, the entire story centers around a fig tree. You get into the head/brain/feelings of this big fig tree which plays a very central part of the story. You’ll learn a lot about animals, insects (ants, mosquitos, butterflies) and other flora and fauna of Cyprus.
Also read Apples Never Fall by Liane Moriarty. Ohhh my, such a good book. I couldn’t put it down. Whatever you do, do not read the ending before you start the book. I’ve never understood people who do this. The book chronicles the day a mom just ups and disappears. The grown children come back home, in panic. The dad isn’t much help, and he becomes the prime suspect of foul play. There is no body, however.
If you’d like a mystery read, try Dete Meserve’s The Space Between. It’s just the kind of page-turner I enjoy – a wife returns to her home after being away on business for a few days, to find her husband missing and what he’s left for her is an unexplained bank deposit of a million dollars, a loaded Glock in the nightstand, and a video security system that’s been wiped clean.
Read Alyson Richman’s historical novel called The Velvet Hours. Most of the book takes place in Paris, with a young woman and her grandmother, a very wealthy (but aging) woman who led a life of a semi-courtesan. Or at least a kept woman. But this grandmother was very astute and found ways to invest her money, to grow her money, and to buy very expensive goods. Then WWII intervenes, and the granddaughter has to close up her grandmother’s apartment, leaving it much the way it had been throughout her grandmother’s life, to escape the Nazis. Years go by, and finally answers are sought and found. An intriguing book, based on the author’s experience with an apartment that had been locked up similarly for decades, also in Paris.
Susan Meissner is one of my favorite authors. This book, The Nature of Fragile Things tells a very unusual story. About a young Irish immigrant, desperate to find a way out of poverty, answers an ad for a mail order bride.
Also read Rachel Hauck’s The Writing Desk. You could call this a romance. A young professional, a writer of one successful book, has writer’s block. Then she’s asked to go to Florida to help her mother (from whom she’s mostly estranged) through chemo. She goes, hoping she can find new inspiration.
Also recently finished The Weight of Ink by Rachel Kadish. The book goes backwards and forwards in time, from the 1600s in London with the day-to-day lives of a group of Jews (who had to be very careful about how they worshiped) to current day as an old house is discovered to hold a treasure-trove of historical papers.
Colleen Hoover has written quite a book, It Ends with Us: A Novel, with a love story being the central theme, but again, this book is not for everyone – it can be an awakening for any reader not acquainted with domestic violence and how such injury can emerge as innocent (sort of) but then becomes something else. There is graphic detail here.
Nicolas Barreau’s novel Love Letters from Montmartre: A Novel is very poignant, very sweet book. Seems like I’ve read several books lately about grieving; this one has a charming ending, but as anyone who has gone through a grave loss of someone dear knows, you can’t predict day to day, week to week. “Snap out of it,” people say, thinking they’re helping.
Another very quirky book, that happens to contain a lot of historical truth is The Phone Booth at the Edge of the World: A Novel by Harry N. Abrams. Set in Japan just after the tsunami 10 years ago when 18,000 people died. At a private park miles away, some very special people installed a phone booth, with a phone (that didn’t work) at the edge of the park, and the survivors of the tsunami began wending their way there to “talk” to their deceased loved ones. Very poignant story.
No question, the most quirky book I’ve read of late, a recommendation from my friend Karen, West with Giraffes: A Novel by Lynda Rutledge. Back in the 1930s a small group of giraffes were brought across the Atlantic from Africa to New York, destined for the then-growing San Diego Zoo. The story is of their journey across the United States in the care of two oh-so-different people, both with a mission.
Could hardly put down Krueger’s book, This Tender Land: A Novel. Tells the harrowing story of a young boy, Odie, (and his brother Albert) who became orphans back in the 30s. At first there is a boarding school, part of an Indian (Native American) agreement, though they are not Indian. They escape, and they are “on the run.”
Just finished Kristin Hannah’s latest book, The Four Winds: A Novel. What a story. One I’ve never read about, although I certainly have heard about the “dust bowl” years when there was a steady migration of down-and-out farmers from the Midwest, to California, for what they hoped to be the American Dream. It tells the story of one particular family, the Martinellis, the grandparents, their son, his wife, and their two children.
Also finished reading Sue Monk Kidd’s recent book, The Book of Longings: A Novel. It is a book that might challenge some Christian readers, as it tells the tale of Jesus marrying a woman named Mary. I loved the book from the first word to the last one. The book is believable to me, even though the Bible never says one way or the other that Jesus ever married. It’s been presumed he never did. But maybe he did?
Jeanine Cummins has written an eye-opener, American Dirt. A must read. Oh my goodness. I will never, ever, ever look at Mexican (and further southern) migrants, particularly those who are victims of the vicious cartels, without sympathy. It tells the story of a woman and her young son, who were lucky enough to hide when the cartel murdered every member of her family – her husband, her mother, and many others. It’s about her journey and escape to America.
Also read JoJo Moyes’ book, The Giver of Stars. Oh gosh, what a GREAT book. Alice joins the Horseback Librarians in the rural south.
Frances Liardet has written a blockbuster tale, We Must Be Brave. I can’t recommend this book highly enough. Although the scene is WWII England, this book is not really about the war. It’s about the people at home, waiting it out, struggling with enough food, clothing and enough heat.
William Kent Krueger wrote Ordinary Grace. From amazon: a brilliantly moving account of a boy standing at the door of his young manhood, trying to understand a world that seems to be falling apart around him. It is an unforgettable novel about discovering the terrible price of wisdom and the enduring grace of God. It’s a coming of age story.
A Column of Fire: A Novel by Ken Follett. It takes place in the 1500s, in England, and has everything to do with the war between the Catholics and the Protestants, that raged throughout Europe during that time, culminating in the Spanish Inquisition.
My Name Is Resolute by Nancy Turner. She’s the author of another book of some renown, These is my Words:
The Shepherd’s Life: Modern Dispatches from an Ancient Landscape by James Rebanks. This is a memoir, so a true story, of a young man growing up in the Lake District of Northern England, who becomes a shepherd. Not just any-old shepherd – actually a well educated one. He knows how to weave a story.


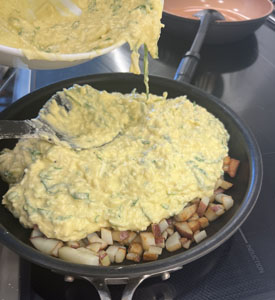
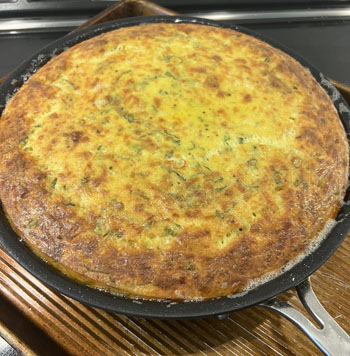
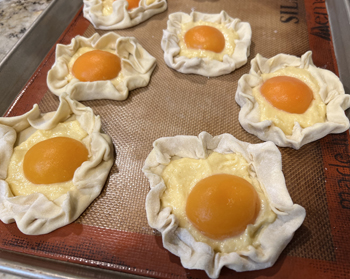
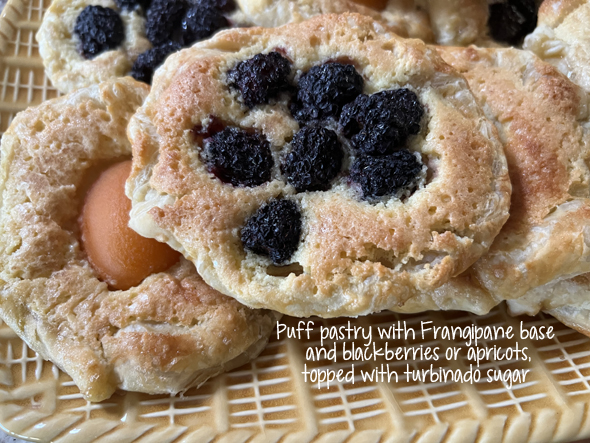
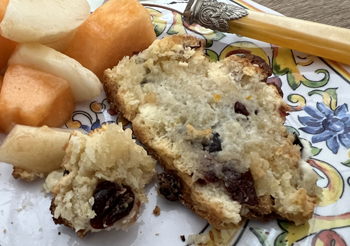 In the picture here, you can barely see some of the orange zest (adds such lovely flavor) and the dried cranberries.


Leave a Comment!